The following configuration can be defined on the [Reconfigure] window.
Connection destination: Represents a connection destination external to the L-Platform, and the IP addresses to be published.
Segment: Represents a network segment located on the L-Platform
Virtual server: Represents a server on the L-Platform
Physical server: Represents a physical server.
Disk: Represents an extended disk that is not a system disk but can be added to the virtual server or physical server.
An example of the [Reconfigure] window display is shown below.
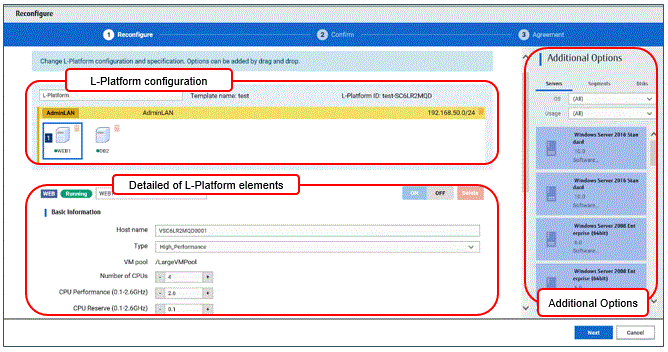
The configuration of the [Reconfigure] window is shown below:
Pane name | Description |
|---|---|
L-Platform configuration | Located on the upper side of the window. Displays the [L-Platform configuration]. |
Additional Options | Located on the right side of the window. Displays a list of elements (virtual server, physical server, segment, and disk) that can be added to the [L-Platform configuration]. |
Details of L-Platform element | Located on the lower side of the window. Displays details about the elements selected in the [L-Platform configuration] pane and allows their content to be edited. Click the [Delete NIC] button to delete targeted NICs. |
Icons displayed in the [L-Platform configuration] area are as follows.
Icon | Explanation | Icon | Explanation |
|---|---|---|---|
| Virtual server without data disks |
| Virtual server with a single data disk |
| Virtual server with multiple data disks |
| Physical server without data disks |
| Physical server with a single data disk |
| Physical server with multiple data disks |
| NIC of a Virtual server |
| NIC of a Physical server |
| Grouped NICs |
| Firewall |
| Server Load Balancer(SLB) |
Icons displayed in the [L-Platform configuration] area to indicate server statuses are shown below.
The power status is displayed using color to the left of the server name.
Icon | Explanation | Icon | Explanation |
|---|---|---|---|
| Stopped |
| Running |
| Starting, stopping, being deployed, or in a failover |
| Failed to start or stop |
The icons to indicate NICs or servers that are targets for server load balancer (SLB) distribution when the SLB displayed on the [L-Platform configuration] pane is selected are as shown below.
The following examples show a virtual server NIC and a virtual server with a single data disk. There are similar icons for various other NICs and servers.
Icon | Explanation | Icon | Explanation |
|---|---|---|---|
| Virtual server NIC for SLB distribution |
| Virtual server, with a single data disk, for SLB distribution |
Icons displayed in [Additional Options] area are as follows.
Icon | Explanation | Icon | Explanation |
|---|---|---|---|
| Virtual image information without data disks |
| Physical image information without data disks |
| Virtual image information with data disks |
| Management segment |
| Business segment |
| Management segment with admin LAN allocated |
| Disconnected disk |
| Connected disk |
Information
Hover the mouse over the icons displayed in [Additional Options] to check details about the image information, such as the name, OS, segment name, disk name, label, and comments.
The L-Platform can be edited on the [Reconfigure] window.
The L-Platform name entered on the [Basic info] window can be modified.
The types of disks that can be added are new disks and existing disks.
New disks can be added to virtual servers and physical servers. Existing disks are displayed if an Infrastructure Administrator has registered them to a storage pool that can reference already created disk resources, and can be added to physical servers.
Note
If the server includes disks not managed by Resource Orchestrator, disks cannot be added or deleted.
When you select a firewall, you can check its settings.
You cannot delete a firewall from an L-Platform.
Item name | Description |
|---|---|
ruleset | Displays the name of the 'ruleset' set for the firewall. The ruleset name cannot be changed. |
Click [Setting] button to check the parameter values in the ruleset. The values set as the default are the values specified in the L-Platform template.
Note
The firewall for a server added by a new L-Platform subscription or L-Platform reconfiguration is set after the L-Platform is deployed. Refer to "5.3.7 Setup Firewall" for details.
A segment can be edited by selecting the segment to be edited.
It is possible to select whether a subnet allocated to the segment can be set automatically or manually in the segment editing. Note, however, that subnets cannot be modified in the L-Platform configuration after the system has been deployed.
If the network to be connected to is specified in the L-Platform template, the specified network remains selected.
The following window displays an example of the [Reconfigure] window when a segment name is clicked. The following window shows the [Reconfigure] window for L-Platform configuration changes.
Details of configuration
Item name | Description |
|---|---|
Category | Specify the category when an automatically selected segment is added. The default is "Business segment".
|
Segment type | Specify the segment identification information used if segments are selected automatically when additions are made by segment extension. |
Maximum number of NICs | Specify the maximum number of NICs that can be deployed in a segment. |
Subnet addresses | If the subnet setting is set to Manual, select an item from the list of subnet addresses or network resources. The setting item (whether to select from subnet addresses or network resources) depends on system settings. |
Subnetmask | For manual configuration, specify the subnetmask value of the network used by the segment. |
Start IP address | Start IP address of the network resource is displayed. |
End IP address | End IP address of the network resource is displayed. |
Number of available IP addresses | Number of available IP addresses of the segment. |
Subnet setting | Specify whether to configure subnet manually or automatically.
|
[Others] tab of [Additional Options]
Item name | Description |
|---|---|
Segment | Extend a segment. |
Note
Segment extension and reduction
A network can be extended to the maximum number of segments for an L-Platform Template.
Since at least one segment is required, it is not possible to delete all segments. When using an L-Platform template with no segments defined, attach at least one segment.
When a segment is deleted, the connected servers and NICs are also deleted. To delete a segment and NICs but not the servers, delete the NICs first and then delete the segment.
A segment where there is a server load balancer cannot be deleted.
The number of segments under firewall control cannot be changed.
Reduction is not possible while a server is operating.
In estimated charges, the unit price for NICs deployed in segments where [Subnet Settings] is "Auto-configure" is treated as being 0 Japanese Yen.
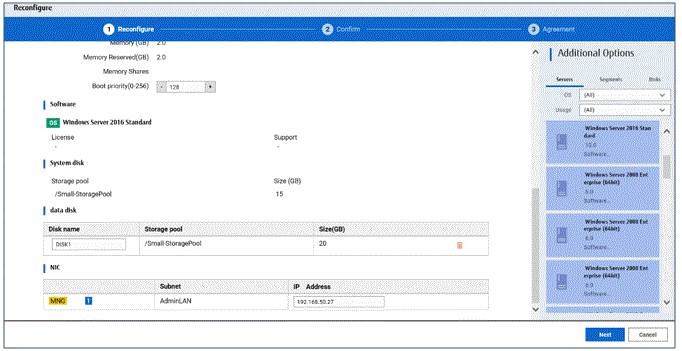
Selecting a virtual server enables editing of that virtual server.
A display example of virtual server setting information is shown below.
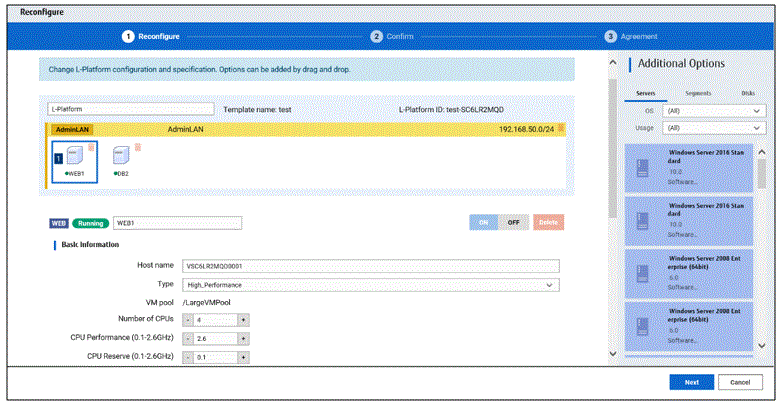
Item name | Description | |
|---|---|---|
Virtual server name | Sets the virtual server name specified in the L-Platform template. <, >, &, ', " and control characters However, the strings and the number of characters that can be specified may vary depending on the system settings. When the OS of the managed server is Windows, specification using up to 15 of the characters below is recommended. For other OSs, specification using up to 63 characters is recommended. The value specified for this item cannot consist of only numbers. Hyphens cannot be used for the first character. Alphanumeric characters, underscores ("_") and hyphens ("-")A pre-existing name cannot be specified. | |
Type | From the drop-down menu, select the type (specifications) of the registered server.
| |
VM pool | From the drop-down menu, select the resource name of the VM pool that is the server deployment destination. | |
Host name | From the drop-down menu, select the resource name of the VM host that is the server deployment destination. | |
CPU | Number of CPUs | Set the number of CPUs of the virtual server. |
Performance | Specify CPU performance of the virtual server in GHz. | |
Reserved | Specify the reserved CPU performance for the virtual server, in GHz. | |
[VMware] | Specify the relative allotment ratio for determining the allotment of memory size when multiple virtual machines are competing for memory resources. [VMware] [Hyper-V]
[Citrix Xen] This is not displayed and cannot be specified if the server virtualization software is RHEL-KVM. | |
Memory | Size | Specify the memory size of the virtual server in GB. Specify the lesser of the two values: Enter either the maximum value entered for image information or enter the maximum value of the VM pool, free memory size of VM hosts with the most free memory size. [OVM for x86 3.x] [KVM] A value outside the range cannot be set. |
[VMware] | Specify the reserved memory size for the virtual server, in GB. [Citrix Xen] Any value outside the allowable range cannot be specified. | |
[VMware] | Specify the relative allotment ratio for determining the allotment of memory size when multiple virtual machines are competing for memory resources. [VMware] [Hyper-V]
This is not displayed and cannot be specified if the server virtualization software is RHEL-KVM. | |
Boot priority | Sets the priority order when performing batched power supply operations in either the L-Platform or the tenant. The smaller the value, the higher the priority orders. Set to 0 when power supply operations are not carried out in a single batch. Note however that this value cannot be set to 0 at the time of new deployment. | |
System Disk | Storage pool | From the drop-down menu, select the storage pool to be used. If the server virtualization software is OVM for x86, only [Automatic] can be selected. If the server virtualization software is OVM for SPARC, or if the server virtualization software is RHEL-KVM and the image location type of the cloning image specified for the image information is "Raw Disk", then the value set in the [Disk resource specification] window will be displayed. To change the settings, click the [Change] button to open the [Disk resource specification] window. |
Virtual Storage | From the drop-down menu, select the virtual storage to be used. | |
Size | Specify the disk capacity of the virtual server in GB.
| |
Disk resource specification | Specify this item if the server virtualization software is OVM for SPARC, or if the server virtualization software is RHEL-KVM and the image location type of the cloning image specified for the image information is "Raw Disk".
| |
Point
The icons displayed in front of the virtual server names correspond to the usage of the virtual servers described in the specification.
WEB: Web server
AP: Application server
DB: Database server
When a virtual server has multiple usages, an icon showing each usage separated by "/" will be displayed.
Example: WEB/AP, AP/WEB/DB etc.
Note
The server type cannot be changed with some types of server virtualization software.
When the 0 or no valid value is specified for CPU frequency, CPU reserve clock rate, memory size, or memory reserve size, it is treated as if the value 0.1 were specified. This modification is included in the changed items.
Depending on the guest OS type, system disks which capacity is expanded may not be recognized or used by the OS. Refer to server virtualization software manuals and technical information to ensure that the expanded disk can be used.
A separate operation is required to make the expanded disk recognizable on the guest OS. Refer to manuals and technical information for each OS for information on the required operations.
If [Automatic] is selected for the system disk storage pool, estimated charges will be calculated based on a system disk unit price of 0 Japanese Yen.
Note that estimated charges may differ to the actual charges because usage charges are calculated according to the unit price of the storage pool that creates the system disk after subscription or reconfiguration is complete.
System disk capacity cannot be expanded in the following cases:
When snapshots exist on the server
When disks not managed by ROR, such as RDM (Raw Device Mapping), are connected to the server
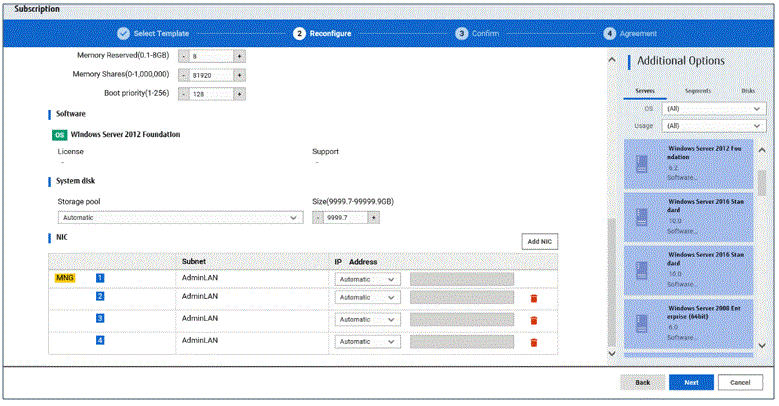
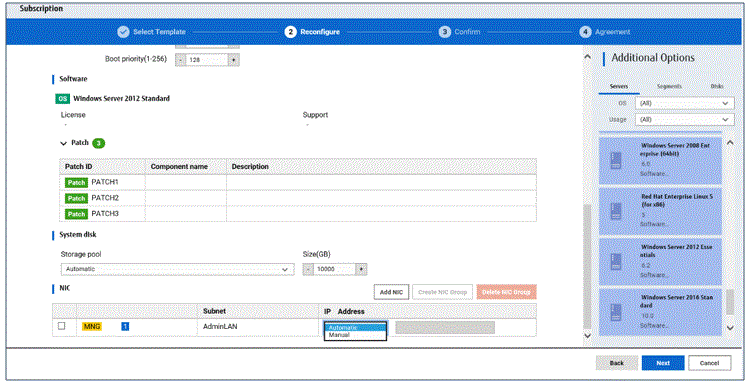
NIC information can be edited by selecting a NIC. Set the IP address allocated to an NIC.
Note that the IP address can be set only if "manual setting" is specified for the subnet during segment editing. However, since the subnet cannot be changed by reconfiguration after a system is deployed, IP address changes are also not possible.
A display example of the NIC reconfiguration is shown below. The following window shows the [Reconfigure] window for L-Platform configuration changes.
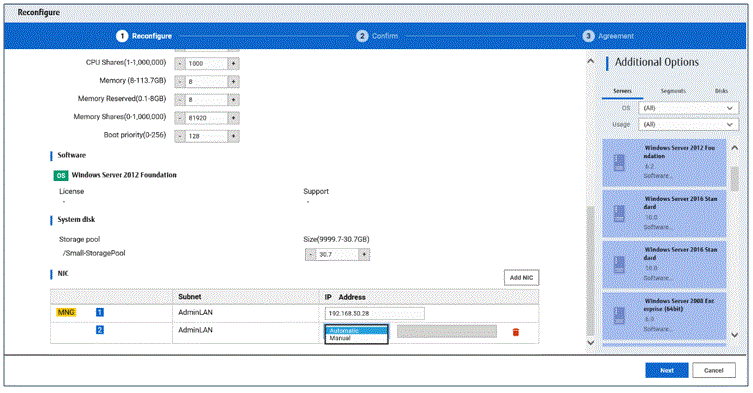
There are two ways of specifying an IP address as follows:
Automatic
Sets an IP address automatically from a subnet.
Manual
Enters an IP address directly.
When there is a conflict between the specified IP address and network resources, an error message will be displayed.
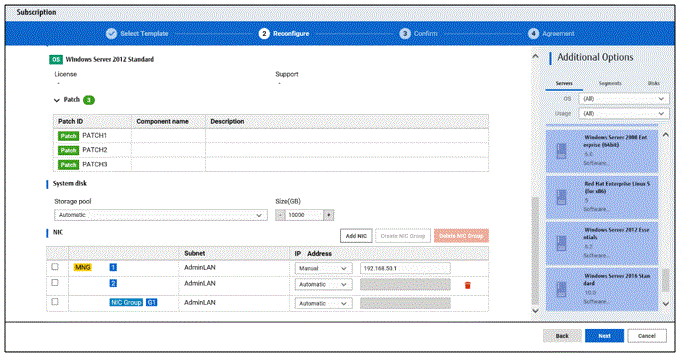
An [MNG] icon is displayed for the control NIC.
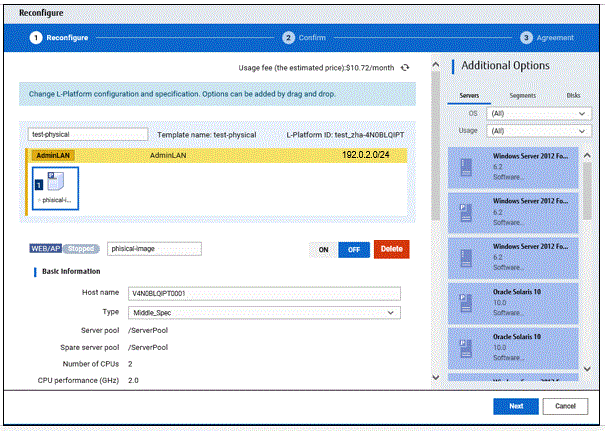
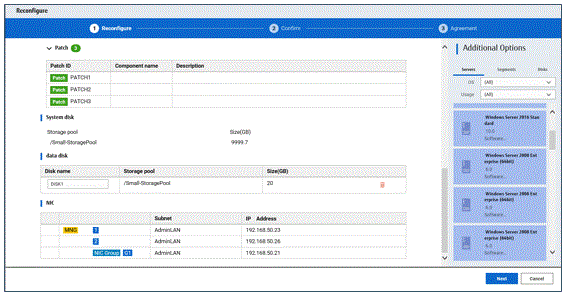
The following window displays an example of an L-Platform where multiple NICs exist. The following window shows the [Reconfigure] window used to subscribe to an L-Platform.
Each NIC is represented by one server. When a server is selected, the same server in each segment is selected.
When a server is selected an icon is displayed showing a number at its lower left hand corner. The number represents an NIC number.
Dark-colored servers are the NICs for administration, and light-colored servers are NICs for business.
When a server is dragged from the [Additional Options] and dropped on a segment, as many servers as the number of NICs specified for the segment in the image information are displayed.
Selecting software information makes it possible to check the software of the operating systems installed on virtual servers and the information of patches that have been applied to software.
When a virtual server has image information for VDI coordination, it is possible to check the VDI user name, the name of the VDI pool the virtual server will belong to after deployment, and the connection information of the VDI admin server.
If the server virtualization software of the virtual server is Solaris Zones and the OS of the virtual server is Solaris 11, the administrator user name can be checked.
Point
When an infrastructure administrator permits setting of VDI user names, the VDI user can be specified when applying to use an L-Platform. Specify the VDI user name in the following format.
NetBIOS domain name\user name
Note
The following message may be displayed when VDI definitions are incorrect. When the following message is displayed even when the specified VDI user is correct, consult with the infrastructure administrator.
One or more specified VDI user name is not valid. Please check VDI user names.
Or
The NetBIOS Domain of one or more VDI users is not valid. Please check the NetBIOS Domain.
NIC Add and Delete
This section explains NIC add and delete.
A business NIC can be added to the same segment as the control NIC by clicking the [Add NIC] button.
Click the [Delete NIC] button deletes an NIC.
Note
Whether it is possible to add NICs to or delete NICs from the servers that have been deployed differs depending on the type of the server virtualization software and power status of the server. Details are shown below:
Operation | Server status | VMware | Hyper-V | RHEL-KVM | Solaris Zones | Citrix XenServer | OVM for X86 | OVM for SPARC |
|---|---|---|---|---|---|---|---|---|
Add | Stop | Y | Y | Y | N | N | N | N |
Operation | Y | N | N | N | N | N | N | |
Delete | Stop | Y | Y | Y | N | N | N | N |
Operation | Y | N | N | N | N | N | N |
Y: Can add or delete
N: Cannot add or delete
A maximum of eight NICs can be added with Solaris Zones management servers.
NICs cannot be added if they would exceed the maximum number of connections for the segment.
Since at least one NIC is required, it is not possible to delete all NICs.
If the server virtualization software is OVM for SPARC, request the tenant administrator to add a NIC to or delete a NIC from a deployed server.
Selecting a physical server enables editing of that physical server.
For a deployed physical server, only the server name, the server type, and the boot priority can be changed.
A display example of physical server reconfiguration is shown below.
Item name | Description | |
|---|---|---|
Host name | Sets the name of a physical server that is in the L-Platform Template. <, >, &, ', " and control characters However, the strings and the number of characters that can be specified may vary depending on the system settings. When the OS of the managed server is Windows, specification using up to 15 of the characters below is recommended. For other OSs, specification using up to 63 characters is recommended. The value specified for this item cannot consist of only numbers. Hyphens cannot be used for the first character. Alphanumeric characters, underscores ("_") and hyphens ("-")A pre-existing name cannot be specified. | |
Type | From the drop-down menu, select the type (specifications) of the registered server.
| |
Server pool | From the drop-down menu, select the resource name of the server pool that is the server deployment destination. | |
Reserve server pool | From the drop-down menu, select the resource name of the reserve server pool. | |
CPU | Number of CPUs | Set the number of CPUs in the physical server. |
performance | Specify the CPU performance of the physical server in GHz units. | |
Memory | Size | Specify the memory size of the physical server in GB units. |
System Disk | Storage pool | From the drop-down menu, select the storage pool to be used. |
Size | Specify the disk capacity of the physical server in GB. When reconfiguring during subscription When reconfiguring after deployment | |
Boot priority | Sets the priority order when performing batched power supply operations in either the L-Platform or the tenant. Range:1-256.The smaller the value, the higher the priority order. Set to 0 when power supply operations are not carried out in a single batch. Note however that this value cannot be set to 0 at the time of new deployment. | |
Note
The server pool physical server with details closest to the specified CPU and memory information is allocated.
If you are deploying a physical server, the estimated and actual charges are calculated based on the values entered for CPU performance and memory size in this step.
Select a NIC and set the IP address allocated to that NIC.
Use the [NICs] tab to set the IP address allocated to an NIC.
Note that the IP address can be set only if "manual setting" is specified for the subnet during segment editing. However, since the subnet cannot be changed by reconfiguration after a system is deployed, IP address changes are also not possible.
A display example of NIC reconfiguration is shown below. Note that the window shown below is the L-Platform subscription [Reconfigure] window.
The following two methods are available for specifying an IP address:
Automatic
The IP address is set automatically from the subnet.
Manual
Enter the IP address directly.
An error message is displayed if the specified IP address is inconsistent with the network resources.
The [MNG] icon is displayed for the control NIC.
The window below is an example of the display when there are multiple NICs. Note that the window shown below is the L-Platform subscription [Reconfigure] window.
NIC1 is represented by one physical server. When a server is selected, the selected state occurs for all the same servers. A numeric icon is displayed to the bottom left of selected servers. It indicates the NIC number.
Dark-colored servers indicate management NICs, and light-colored servers indicate business NICs.
If a segment is dragged and dropped from [Additional Options], the number of servers displayed matches the number of NICs specified in the image information of the segment.
Point
The NIC setting will be an untagged VLAN.
Selecting software information makes it possible to check the software of the operating systems installed on physical servers and the information of patches that have been applied to software.
NIC Add and Delete
This section explains NIC add and delete.
Addition and deletion of NICs for physical servers is possible only when applying for L-Platform subscriptions and when adding (new) servers during L-Platform reconfiguration.
A business NIC can be added to the same segment as the control NIC by dragging and dropping the [NIC] icon.
Click the [Delete NIC] button deletes an NIC.
Note
NICs cannot be added if they would exceed the maximum number of connections for the segment.
Since at least one NIC is required, it is not possible to delete all NICs.
When add or delete NICs for a physical server, configure the number of NICs after settings are made to match the number of NICs of the physical server being used.
NIC Grouping
This function is available with physical servers only.
This section explains NIC grouping.
Making a group
Select multiple checkboxes, and then click the [Create NIC Group] button. However, Multidata input NIC cannot be grouped. Groups can include control NIC.
Cancelling a grouping
Select multiple checkboxes, and then click the [Delete NIC Group] button.
Note
This is possible only during L-Platform subscription. NIC groups cannot be made or cancelled after deployment.
Two NICs can be grouped. Three or more NICs cannot be grouped.
In estimated charges, grouped NICs are handled as if each NIC in the group exists.
Selecting a virtual server to which a disk has been added displays a list of virtual servers and disks, so you can select a disk.
The following window shows the [Reconfigure] window used to subscribe to an L-Platform.
Item name | Description |
|---|---|
Disk name | Sets the name of a disk name in the L-Platform template. <, >, &, ', " and control characters A pre-existing name cannot be specified. |
Storage pool | From the drop-down menu, select the deployment destination resource pool. |
Virtual Storage | From the drop-down menu, select the virtual storage that is the deployment destination. |
Size | Specify the disk capacity of the virtual server in GB.
|
Note
If the server virtualization software is Hyper-V, the maximum number of disks after addition is four, including the system disk.
Existing disks cannot be added or deleted if the server virtualization software is Citrix XenServer or OVM for x86.
If the server virtualization software is OVM for SPARC, only existing disks can be added or deleted, but it is not possible to add to a server existing disks already attached to another server.
When the server virtualization software is Solaris Zones and the OS of the virtual server is Solaris 10, attaching and detaching of disks is not possible.
When the server virtualization software is Solaris Zones and the OS of the virtual server is Solaris 11, detachment of already deployed disks is not possible.
Disks cannot be added to or deleted from images that include data disks.
Disk capacity cannot be expanded for data disks included in images.
If [Automatic] is selected for the storage pool, estimated charges will be calculated based on a disk unit price of 0 Japanese Yen.
Note that estimated charges may differ to the actual charges because usage charges are calculated according to the unit price of the storage pool that creates the disk after subscription or reconfiguration is complete.
Data disk capacity cannot be expanded in the following cases:
When snapshots exist on the server
When disks not managed by ROR, such as RDM (Raw Device Mapping), are connected to the server
Selecting a physical server to which a disk has been added displays a list of physical servers and disks, so you can select a disk.
The following window shows the [Reconfigure] window used to subscribe to a service.
Item name | Description |
|---|---|
Disk name | Sets the name of a disk name in the L-Platform template. <, >, &, ', " and control characters A pre-existing name cannot be specified. |
Storage pool | From the drop-down menu, select the deployment destination resource pool. If an existing disk is selected, modification is not possible. |
Size | Specify the disk capacity of the virtual server in GB. Specify the lesser of the two values: Enter either the maximum value entered for image information or enter the maximum value of the storage pool, free space size of storages with the most free space size. |
[Server] tab
"Physical server" and "Virtual server" can be selected from [Type], enabling only servers of the selected type to be displayed.
The parameters and rulesets set in the SLB are displayed when an SLB is selected.
[SLB]
Item name | Description |
|---|---|
Deployment ruleset | The names of the ruleset set in the server load balancer are displayed. The ruleset names cannot be modified. |
Description | Descriptions of the ruleset for deploying server load balancer are displayed. |
Click the [Parameter details] button to confirm the values of the parameters set in rulesets.
If a server load balancer is defined in an L-Platform template, the default rulesets and parameter values are those specified in the L-Platform template.
[SLB Parameter details] window
A list of parameters defined in the ruleset is displayed in the [SLB Parameter details] window.
Click the [SLB Parameter details] button to display the [Parameter details] window.
Item name | Description |
|---|---|
Selected ruleset | The names of the ruleset for deploying server load balancer are displayed. |
Description | Descriptions of the ruleset for deploying server load balancer are displayed. |
[SLB] tab
Parameters that are unrelated to the server are displayed:
Item name | Description |
|---|---|
Parameter | Displays the parameter labels. |
Description | Displays the parameter descriptions. |
Value | The value to be set for the parameter is displayed. |
Description of the selected parameter | Displays the description of the parameter that is moussed over. |
[Server] tab
Parameters that are related to the server are displayed:
Item name | Description |
|---|---|
Server | The names of the servers where the parameters are enabled are displayed. "-" is displayed for parameters unrelated to the server. |
Parameter | Displays the parameter labels. |
Description | Displays the parameter descriptions. |
Value | The value to be set for the parameter is displayed. |
Description of the selected parameter | Displays the description of the parameter that is moussed over. |