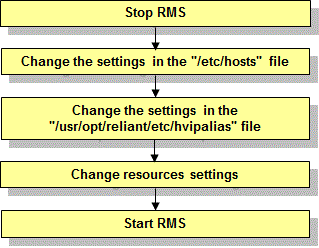
This section explains the procedure for changing the host name and the IP address of the takeover network resource.
Operation flow

Operation Procedure:
Stop RMS of all the nodes.
If RMS is running, see "7.2.1.2 Stopping RMS" and stop RMS of all the nodes.
Change the settings in the "/etc/hosts" file.
Change the host name and IP address in the "/etc/hosts" file on all the nodes that use takeover network resource.
Change the settings in the "/usr/opt/reliant/etc/hvipalias" file.
See "6.7.3.6 Setting Up Takeover Network Resources" and change the settings in the "hvipalias" file on all the nodes that use takeover network resource.
There are two items that may need to be changed as follows.
<node name> : When the host name is changed, the CF node name also needs to be changed.
               Change the value of this field to the modified CF node name.
<takeover>  : Change this host name when the host name associated with the takeover IP address
                was changed.
Change the setting with the RMS Wizard.
Execute the "hvw" command in any node that is part of the cluster system.
Change the host name settings for the takeover network resource from the GUI menu displayed in the RMS Wizard.
Note
For changing only the IP addresses of takeover network resource but not the host names, it is not necessary to use the RMS Wizard.
See
For details on changing settings with the RMS Wizard, see "8.5 Changing the Operation Attributes of a userApplication."
Select "Application-Edit" from the "Main configuration menu."
node1: Main configuration menu, current configuration: config
No RMS active in the cluster
 1) HELP                                10) Configuration-Remove
 2) QUIT                                11) Configuration-Freeze
 3) Application-Create                  12) Configuration-Thaw
 4) Application-Edit                    13) Configuration-Edit-Global-Settings
 5) Application-Remove                  14) Configuration-Consistency-Report
 6) Application-Clone                   15) Configuration-ScriptExecution
 7) Configuration-Generate              16) RMS-CreateMachine
 8) Configuration-Activate              17) RMS-RemoveMachine
 9) Configuration-Copy
Choose an action: 4
Select the userApplication that needs modification of the configuration from the "Application selection menu."
Edit: Application selection menu (restricted):
1) HELP
2) QUIT
3) RETURN
4) OPTIONS
5) APP1
Application Name: 5
Select "IpAddresses" in "turnkey wizard."
Consistency check ...

Settings of turnkey wizard "STANDBY" (APP1:consistent)
 1) HELP                                10) Enterprise-Postgres(-)
 2) READONLY                            11) Symfoware(-)
 3) SAVE+EXIT                           12) Procedure:SystemState3(-)
 4) -                                   13) Procedure:SystemState2(-)
 5) ApplicationName=APP1                14) Gls:Global-Link-Services(-)
 6) Machines+Basics(app1)               15) IpAddresses(Adr_APP1)
 7) CommandLines(-)                     16) LocalFileSystems(-)
 8) Procedure:Application(-)            17) Gds:Global-Disk-Services(-)
 9) Procedure:BasicApplication(-)
Choose the setting to process: 15
Select Interfaces[X] to set the host name to be changed from the "Ipaddresses and ipaliases menu."
Consistency check ...

Ipaddresses and ipaliases (Adr_APP1:consistent)
 1) HELP                                 7) Interfaces[0]=VAProuter,l3hub:takeover1
 2) NO-SAVE+EXIT                         8) PingHostPool[0]=router
 3) SAVE+EXIT                            9) PingHostPool[1]=l3hub
 4) REMOVE+EXIT                         10) (NeedAll=yes)
 5) AdditionalInterface                 11) (Timeout=60)
 6) AdditionalPingHost                  12) (InterfaceFilter=)
Choose the setting to process: 7
Select the changed host name associated with the takeover IP address.
 1) HELP                   6) node2RMS
 2) RETURN                 7) takeover2
 3) NONE
 4) FREECHOICE
 5) node1RMS
Choose an interface name: 7
Select "SAVE+RETURN."
Set flags for interface: takeover2
Currently set: VIRTUAL,AUTORECOVER,PING (VAProuter,l3hub)
1) HELP                   4) DEFAULT                7) MONITORONLY(M)
2) -                      5) BASE(B)                8) NOT:PING(P)
3) SAVE+RETURN            6) NOT:AUTORECOVER(A)
Choose one of the flags: 3
Make sure that the changed host name is displayed in Interfaces[X] in the "Ipaddresses and ipaliases menu."
Ipaddresses and ipaliases (Adr_APP1:consistent)
 1) HELP                                 7) Interfaces[0]=VAProuter,l3hub:takeover2
 2) NO-SAVE+EXIT                         8) PingHostPool[0]=router
 3) SAVE+EXIT                            9) PingHostPool[1]=l3hub
 4) REMOVE+EXIT                         10) (NeedAll=yes)
 5) AdditionalInterface                 11) (Timeout=60)
 6) AdditionalPingHost                  12) (InterfaceFilter=)
Choose the setting to process:
If you have to change multiple objects, repeat Steps 4. to 7. for each object. After completing all changes, select "SAVE+EXIT."
Select "SAVE+EXIT" in "turnkey wizard."
Settings of turnkey wizard "STANDBY" (APP1:consistent)
 1) HELP                                10) Enterprise-Postgres(-)
 2) -                                   11) Symfoware(-)
 3) SAVE+EXIT                           12) Procedure:SystemState3(-)
 4) -                                   13) Procedure:SystemState2(-)
 5) ApplicationName=APP1                14) Gls:Global-Link-Services(-)
 6) Machines+Basics(app1)               15) IpAddresses(Adr_APP1)
 7) CommandLines(-)                     16) LocalFileSystems(-)
 8) Procedure:Application(-)            17) Gds:Global-Disk-Services(-)
 9) Procedure:BasicApplication(-)
Choose the setting to process: 3
Select "RETURN" on "Application selection menu."
Edit: Application selection menu (restricted):
1) HELP
2) QUIT
3) RETURN
4) OPTIONS
5) APP1
Application Name: 3
Select "Configuration-Generate" and "Configuration-Activate" on "Main configuration menu."
See "6.7.4 Generate and Activate" for information on Configuration-Generate and Configuration-Activate.
Select "QUIT" to exit from the RMS Wizard.
Start RMS.
Start RMS as described in "7.2.1.1 Starting RMS."