This appendix explains the HTTPS communication protocol used by Resource Orchestrator and its security features.
Resource Orchestrator uses HTTPS communication for the three cases shown in the figure below. Certificates are used for mutual authentication and for encrypting communication data.
Figure B.1 HTTPS Communication
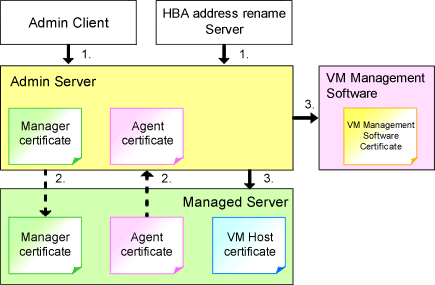
Between the Admin Client and the Admin Server, or Between the HBA address rename Server and the Admin Server
The admin client and HBA address rename server automatically obtain a certificate from the admin server at each connection. This certificate is used to encrypt the communicated data.
Between the Admin Server and Managed Servers (Communication with Agents)
Certificates are created on both the admin server and managed servers when Resource Orchestrator (manager or agent) is first installed. Certificates of other communication targets are stored at different timings, as described below (refer to "Certificate Creation Timing"). Those certificates are used for HTTPS communication based on mutual authentication.
When re-installing the manager, its agent certificates (stored on the admin server) are renewed. Because the renewed certificates differ from those stored on the agent side (on managed servers), agents are not able to communicate with the admin server. To avoid such communication issues, it is recommended to backup agent certificates (on the admin server) before uninstalling the manager, and restore them after re-installation. When re-installing the manager, back up the certificates referring to "11.1 Manager Uninstallation" in the "Setup Guide CE". When restoring the certificates, refer to "2.1 Manager Installation" in the "Setup Guide CE".
Between the Admin Server and Managed Servers (Communication with VM Hosts), or Between the Admin Server and VM Management Software [VMware]
The admin server obtains and stores certificates for each connection with a managed server (VM host) or VM management software. Those certificates are used to encrypt communications.
Certificate Creation Timing
Certificates are automatically obtained each time HTTPS connections are established. They are not stored on the admin server.
The certificates used for HTTPS communication are automatically exchanged and stored on the manager and agents on the following occasions:
When registering a managed server
Right after re-installing and starting an agent
Certificates are automatically obtained each time HTTPS connections are established. They are not stored on the admin server.
Types of Certificates
Resource Orchestrator uses the following certificates.
The public keys included in the certificates are created using X.509-based RSA encryption. These keys are 2048 bits long.
The public keys included in the certificates are created using X.509-based RSA encryption. These keys are 2048 bits long.
The public keys included in the certificates are created using X.509-based RSA encryption. The key length depends on the specifications of the VM host or the VM management software.
Adding the Admin Server's Certificate to Client Browsers
Resource Orchestrator automatically generates a unique, self-signed certificate for each admin server during manager installation. This certificate is used for HTTPS communication with admin clients.
Use of self-signed certificates is generally safe within an internal network protected by firewalls, where there is no risk of spoofing attacks and communication partners can be trusted. However, Web browsers, which are designed for less-secure networks (internet), will see self-signed certificates as a security threat, and will display the following warnings.
Warning dialog when establishing a connection
When opening a browser and connecting to the admin server for the first time, a warning dialog regarding the security certificate received from the admin server is displayed.
Address bar and Phishing Filter warning in Internet Explorer
The background color of the address bar will become red and the words "Certificate Error" will be displayed on its right side of the address bar of the login screen, the ROR console, and BladeViewer.
Furthermore, the Phishing Filter may show a warning on the status bar.
When using Internet Explorer, the above warnings can be disabled by creating a certificate for the admin server's IP address or host name (FQDN) that is specified in the address bar's URL, and installing it to the browser.
On the admin server, a certificate for host name (FQDN) is automatically created during installation of the manager.
When using other servers as admin clients, use the following procedure to install the admin server's certificate on each client.
Therefore, the certificate creation step in the following procedure can be skipped when using the admin server as an admin client. In that case, use host name (FQDN) in the URL and proceed to step 2.
Create a Certificate
Open the command prompt on the admin server.
Execute the following command to move to the installation folder.
[Windows Manager]
>cd "Installation_folder\SVROR\Manager\sys\apache\conf" <RETURN> |
[Linux Manager]
# cd /etc/opt/FJSVrcvmr/sys/apache/conf <RETURN> |
After backing up the current certificate, execute the certificate creation command bundled with Resource Orchestrator (openssl.exe).
When using the -days option, choose a value (number of days) large enough to include the entire period for which you plan to use Resource Orchestrator. However, the certificate's expiration date (defined by adding the specified number of days to the current date) should not go further than the 2038/1/19 date.
Example
When the Manager is installed in the "C:\Fujitsu\ROR" folder, and generating a certificate valid for 15 years (or 5479 days, using the -days 5479 option)
[Windows Manager]
>cd "C:\Fujitsu\ROR\SVROR\Manager\sys\apache\conf" <RETURN> |
[Linux Manager]
# cd /etc/opt/FJSVrcvmr/sys/apache/conf <RETURN> |
* Note: Enter the IP address to be entered in the Web browser or the host name (FQDN).
Example
IP address: 192.168.1.1
Host name: myhost.company.com
Add the Certificate to the Web Browser
Open the Resource Orchestrator login screen, referring to "Chapter 3 Login to the ROR Console" in the "Setup Guide VE".
When opening the ROR console, enter the same IP address or host name (FQDN) as that used to generate the certificate in the previous step. Once the login screen is displayed, perform the following operations.
Open the [Certificate] dialog.
Open the "Certificate is invalid dialog" by clicking the "Certificate Error" displayed in the address bar in Internet Explorer. This will open an "Untrusted Certificate" or "Certificate Expired" message.
Click the "View certificates" link displayed at the bottom of this dialog.
Confirm that the "Issued to" and "Issued by" displayed in the [Certificate] dialog are both set to the IP address or host name (FQDN) used to generate the certificate.
In the [Certificate] dialog, click [Install Certificate].
The [Certificate Import Wizard] dialog is displayed.
Click [Next>].
Select "Place all certificates in the following store".
Click [Browse].
The [Select Certificate Store] dialog is displayed.
Select "Trusted Root Certification Authorities".
Click [OK].
Click [Next>].
Check that "Trusted Root Certification Authorities" is selected.
Click [Finish].
Restart the Web browser.
If multiple admin clients are used, perform this operation on each admin client.
Open the Resource Orchestrator login screen, referring to "Chapter 1 Login and Logout" in the "User's Guide VE".
If the [This Connection is Untrusted] window is displayed, perform the following procedure:
Select <I Understand the Risks> and click the <Add Exception> button.
The [Add Security Exception] window is displayed.
In the [Add Security Exception] window, click the <View> button.
The[Certificate Viewer] is displayed.
In the [Certificate Viewer], ensure that the certificate and the issuer have an IP address or hostname (FQDN) specified.
In the [Add Security Exception] window, click the <Confirm Security Exception> button.
After logging in and clicking a tab, the [This Connection is Untrusted] window may be displayed.
If this occurs, perform the following procedure:
In the [Options] window, click the <Advanced>, and then the <Encryption> tab.
Click the <View Certificates> button.
The [Certificate Manager] window is displayed.
Select the <Servers> tab, and then click the <Add Exception> button.
The [Add Security Exception] window is displayed.
In the [Add Security Exception] window, enter the URL displayed in the [This Connection is Untrusted] window, and then click <Get Certificate>.
Click the <View> button to display the [Certificate Viewer].
In the Certificate Viewer, ensure that the certificate and the issuer have an IP address or hostname (FQDN) specified.
In the [Add Security Exception] window, click the <Confirm Security Exception> button.
Click the <OK> button.
Note
Enter the IP address or host name (FQDN) used to generate the certificate in the Web browser's URL bar. If the entered URL differs from that of the certificate, a certificate warning is displayed.
Example
A certificate warning is displayed when the following conditions are met.
The entered URL uses an IP address while the certificate was created using a host name (FQDN)
The admin server is set with multiple IP addresses, and the entered URL uses an IP address different from that used to generate the certificate
When using Firefox on Windows OS, the certificate needs to be installed to the OS via Internet Explorer.