This section describes how to modify the port number when Systemwalker Desktop Keeper is in use.
In addition, after the port number has been modified, it is necessary to modify the firewall's exceptions setting.
Modify via Management Server/Master Management Server
Use the Server Settings Tool to modify. For more information on how to do so, refer to "Modify Communication Information of Management Server" of User's Guide for Administrator.
Open <Installation Folder of Database Related Files>\ENV\SWDTKENV.INI with text editor.
Modify the port number specified in "RDASVPORT=" of [SYSTEM] section.
Save with overwriting.
Open <Installation Folder of Database Related Files>\ENV\SWDTKMNT.INI with text editor.
Modify the port number specified in "RDASVPORT=" of [SYSTEM] section.
Save with overwriting.
Start Server Settings Tool of Systemwalker Desktop Keeper from the Server Settings Tool of Management Server.
You can start the Start Server Settings Tool from Start > Systemwalker Desktop Keeper > Server > Server settings tool or Apps > Systemwalker Desktop Keeper > Server settings tool.
Enter the 'User ID' and 'Password' set when installing Management Server, and click OK button. Enter the Initial Administrator (secureadmin) in 'User ID'.
Server Settings Tool window is displayed.
Click the Management Server Setting button of the Server Settings Tool window, and confirm the following set values.
Management Server<---->Operation Database of Port number Setting
Initial value: 42050
Management Server<---->Log Viewing Database of Port number Setting
Initial value: 42051
Default Port Number is set at the time of installation.
the following setting for actually using the Relay Server.
Edit the Services file.
Path for saving the Services file: C: \WINDOWS\system32\drivers\etc
Settings to be added in Services file: Swdtk Communication Port Number/tcp
Note) Use the value set with Procedure 2 for the Communication port.
Stop the service of Systemwalker Desktop Keeper
It can be stopped from Start > Systemwalker Desktop Keeper > Server> Server settings tool or Apps > Systemwalker Desktop Keeper > Server settings tool.
Enter the 'User ID' and 'Password' set when installing the Management Server, and click OK button.
Server Settings Tool window is displayed.
Stop the service of Systemwalker Desktop Keeper from Service> Stop the Service
Re-start the service of PostgreSQL.
Re-start the following services from Control Panel > Administrative Tools > Service.
When Port of Operation Database is modified: PostgreSQL RDB SWDTK
When Port of Log Viewing Database is modified: PostgreSQL RDB SWDTK2
Start the service of Systemwalker Desktop Keeper.
It can be started from Start > Systemwalker Desktop Keeper > Server > Server Settings Tool or Apps > Systemwalker Desktop Keeper > Server settings tool.
Enter the 'User ID' and 'Password' set when installing Management Server, and click OK button.
Server Settings Tool window is displayed.
Start the service of Systemwalker Desktop Keeper from Service > Service Startup
Open connection Port to be used in remote connection by Firewall.
Register the Port Number set to enable the remote connection to PostgreSQL database of Management Server from Relay Server as 'Exception' of Firewall and open the Port.
Port Number to be opened is the Port Number set in "Performing settings for opening the database (Management Service/Master Management Server)" of Installation Guide.
Open iOS Management Database Settings File, and modify the Port Number.
[iOS Management Database Environment] \postgresql.conf
Folder specified when iOS Management Database is constructed by going to iOS Management Database Environment: Server Settings Tool > Build, delete, or show information of database
port=55432
Start the service of 'PostgreSQL_swdtmdm'.
Use the Server Settings Tool to change the port numbers. Refer to "Modify Communication Information of Management Server" in the User's Guide for Administrator for details.
Modify via Relay Server
Stop the service of Relay Server of Systemwalker Desktop Keeper.
<Relay Server Installation Folder>\bin\SDSVService.bat -STOP
Modify the port number by Configuration Change Command (SDSVSetMS.exe). For the options to be specified, refer to "1.30 SDSVSetMS.EXE (Change Configuration of Relay Server)".
An example of modifying the port number of No.(29) of Port Number List to '58090' is as follows:
<Relay Server Installation Folder>\bin\SDSVSetMS.exe -iOS.https.p 58090
Start the service of Relay Server of Systemwalker Desktop Keeper.
<Relay Server Installation Folder>\bin\SDSVService.bat -START
Port numbers other than the above numbers used in the Relay Server cannot be modified.
Modify via Management Console
Use the installation program to modify. For more information about how to do so, refer to "Change Management Console Environment" of User's Guide for Administrator. (Modify specified part of the port number)
Use the CT operation parameter information file to modify. For more information about how to do so, refer to "Change Operation Settings of Client (CT)" of User's Guide for Administrator.
Modify via Client (CT)
Use the installation program to modify. For more information about how to do so, refer to "Wizard-style Installation" of Installation Guide (Modify specified part of the [Settings of E-mail Control Method] window).
Uninstall the client (CT). For more information about how to do so, refer to "Uninstall CT" of Installation Guide.
Re-install the client (CT). When installing, specify the port number to be modified. For more information about how to do so, refer to "Install CT" of Installation Guide.
Modify via Log Analyzer Server
Open <Installation Folder of Log Analyzer Server>\bin\SWDTLAENV\ENV\system.ini with a text editor.
When modifying the port number of No. (16) in the port number list (the port number specified in Communication Port 3 during the installation of the Log Analyzer Server), the port number specified in "PORT=" of RDB section should be modified.
Save with overwriting.
After database construction, execute the following procedure when modifying a port number.
Stop the service 'SymfoWARE RDB SWDTLA'.
Open the services file under Windows directory\system32\drivers\etc
Implement the following depending on the Port number to be modified.
When modifying the port number of No. 16 in the port number list (the port number specified in Communication Port 3 during the installation of the Log Analyzer Server, modify the following port number description.
"SWDTLA" Port number/TCP
Start the service 'SymfoWARE RDB SWDTLA'.
Modify the Port Number of IIS to Numbers Other Than 80
This section describes how to modify the port number of No. (18) in the port number list.
If the port number "80" of IIS has been used by the system, modify it according to the following procedure.
Confirm that the port number is already being used in the system and then modify to a non-used port number.
When modifying the port number of IIS, make sure to modify the port number of the Log Analyzer Server.
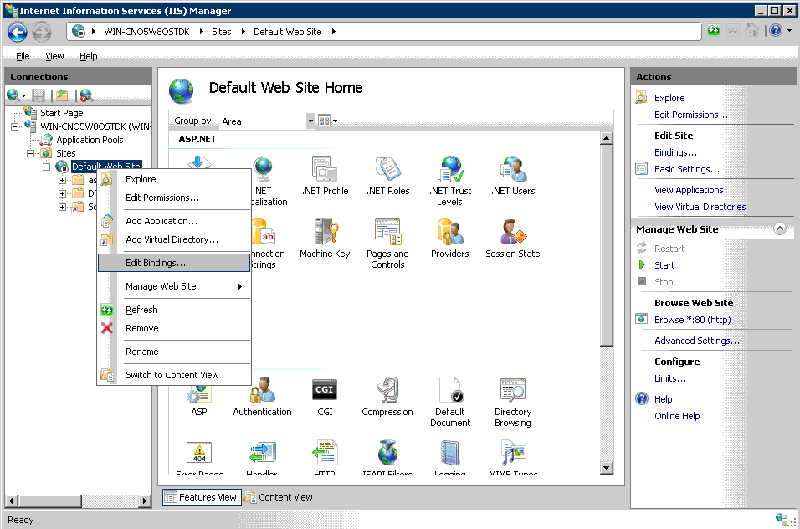
Start Control Pane>Administrative Tools > Internet Information Service (IIS) Manager.
Select Default Web Site of Sites, right-click and select Edit Bindings.
From the Site Bindings window that is displayed, select the line of HTTP and click the Edit button.
The Edit Site Binding window is displayed.
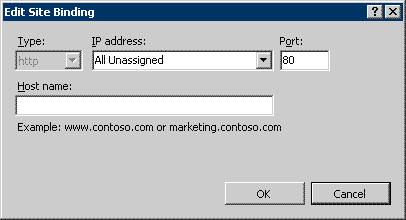
Modify the Port number, and click the OK button.
Modify the settings of the Management Server to make it consistent with the modified IIS port number.
Logon to Windows with an account that belongs to the Administrators group.
Select Systemwalker Desktop Keeper > Server > Desktop Keeper Main Menu right-click and select Properties.
The Desktop Keeper Main Menu Properties window is displayed.

Modify the port number on the URL displayed at Target of the Properties of Desktop Keeper Main Menu window to make it consistent with the modified port number.
Example) Modify the Port Number to 12250
[Before Modification]
"C: \Program Files\Internet Explorer\iexplore.exe" http: //localhost/DTK/index.html
[After Modification]
"C: \Program Files\Internet Explorer\iexplore.exe" http: //localhost: 12250/DTK/index.html
4. Click the OK button.