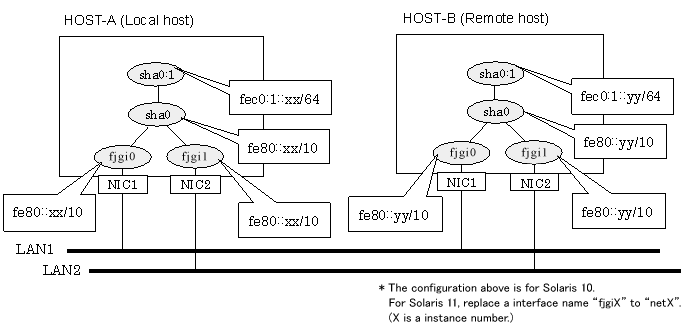
This section describes an example configuration procedure of the network shown in the diagram below.
The xx, yy in the figure below are assigned automatically by the automatic address configuration.
[HOST-A]
1) Setting up the system
1-1) Create /etc/inet/ndpd.conf file and set the followings:
ifdefault AdvSendAdvertisements true # Every interface sends a router advertisement. prefix fec0:1::0/64 sha0 # sha0 sends Prefix "fec0:1::0/64". |
Note
In the Solaris server that runs Fast switching mode, configure two or more router as IPv6 router. If the IPv6 router breaks down, it cannot use site-local address to communicate. To prevent this, it is recommended to setup at least two IPv6 routers.
For details on /etc/inet/ndpd.conf, refer to the Solaris manual.
1-2) For Solaris 10
Create /etc/hostname6.fjgi0 and /etc/hostname6.fjgi1 files as an empty file.
1-2) For Solaris 11
Set the interface to be used by using the ipadm(1M) command.
Interface net0
# /usr/sbin/ipadm create-ip net0 # /usr/sbin/ipadm create-addr -T addrconf net0/v6 |
Interface net1
# /usr/sbin/ipadm create-ip net1 # /usr/sbin/ipadm create-addr -T addrconf net1/v6 |
2) Reboot (For Solaris 10)
Run the following command to reboot the system. Make sure fjgi0 and fjgi1 are enabled as IPv6 interfaces after rebooting the system.
# /usr/sbin/shutdown -y -i6 -g0 |
3) Creation of virtual interface
3-1) For Solaris 10
# /opt/FJSVhanet/usr/sbin/hanetconfig create inet6 -n sha0 -m t -t fjgi0,fjgi1 |
3-1) For Solaris 11
# /opt/FJSVhanet/usr/sbin/hanetconfig create inet6 -n sha0 -m t -t net0,net1 |
4) Activation of virtual interface
# /opt/FJSVhanet/usr/sbin/strhanet |
[HOST-B]
1) Setting up the system
1-1) Create /etc/inet/ndpd.conf file. Defined information is the same as for HOST-A.
1-2) For Solaris 10
Create /etc/hostname6.fjgi0 and /etc/hostname6.fjgi1 file as an empty file.
1-2) For Solaris 11
Set the interface to be used by using the ipadm(1M) command.
Interface net0
# /usr/sbin/ipadm create-ip net0 # /usr/sbin/ipadm create-addr -T addrconf net0/v6 |
Interface net1
# /usr/sbin/ipadm create-ip net1 # /usr/sbin/ipadm create-addr -T addrconf net1/v6 |
2) Reboot (For Solaris 10)
Run the following command to reboot the system. Make sure fjgi0 and fjgi1 are enabled as IPv6 interfaces after rebooting the system.
# /usr/sbin/shutdown -y -i6 -g0 |
3) Creation of virtual interface
3-1) For Solaris 10
# /opt/FJSVhanet/usr/sbin/hanetconfig create inet6 -n sha0 -m t -t fjgi0,fjgi1 |
3-1) For Solaris 11
# /opt/FJSVhanet/usr/sbin/hanetconfig create inet6 -n sha0 -m t -t net0,net1 |
4) Activation of virtual interface
# /opt/FJSVhanet/usr/sbin/strhanet |