This section describes an example of configuring an environment for GS Hot-standby.
For configuring the GS, refer to the GS manual.
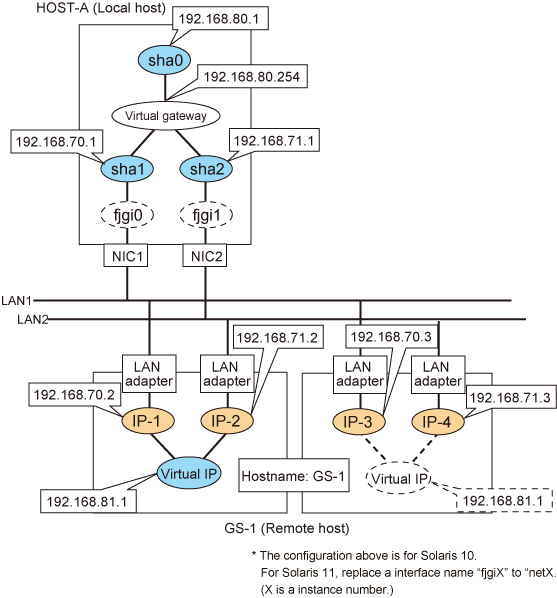
The dotted line indicates that the interface is inactive.
[HOST-A]
1) Setting up the system
1-1) Define IP addresses and hostnames in /etc/inet/hosts file.
192.168.70.1 host11 # HOST-A Virtual IP (mode:n) 192.168.71.1 host12 # HOST-A Virtual IP (mode:n) 192.168.80.1 hosta # HOST-A Virtual IP (mode:c) 192.168.80.254 virgw # Virtual gateway 192.168.70.2 gs11 # GS-1 Physical IP (1) 192.168.71.2 gs12 # GS-1 Physical IP (2) 192.168.70.3 gs13 # GS-1 Physical IP (3) 192.168.71.3 gs14 # GS-1 Physical IP (4) 192.168.81.1 gsa # GS-1 Virtual IP |
1-2) Define the subnet mask in /etc/inet/netmasks file.
192.168.70.0 255.255.255.0 192.168.71.0 255.255.255.0 192.168.80.0 255.255.255.0 192.168.81.0 255.255.255.0 |
2) Creation of virtual interface
2-1) For Solaris 10
# /opt/FJSVhanet/usr/sbin/hanetconfig create -n sha1 -m n -i 192.168.70.1 -t fjgi0 # /opt/FJSVhanet/usr/sbin/hanetconfig create -n sha2 -m n -i 192.168.71.1 -t fjgi1 # /opt/FJSVhanet/usr/sbin/hanetconfig create -n sha0 -m c -i 192.168.80.1 -t sha1,sha2 |
2-1) For Solaris 11
# /opt/FJSVhanet/usr/sbin/hanetconfig create -n sha1 -m n -i 192.168.70.1 -t net0 # /opt/FJSVhanet/usr/sbin/hanetconfig create -n sha2 -m n -i 192.168.71.1 -t net1 # /opt/FJSVhanet/usr/sbin/hanetconfig create -n sha0 -m c -i 192.168.80.1 -t sha1,sha2 |
3) Setting the virtual gateway
# /opt/FJSVhanet/usr/sbin/hanetgw create -n sha0 -g 192.168.80.254 |
4) Setting the Communication target monitoring function
# /opt/FJSVhanet/usr/sbin/hanetobserv create -n GS-1 -i 192.168.81.1 -t 192.168.70.2,192.168.71.2 -m on # /opt/FJSVhanet/usr/sbin/hanetobserv create -n GS-1 -i 192.168.81.1 -t 192.168.70.3,192.168.71.3 |
5) Activation of virtual interface
# /opt/FJSVhanet/usr/sbin/strhanet |