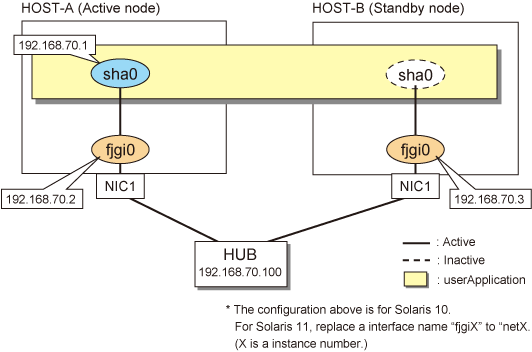
This section describes an example configuration procedure of the network shown in the diagram below.
For configuring the cluster system, refer to the Cluster system manual.
In this section, description of private LAN is omitted.
The dotted line indicates that the interface is inactive.
[HOST-A]
1) Setting up the system
1-1) Define IP addresses and hostnames in /etc/inet/hosts file.
192.168.70.1 hosta # HOST-A/B Virtual IP (Takeover IP) 192.168.70.2 host11 # HOST-A Physical IP 192.168.70.3 host21 # HOST-B Physical IP 192.168.70.100 swhub1 # Primary HUB IP |
1-2) For Solaris 10
Write the hostnames defined above in /etc/hostname.fjgi0 file. If a file does not exist, create a new file.
Contents of /etc/hostname.fjgi0
host11 |
1-2) For Solaris 11
Set the host by the interface used with the ipadm(1M) command and also by the host name defined above.
Interface net0
# /usr/sbin/ipadm create-ip net0 # /usr/sbin/ipadm create-addr -T static -a host11/24 net0/v4 |
1-3) Define the subnet mask in /etc/inet/netmasks file.
192.168.70.0 255.255.255.0 |
2) Reboot (For Solaris 10)
Run the following command to reboot the system. Make sure fjgi0 are enabled as IPv4 interfaces after rebooting the system.
# /usr/sbin/shutdown -y -i6 -g0 |
3) Creation of virtual interface
3-1) For Solaris 10
# /opt/FJSVhanet/usr/sbin/hanetconfig create -n sha0 -m d -i 192.168.70.1 -e 192.168.70.2 -t fjgi0 |
3-1) For Solaris 11
# /opt/FJSVhanet/usr/sbin/hanetconfig create -n sha0 -m d -i 192.168.70.1 -e 192.168.70.2 -t net0 |
Note
Ensure that the physical IP address specified using option '-e' is the same IP address configured in /etc/hostname.fjgi0 or with the ipadm(1M) command.
4) Setting up the HUB monitoring function
# /opt/FJSVhanet/usr/sbin/hanetpoll create -n sha0 -p 192.168.70.100 -b off |
5) Creation of takeover virtual interface
# /opt/FJSVhanet/usr/sbin/hanethvrsc create -n sha0 |
6) Starting the HUB monitoring function
# /opt/FJSVhanet/usr/sbin/hanetpoll on |
[HOST-B]
1) Setting up the system
1-1) Define IP addresses and hostnames in /etc/inet/hosts file. Defined information is the same as for HOST-A.
1-2) For Solaris 10
Write the hostnames defined above in /etc/hostname.fjgi0 file. If a file does not exist, create a new file.
Contents of /etc/hostname.fjgi0
host21 |
1-2) For Solaris 11
Set the host by the interface used with the ipadm(1M) command and also by the host name defined above.
Interface net0
# /usr/sbin/ipadm create-ip net0 # /usr/sbin/ipadm create-addr -T static -a host21/24 net0/v4 |
1-3) Define the subnet mask in /etc/inet/netmasks file. Defined content is same as HOST-A.
2) Reboot (For Solaris 10)
Run the following command to reboot the system. Make sure fjgi0 are enabled as IPv4 interfaces after rebooting the system.
# /usr/sbin/shutdown -y -i6 -g0 |
3) Creation of virtual interface
3-1) For Solaris 10
# /opt/FJSVhanet/usr/sbin/hanetconfig create -n sha0 -m d -i 192.168.70.1 -e 192.168.70.3 -t fjgi0 |
3-1) For Solaris 11
# /opt/FJSVhanet/usr/sbin/hanetconfig create -n sha0 -m d -i 192.168.70.1 -e 192.168.70.3 -t net0 |
Note
Ensure that the physical IP address specified using option '-e' is the same IP address configured in /etc/hostname.fjgi0 or with the ipadm(1M) command.
4) Setting up the HUB monitoring function
# /opt/FJSVhanet/usr/sbin/hanetpoll create -n sha0 -p 192.168.70.100 -b off |
5) Creation of takeover virtual interface
# /opt/FJSVhanet/usr/sbin/hanethvrsc create -n sha0 |
6) Starting the HUB monitoring function
# /opt/FJSVhanet/usr/sbin/hanetpoll on |
[Configuration by RMS Wizard]
After completing step 6) of both HOST-A and HOST-B, connect to the administration server using RMS Wizard, then setup the cluster environment.
To create Gls resource, select the SysNode for HOST-A and HOST-B. Once Gls is created, register it on the userApplication.
When registering on the userApplication, select the SysNode compliant with HOST-A and HOST-B in the order of operation node followed by standby node. Then, register the takeover address "192.168.70.1".
After completing the configuration, start the userApplication to activate the takeover virtual interface on the operation node.