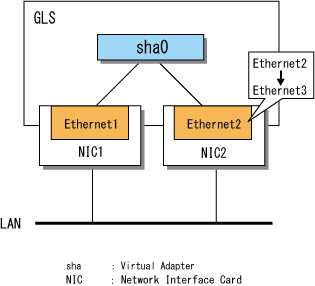
This section describes how to change the physical adapters bundled into a virtual adapter. In the procedure below, the name of the virtual adapter is sha0. This virtual adapter contains two physical adapters: Ethernet 1 and Ethernet 2. In the procedure below, Ethernet 2 is replaced with Ethernet 3.
Figure 5.3 Changing Physical Adapters
Check the name and status of the physical adapter to be changed.
> dsphanet Name Status Adapters +-------+--------+-----------------------------------------------------+ sha0 Active Ethernet 1(ON),Ethernet 2(STBY) |
For more details on the dsphanet command, refer to "6.3.1 dsphanet"
When the physical adapter to be changed is operational, change the status of the adapter to standby with the change subcommand of the hanetnic command.
For details on the change subcommand of the hanetnic command, see "6.2.3.3 change."
Check whether the ping monitor function is set.
> hanetpoll print |
For more details on the hanetpoll command, refer to "6.2.5 hanetpoll."
If ping monitoring is not set, step 3, step 4, and step 5 are not applicable.
Stop the ping monitor function.
Use the off subcommand of the hanetpoll command.
> hanetpoll off |
Check that ping monitor function is stopped.
Execute the dsphanet command with the -r option and check that the ping monitor status of all physical adapters is "-."
> dsphanet -r
[sha0]
 Adapters                        Resources
+-------------------------------+----------------------------------------+
 Ethernet 1(ON)     LINK(O)
                                 PING(-)
                                  192.168.2.10(-),192.168.2.20(-)
 Ethernet 2(STBY)   LINK(O)
                                 PING(-)
192.168.2.10(-),192.168.2.20(-) |
For more details on the dsphanet command, refer to "6.3.1 dsphanet."
Back up the information of the ping monitor target set for the physical adapter.
Check that there is no file storing the information of the ping monitor target.
> dir /b C:\glspollbackup File Not Found |
Save the information of the ping monitor target to a file.
Use the print subcommand of the hanetpoll command.
> hanetpoll print > C:\glspollbackup |
Delete the information of the ping monitor targets.
Delete the information of the ping monitor targets set for the physical adapter to be changed, which was checked in step 1.
Use the delete subcommand of the hanetpoll command.
> hanetpoll delete -t "Ethernet 2" |
Check that no ping monitor targets are set.
Use the print subcommand of the hanetpoll command.
> hanetpoll print
Polling Status         = OFF
        interval(idle) =   3( 60) sec
        times          =   5 times
 Adapter                         Fo  Target ip
+-------------------------------+---+------------------------------------+
Ethernet 1 YES 192.168.2.10,192.168.2.20 |
Delete the information of the physical adapter to be changed, which was checked in step 1, from the definition data for the virtual adapter.
Use the delete subcommand of the hanetnic command.
> hanetnic delete -n sha0 -t "Ethernet 2" |
For more details on the hanetnic command, refer to "6.2.3 hanetnic."
Check that physical adapters to be changed are not bundled in the virtual adapter.
Execute the dsphanet command.
> dsphanet Name Status Adapters +-------+--------+-------------------------------------------------------+ sha0 Active Ethernet 1(ON) |
Install a new adapter into the definition data for the virtual adapter.
Execute the add subcommand of the hanetnic command.
> hanetnic add -n sha0 -t "Ethernet 3" |
Check that the new physical adapter is bundled in the virtual adapter.
Use the dsphanet command.
> dsphanet Name Status Adapters +-------+--------+----------------------------------------------------------+ sha0 Active Ethernet 1(ON),Ethernet 3(STBY) |
Set the ping monitor target for the new physical adapter.
Display the contents of the file saved in step 4 and check the information of the ping monitor target to be set.
> type C:\glspollbackup
Polling Status = OFF
interval(idle) = 3( 60) sec
times = 5 times
Adapter Fo Target ip
+-------------------------------+---+--------------------------------------+
Ethernet 1 YES 192.168.2.10,192.168.2.20 |
Set the ping monitor target for the physical adapter.
Use the create subcommand of the hanetpoll command.
> hanetpoll create -t "Ethernet 3" -p 192.168.2.10,192.168.2.20 |
Check that the information of the ping monitor targets is set.
Use the print subcommand of the hanetpoll command.
> hanetpoll print
Polling Status         = OFF
        interval(idle) =   3( 60) sec
        times          =   5 times
 Adapter                         Fo  Target ip
+-------------------------------+---+---------------------------------------+
 Ethernet 1         YES 192.168.2.10,192.168.2.20
Ethernet 3 YES 192.168.2.10,192.168.2.20 |
Start the ping monitor function.
Use the on subcommand of the hanetpoll command.
> hanetpoll on |
Check that the ping monitor function is started.
Execute the dsphanet command with the -r option and check that the ping monitor status of all physical adapters in "ON" state is "O."
> dsphanet -r
[sha0]
 Adapters                        Resources
+-------------------------------+-------------------------------------------+
 Ethernet 1(ON)     LINK(O)
                                 PING(O)
                                  192.168.2.10(O),192.168.2.20(O)
 Ethernet 3(STBY)   LINK(O)
                                 PING(-)
192.168.2.10(-),192.168.2.20(-) |