This section describes how to add a virtual adapter.
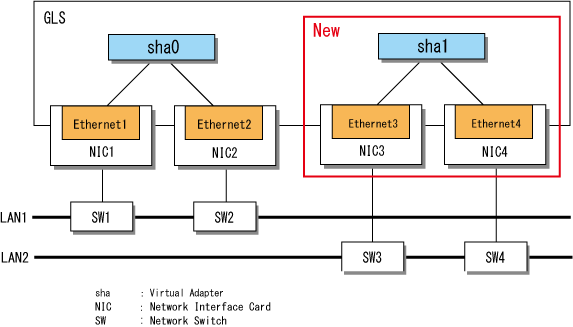
Figure 5.1 Adding a Virtual Adapter
Deactivate all virtual adapters by executing the stphanet command.
> stphanet FJSVhanet: INFO: 00005: The ping monitoring stopped. FJSVhanet: INFO: 00000: The command ended normally. |
Display the [Network Connections] window by selecting from [Control Panel]-[Network and Internet]-[Network and Sharing Center]-[Change adapter settings], then check your network adapters that need to be bundled.
Create the new virtual adapter by executing the create subcommand of the hanetconfig command, specifying virtual adapter sha1 to bundle the physical adapters (Ethernet 3 and Ethernet 4).
> hanetconfig create -n sha1 -t "Ethernet 3","Ethernet 4" FJSVhanet: INFO: 00000: The command ended normally. |
For more details on the hanetconfig command, refer to "6.2.2 hanetconfig."
Check the settings by executing the print subcommand of the hanetconfig command.
> hanetconfig print Name VID Adapters +--------+----+----------------------------------------------------------------+ sha0 ---- Ethernet 1,Ethernet 2 |
Point
Repeat steps 2 and 3 for each virtual adapter that you create.
Usually, the physical adapter that has been specified first will be used as the operational adapter.
See
To ensure that GLS is set and functions correctly, perform the following tasks after adding virtual adapters:
Set the ping monitor function.
For more details, refer to "5.3.2 Setting Ping Monitoring."
Set IP addresses.
For more details, refer to "3.4.5 Follow-up Tasks: IP Address Settings."
Activate virtual adapters.
For more details, refer to "5.1.2 Activating and Deactivating Virtual Adapters."
Start the ping monitor function.
For more details, refer to "5.3.3 Starting and Stopping the Ping Monitor Function."