The [Register User] window can be used to register a new user.
Note
If the setting is not to register user to the directory service from this product, perform the following before registering the user in the [Register User] window:
Note that whether the user is registered from this product to the directory service is determined in the directory service operation definitions file (ldap_attr.rcxprop).
Refer to "8.6.1 Settings for Tenant Management and Account Management" in the "Operation Guide CE" for information on the directory service operation definitions file.
Check whether the user information is registered in the directory service. Register the user information if it is not registered.
Perform the following steps to register a new user:
In the [User List] window, click the [Register user] button.
The [Register User] window is displayed.
In the [Register User] window, specify the information for the user being registered.
The following window is an example for internal authentication.
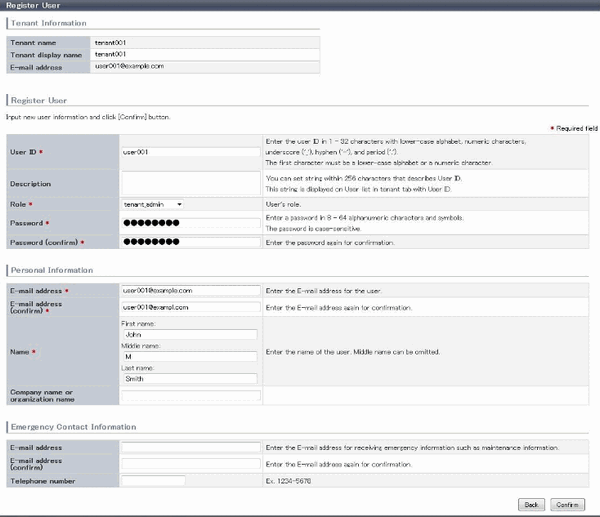
Item | Explanation | |
|---|---|---|
Tenant Information | The following information is displayed for the tenant that is registering the user:
| |
User ID | [When using internal authentication, or when using the directory service provided with ServerView Operations Manager using Single Sign-On authentication] [When using Active Directory for the directory service] | |
Description | Specify an explanation of the user's user ID. | |
Role | Select the role for the user you are creating. Select tenant_admin (tenant administrator), tenant_operator (tenant operator), tenant_monitor (tenant monitor), tenant_user (tenant user), or a role created from a copy of one of these. | |
Password | Specify the user password. Specify between 8 and 64 characters, using single-byte alphanumerics and symbols. | |
Password (confirm) | Re-enter the user password for confirmation purposes. | |
Personal Information | ||
E-mail address | Use up to 64 characters to specify the user's e-mail address. This specification is mandatory. | |
E-mail address (confirm) | Re-enter the user's e-mail address for confirmation purposes. This entry is mandatory. | |
Name | Specify the user's first name, middle name and last name using up to 15 characters for each. The specification of first name and last name is mandatory. | |
Company name or Organization name | Specify the company name or organization name using up to 30 characters. | |
Emergency Contact Information | ||
E-mail address | Use up to 64 characters to specify the e-mail address for receiving emergency notifications. | |
E-mail address (confirm) | Re-enter the emergency contact e-mail address for confirmation purposes. | |
Telephone number | Specify the emergency contact phone number. | |
Click the [Confirm] button.
The confirmation window is displayed.
Check the user information, and then click the [Register] button.
The completion window is displayed.
Click the [Back to User List] button to return to the [User List] window.
Note
When user registration is completed, notify the user of the necessary information by e-mail or similar.