To add a project, perform the following operations.
Go to the [Project Management] menu in the [Home] window and click the [Add New] link.
Specify the details using the wizard. Click the [Next] button to proceed. Clicking the [Cancel] button discards all of the entries.
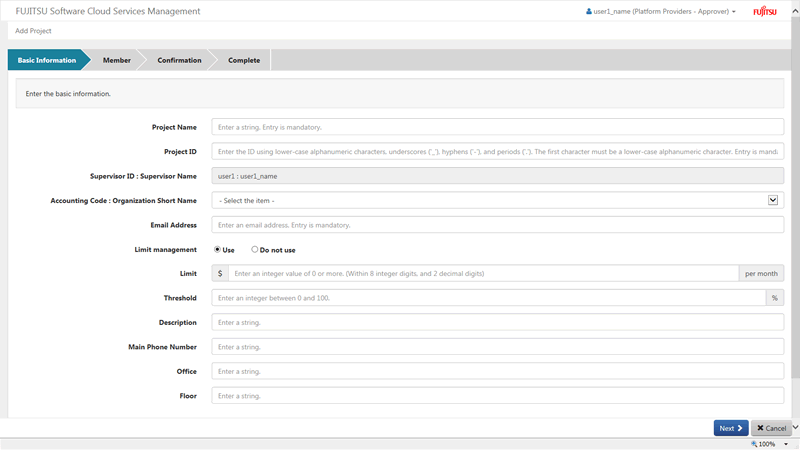
Figure 3.1 Add Project Window

Basic information
Specify the following items:
This name which is displayed in the project list, etc.
Any UTF-8 format character string up to 64 characters in length, excluding control characters such as line feeds, can be specified.
This ID is used to identify the project.
This item can only be specified during addition and cannot be modified.
Do not specify a project ID which has already been added.
A character string up to 32 characters in length containing lower-case alphanumeric characters, hyphens ("-"), underscores ("_") and periods (".") can be specified. The beginning character must be a lower-case alphanumeric character.
Specify the user ID of a user who has the final authority regarding the modification and deletion of the details of the project. The specified user has the project manager role.
When adding a project, the user who performs the addition is automatically configured. Modification can be performed after addition is complete.
When the operating user is an administrator, the supervisor can be selected from among all platform provider approvers.
Specify the accounting codes of the platforms to be added to the project.
When the operating user is an operator approver, the codes can be selected from the accounting codes linked with the organization to which the user belongs and the organizations under it.
When the operating user is an administrator, the codes can be selected from among all accounting codes.
Point
Accounting codes are added by operators. When specifiable accounting codes are not displayed, or when they are not the expected accounting codes, contact the operators.
The added accounting codes can be confirmed in the [Organization/User List] window.
The email address used for receiving notification from operators, notification of exceeding a threshold, and notification when creating and updating a key pair.
A character string up to 256 characters in length which qualifies as a "/^[\w\.\-]+@(?:[\w\-]+\.)+[\w\-]+$/" regular expression can be specified. If X is defined as a string which contains alphanumeric characters, hyphens ("-"), and underscores ("_"), and Y contains X and periods ("."), the format of the regular expression is "Y@X.X".
Enable limit management for each project, and configure whether the usage charges are managed using a limit.
Specify an upper limit value for monthly billing available for use by the project.
Any number up to 8 digits and within 2 decimal points can be specified.
Specify a percentage of the usage charge threshold specified in limit. When usage charges exceed the specified percentage in the project, an alert e-mail will be automatically sent.
An integer from 0 to 100 can be specified.
Point
When configuring [Limit] and [Threshold], the values can be specified only when [Limit Management] is enabled. Depending on the settings configured by the operators, [Limit Management] may not be displayed.
A description (comment) about the project can be specified.
Any UTF-8 format character string up to 256 characters in length, excluding control characters such as line feeds, can be specified.
These items are defined by the operators. Specify them based on the displayed description.
Any UTF-8 format character string up to 256 characters in length, excluding control characters such as line feeds, can be specified.
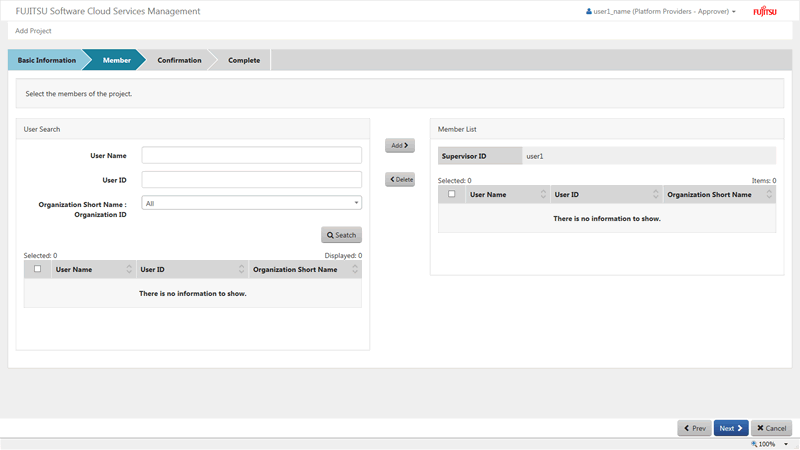
Figure 3.2 Addition of Project Members

Member
Add a user who performs platform development of the corresponding project as a member.
Select a user to be added in the [User Search] area, and add the target user in the [Member List] area.
Specifying a user name, user ID, and organization short name, and clicking the [Search] button displays the users who match the search conditions in a list, and the number of search results is displayed in the [Displayed] field. Selecting the checkbox of the user to be added and clicking the [Add] button migrates the selected user to the [Member List] area.
Selecting the checkbox of a user in the [Member List] area and clicking the [Delete] button migrates the selected user to the [User Search] area.
Use [Add] or [Delete] to define the members. After defining the members, click the [Next] button.
Point
In the list in the [User Search] area, users displayed in the [Member List] area and the user specified for the supervisor ID are not displayed.
Confirmation
A summary of the specified information is displayed. To correct any incorrect entries, go back to the previous windows for entry using the [Prev] button and make any necessary corrections.
Complete
Click the [Request] button in the [Confirmation] window. The request is indicated as waiting processing, and a request for approval email is automatically sent to the approvers.