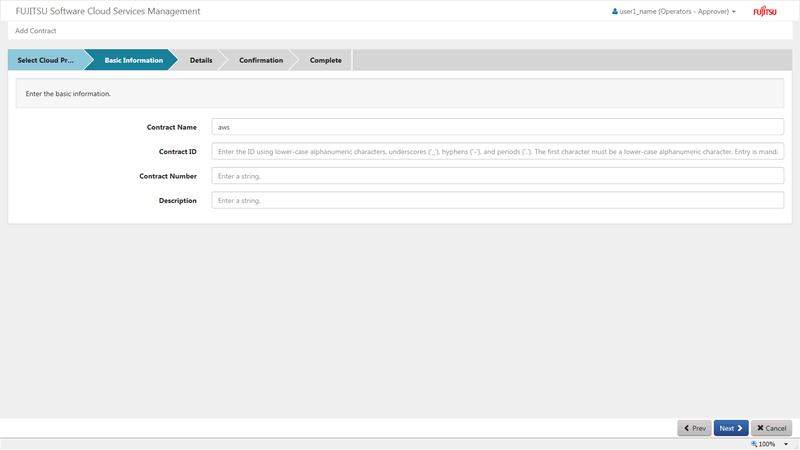
This section explains how to add contracts.
Go to the [Contract Management] menu in the [Home] window and click the [Add New] link.
Specify the details using the wizard. Click the [Next] button to proceed. Clicking the [Cancel] button discards all of the entries.
Figure 3.1 Add Contract Window

Select Cloud Provider
Select the connection information of a contracted cloud provider or an on premises connection.
To add a cloud provider with which a new contract was entered into, it is necessary to add cloud vendor information. For details on the addition of cloud vendor information, refer to the "FUJITSU Software Cloud Services Management Operation Guide".
Basic Information
Specify the following items:
Enter the name to distinguish the contract from other contracts in a Contract List or Menu List.
Any UTF-8 format character string up to 64 characters in length, excluding control characters such as line feeds can be specified.
This ID is to distinguish the contract within Cloud Services Management. This item can only be specified during addition.
Do not specify a contract ID which has already been added.
A character string up to 32 characters in length containing lower-case alphanumeric characters, hyphens ("-"), underscores ("_") and periods (".") can be specified. The beginning character must be a lower-case alphanumeric character.
Enter a number to be linked to the contract with the cloud provider.
Any UTF-8 format character string up to 64 characters in length, excluding control characters such as line feeds can be specified.
Enter a comment about the contract.
Any UTF-8 format character string up to 256 characters in length, excluding control characters such as line feeds can be specified.
Details
Specify the following items. Displayed items may vary depending on the selected cloud vendor.
Enter the ID used for logging on to the portal of the cloud provider and other locations if necessary.
Any UTF-8 format character string can be specified, excluding control characters such as line feeds.
Enter the ID used when submitting inquiries to the cloud provider, if necessary.
Any UTF-8 format character string can be specified, excluding control characters such as line feeds.
Enter the information of the users that entered into the contract with the cloud provider, if necessary.
A name or organization name not added in Cloud Services Management can be specified.
Any UTF-8 format character string up to 64 characters in length, excluding control characters such as line feeds can be specified.
Enter the contact information of the users that entered into the contract with the cloud provider, if necessary.
Any UTF-8 format character string up to 256 characters in length, excluding control characters such as line feeds can be specified.
Enter any necessary comments such as the contract start date, the date of the next update, the length of the contract with the cloud provider, etc.
Any UTF-8 format character string up to 256 characters in length, excluding control characters such as line feeds can be specified.
Enter the body of the user agreement which is displayed when a platform or a service is added, if necessary. Confidential information, personal information, and other notes regarding use of the relevant cloud vendor, etc., can also be specified.
Any UTF-8 format character string up to 1024 characters in length, including line feeds, can be specified.
Confirmation
A summary of the specified information is displayed. To correct any incorrect entries, go back to the previous windows for entry using the [Prev] button and make any necessary corrections.
Complete
Click the [Add] button in the [Confirmation] window, complete addition of the contracts.
Note
If the body message of the user agreement is not specified, the [Agree] check box is not shown when a platform or a service is added, and no check is required.
Information
The [Add] button on the upper right of the [Contract List] window may also be used for contract addition.