Install the software required for PRIMECLUSTER on each node.
The explanation is divided into the following topics:
Installation and configuration of related software
Installation and environment configuration of applications
After installing the software related to PRIMECLUSTER, you need to take it into operation and make various settings for the OS and the hardware.
Perform the following steps as necessary.
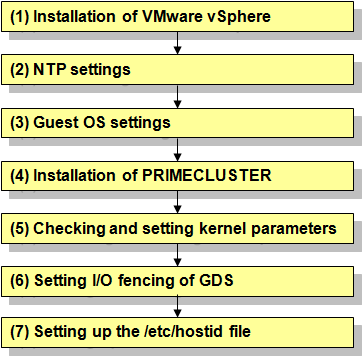
Installation of VMware vSphere
Take the following steps to set system disks and related devices, shared disks and related devices, and the virtual network.
Setting up system disks and related devices
When you create a new virtual machine using the wizard executed from vSphere Client version 5, proceed to "Create Disk" and select [Eager Zeroed].
When you create a new virtual machine using the wizard executed from vSphere Client version 4, proceed to "Create Disk." Select "Support clustering features such as Fault Tolerance" and create disks in eagerzeroedthick format.
For types of SCSI controllers, set to "LSI Logic Parallel" for the RHEL5 environment, and set to "LSI Logic Parallel" or "VMware Paravirtual" for the RHL6 environment.
Set to "None" for sharing of the SCSI bus.
Setting up shared disks
When creating the first virtual machine, create shared disks taken over in the cluster system with Raw DeviceMapping (RDM). For the second virtual machine, select "Use an existing virtual disk" and specify the first RDM disk you created.
Besides the shared disks taken over in the cluster system, create the data store shared among multiple ESXi hosts. Create the virtual machine disk (.vmdk) file of the shared disks taken over in the cluster system in this data store.
Set the compatibility mode if shared disk to "Physical."
For virtual device nodes, use a new SCSI controller which is different from the system disk.
(Example: X indicates the controller number and Y indicates the disk number for the SCSI disk [SCSI(X:Y)]. When the virtual device node of the system disk is [SCSI(0:0)], do not use the virtual device node [SCSI(0:Y)] whose controller number is 0. Set the different number such as [SCSI(1:0)].)
For virtual device nodes, set the controller number and the disk number to be consistent on all the nodes of the cluster system.
For types of SCSI controllers, set the same type as the system disk on a guest OS.
For sharing SCSI buses, set to "Physical."
For VMware ESXi/ESX hosts, it is necessary to mark as "Permanent Reservation" with the disk device used for shared disk of PRIMECLUSTER.
Use the following esxcli command to mark the device as permanent reservation.
esxcli storage core device setconfig -d <naa.id> --perennially-reserved=true
See KB1016106 in the Knowledge Base site of VMware Inc. for configuration instructions.
Setting up the virtual network
When creating the virtual machine, create at least two network systems for the cluster interconnect and connect them to different physical adapters.
For sharing the physical network adapter that is used as the cluster interconnect with multiple clusters, allocate a different port group to each cluster system for a vSwitch. In this case, set different VLAN ID to each port group.
Note
When bundling the network that is specified to the interconnect by using NIC teaming of VMware, make sure to use any one of the following configurations to set the load balancing option (active-active configuration) to NIC teaming.
Route based on source port ID
Route based on source MAC hash
Use explicit failover order
Redundant configuration (active-standby) is enabled in any configurations other than the above configurations 1 to 3.
NTP settings (Guest OS)
These settings serve to synchronize the time of each node in the cluster system configuration. Be sure to make these settings when you configure the cluster.
Make these settings on the guest OS before you install PRIMECLUSTER.
Guest OS settings (Guest OS)
Take the following steps to set the guest OS.
File system settings for system volume
In the default setting of the ext3 or ext4 file system, even if an I/O device where the system volume is allocated fails, a cluster failover does not occur and the system operation may continue based on the data stored on the memory.
If you want PRIMECLUSTER to trigger a cluster failover immediately when an I/O device where the system volume is allocated fails, perform the following setting.
Specify "errors=panic" to the mount option of each partition (the ext3 or the ext4 file system) included in the system volume.
Example: To set it in /etc/fstab (when /, /var, and /home exist in one system volume)
LABEL=/ / ext3 errors=panic 1 1
LABEL=/boot /boot ext3 errors=panic 1 2
LABEL=/var /var ext3 errors=panic 1 3
LABEL=/home /home ext3 errors=panic 1 4
However, a cluster failover may not operate immediately because it takes time before the file system receives the I/O error. The detection frequency of I/O error can be raised if the writing operation to the system volume is regularly done.
Installation of PRIMECLUSTER (Guest OS)
For installing PRIMECLUSTER, an installation script (CLI Installer) is available.
This script method installs PRIMECLUSTER node by node on systems that already have Linux(R) and related software installed. It is also utilized for installation on cluster management servers.
See
For details on the installation procedure, see the Installation Guide for PRIMECLUSTER.
Checking and setting the kernel parameters
Depending on the environment, the kernel parameters must be modified.
All nodes on which PRIMECLUSTER is to be installed
Depending on the utilized products and components, different kernel parameters are required.
Check the Kernel Parameter Worksheet and modify the settings as necessary.
See
For details on the kernel parameters, see "A.6 Kernel Parameter Worksheet."
Setting I/O fencing of GDS
When a shared disk is registered to a GDS class, set up I/O fencing of GDS.
Add the following line into the /etc/opt/FJSVsdx/sdx.cf file:
SDX_VM_IO_FENCE=onAll nodes on which PRIMECLUSTER is to be installed.
Setting up the /etc/hostid file
To run I/O fencing properly, you may need to set up the /etc/hostid file depending on the environment.
According to the following steps, check whether setting up the /etc/hostid file is required, and then, set it up if needed.
How to check
Execute the hostid command and check the output.
When the output is other than "00000000," setting up the /etc/hostid file is not necessary.
# hostid
a8c00101
When the output is "00000000," follow the setting procedure below to set the host identifier (output of hostid) on all the nodes that configure the cluster. For the host identifier, specify the value unique to each node. Do not set 00000000 for the value.
Setting procedure
Create the /etc/hostid file.
# touch /etc/hostid
Create the following python script file.
[Contents of the file to be created]
#!/usr/bin/python
from struct import pack
filename = "/etc/hostid"
hostid = pack("I",int("0x<hhhhhhhh>",16))
open(filename, "wb").write(hostid)(hhhhhhhh: Describe the intended host identifier in base 16, 8 digit numbers)
Set the execute permissions to the created script file and then, execute it.
# chmod +x <created script file name>
# ./<created script file name>
Execute the hostid command to check if the specified host identifier is obtained.
# hostid
hhhhhhhh
(hhhhhhhh: host identifier that is specified in the script file)
Note
To activate the modified kernel parameters and I/O fencing of GDS, restart the guest OS after installation settings for related software is complete.
Install applications products to be operated on the PRIMECLUSTER system and configure the environment as necessary.
See
For details on environment setup, see manuals for each application.
For information on PRIMECLUSTER-related products supporting VMware, see the documentation for each product.