Note
If a user whose user name contains fullwidth characters upgrades a client (CT), an error message may be displayed.
When installing a client (CT), use a user name that contains halfwidth characters only.
The procedures for version upgrade of the Client (CT) in the Wizard Pattern are as follows:
Log on to Windows with an Administrators group affiliated user or Domain Admins group affiliated user. When other applications are in use, end these applications.
After inserting DVD-ROM of Systemwalker Desktop Keeper into PC, the installer window is displayed.
Select "CT(Client) Installation".
If the Setup has not been started, start "swsetup.exe" of DVD-ROM drive.
The "Welcome to use Systemwalker Desktop Keeper Client installation" window is displayed. Click the Next button.
The Set printing monitoring mode window is displayed. For printing mode, select any of the following options and click the Next button.
Monitoring the printing of all printers set in this terminal (Recommended): This is selected when collecting printing operation logs according to each Client (CT). In this case, printing operation logs will be collected in each Client (CT).
Monitoring the printing of local printer only:
This is selected when the printing operation in Client under the same Management Server/Master Management Server with the printing server is performed through the printing server. The Client (CT) is also required to be installed on the printing server. In this case, the printing operation log cannot be collected through a Client that is not a printing server. The printing operation log will be collected by the printing server.
Note
Notes on print monitoring mode
Integrate the options above in the Client (CT) under the Master Management Server or Management Server. If not integrated, the printing operation log cannot be collected.
In the case of taking a non-server OS (Windows Server(R) 2003, Windows Server(R) 2008 and Windows Server(R) 2012) as the print server, when set as Monitoring the printing of all printers set in this terminal (Recommended), the print server will not be able to connect over 10 Clients to print. At this time, set as Monitoring the printing of local printer only.
Point
Register user ID on the print server
When installing the Client (CT) after selecting " Monitoring the printing of local printer only " for the print server, the user ID used in the print client (CT) should also be registered on the print server. If not, the user ID of print log will be output as follows:
When user authority is only set to the user ID being used in the print client (CT), User ID of the log will be collected as Guest.
When requesting to log on to the log server as an Administrator during print, User ID of the log will be collected as Administrator.
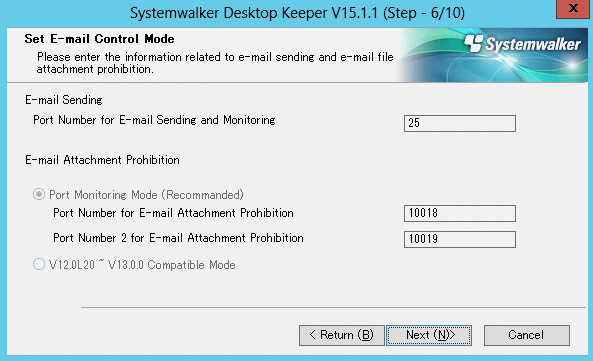
When "Set E-mail Control Mode" window is displayed, set the mode for E-mail attachment prohibition, and click the Next button.

Port Number for E-mail Sending and Monitoring: when selecting port monitoring mode, enter the port number for the communication between the Client (CT) and SMTP server.
Port Monitoring Mode (Recommended): this is selected when using the prohibition function based on the driver for E-mail attachment prohibition. Set this setting as default one.
When upgrading from V13.0.0 or earlier, select E-mail attachment prohibition under the port monitoring mode in case the prohibition to be the same as that of V13.0.0 or earlier if it has not set.
Port Number for E-mail Attachment Prohibition: when selecting port monitoring mode, enter the port number for internal use in E-mail attachment prohibition processing. In case of Base Edition, this cannot be specified.
Port Number 2 for E-mail Attachment Prohibition: when selecting port monitoring mode, enter the port number for internal use in E-mail attachment prohibition processing. In case of Base Edition, this cannot be specified.
V12.0L20-V13.0.0 Compatible Mode: this is selected when using the prohibition function based on the pattern of V13.0.0 or earlier. During the version upgrade from V13.0.0 or earlier, specify only when the same prohibition is required. In case of Base Edition, this cannot be specified.
Note
Notes when setting E-mail attachment prohibition mode
In the case of Windows Vista(R), Windows Server(R) 2008, Windows(R) 7, Windows(R) 8, Windows(R) 10 or Windows Server(R) 2012, only the port monitoring mode can be selected as the E-mail attachment prohibition mode.
For the port for E-mail attachment prohibition, make sure to specify a port not used in other processing and communication.
When performing version/edition upgrade from the following versions to V15.1.0, after installing "E-mail Sending Log Acquisition Function", the function cannot operate before rebooting:
BEV12.0L20
SEV12.0L20
BEV13.0.0 /SEV13.0.0
When performing version upgrade from the following versions to V15.1.0, before rebooting, the version before version upgrade operates well:
BEV13.2.0 /SEV13.2.0
V14.2.0
When the "Creation Settings of File Export Utility Icon" window is displayed, set whether to create the icon of File Export Utility and click the Next button. Start installation.
Create in Desktop: This is selected when creating the File Export Utility icon on the desktop.
Create in the Send to Menu: This is selected when creating the File Export Utility icon in the Send to menu.
The Update is completed window will be displayed after completing normally.
Restart the operating system when using the program. Select either of the following items and click the Finish button:
Yes, restart the computer immediately.
No, restart the computer later.