This section describes an example configuration procedure of the network shown in the diagram below.
For configuring the SURE, refer to the SURE manual.
The dotted line indicates that the interface is inactive.
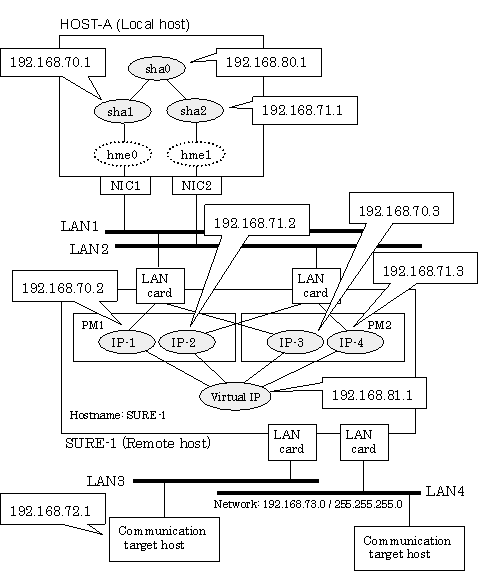
[HOST-A]
1) Setting up the system
1-1) Define IP addresses and hostnames in /etc/inet/hosts file.
192.168.70.1 host11 # HOST-A Virtual IP (mode:n) 192.168.71.1 host12 # HOST-A Virtual IP (mode:n) 192.168.80.1 hosta # HOST-A Virtual IP (mode:c) 192.168.70.2 sure11 # SURE-1 Physical IP (1) 192.168.71.2 sure12 # SURE-1 Physical IP (2) 192.168.70.3 sure13 # SURE-1 Physical IP (3) 192.168.71.3 sure14 # SURE-1 Physical IP (4) 192.168.81.1 surea # SURE-1 Virtual IP (1) 192.168.81.2 sureb # SURE-1 Virtual IP (2) |
1-2) Create /etc/notrouter file as an empty file.
1-3) Define the subnet mask in /etc/inet/netmasks file.
192.168.70.0 255.255.255.0 192.168.71.0 255.255.255.0 192.168.80.0 255.255.255.0 192.168.81.0 255.255.255.0 |
2) Reboot
Run the following command and reboot the system.
/usr/sbin/shutdown -y -i6 -g0
3) Creation of virtual interface
/opt/FJSVhanet/usr/sbin/hanetconfig create -n sha1 -m n -i 192.168.70.1 -t hme0
/opt/FJSVhanet/usr/sbin/hanetconfig create -n sha2 -m n -i 192.168.71.1 -t hme1
/opt/FJSVhanet/usr/sbin/hanetconfig create -n sha0 -m c -i 192.168.80.1 -t sha1,sha2
4) Setting the Communication target monitoring function
/opt/FJSVhanet/usr/sbin/hanetobserv create -n SURE-1 -i 192.168.81.1 -t 192.168.70.2:1,192.168.71.2:1,192.168.70.3:2,192.168.71.3:2 -m on -r on
5) Setting the TCP relay function
/opt/FJSVhanet/usr/sbin/hanetobserv create -i 192.168.81.1 -c 192.168.72.1,192.168.73.0:255.255.255.0
6) Activation of virtual interface
/opt/FJSVhanet/usr/sbin/strhanet