In order to re-build the project as a true control, you need to change the File Type property of the module from "0 - Execute Module" to "1 - DLL Module".
Make this change now by selecting the properties for the MyClock module and changing the File Type property to "1- DLL Module".
You will notice that a new icon will appear to the right of the module name that looks like a gear. It signifies that this module is a component or control module.
Since you are going to register this as a control on your system, you should take the following steps to give it a meaningful name:
Select ClockForm form and right-click on it and select Properties from the context menu that appears. This will bring up ClockForm's properties.
Click on the OLE tab. In the ProgID property, enter:
MyClock.ClockForm
This will become the name of the control.
In the Description property, enter a meaningful description such as "My COBOL Clock Control".
Click on the OK button to close the properties dialog window.
Now save the project and rebuild it. You now have a control module. You must, however, perform one more step before being allowed to insert this control into another application.
You must register the control to the Windows system. You do this by right clicking on the module name (MyClock) in the Project Manager hierarchy and selecting the Register option from the pop-up menu. You should receive a message box displayed indicating that the control was registered successfully.
You cannot execute the control directly because it is a true control (you cannot execute a .DLL module in Windows). You must add this control to another project in much the same way as you add a CommandButton control to a form.
Create a new standard form project in PowerCOBOL (this will automatically close the current clock control project).
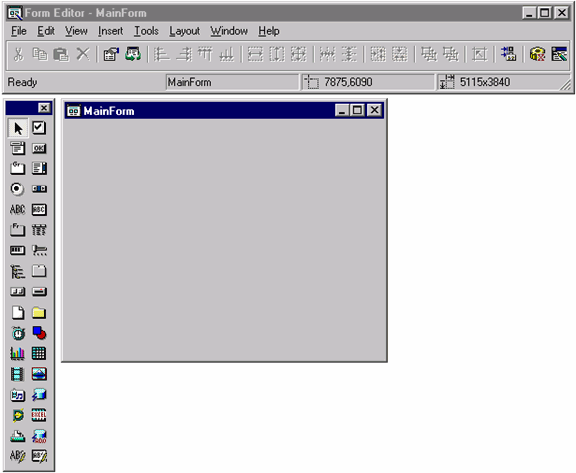
Now open the form editor on the newly created form, MainForm.
You will see the standard Toolbox palette. The clock you created exists in your Windows system as an external (custom) control that may be added into a wide variety of applications using any number of development environments.
The form editor should appear as follows:
Figure 11.10 The form editor on the new form
In order to access external custom controls available in your system, you select the Custom Controls option from the Tools menu, or click on the mini icon in the tool bar that looks like a gear or right-click on the Toolbox palette and select the Custom Control option. Go ahead and right click on the Toolbox palette and select the Custom Control option from the context menu that appears.
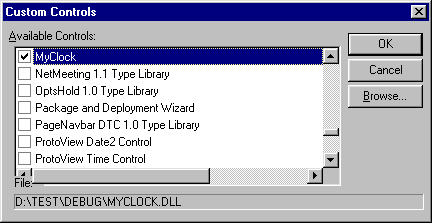
Your system should process for a few moments (it is reading the Windows Registry and creating a list of all registered controls on your system). This will present you with a list of all registered custom controls available in your system. You may typically use any of these controls within a PowerCOBOL application.
Scroll down the list in the window presented to you and find the "MyClock" control you just built and registered, and check it to select it to add to your Toolbox palette:
Figure 11.11 The Custom Controls dialog box
After clicking the OK button, you will note that a new control appears in the Toolbox palette at the bottom entitled "OCX":
Figure 11.12 The Toolbox palette with the new clock control selected

If you would like to specify the OCX icon to be another image, use the ToolboxBitmap property of the form.
You may now use the clock control just like any other control by clicking on it in the toolbox palette and dropping on your form.
Go ahead and click on the OCX icon in the toolbox palette and move over to the form and click on it to drop the control on the form.
The Clock control should appear and should begin ticking on your form. You may have to resize it to see all of it.
The Form should now appear as follows:
Figure 11.13 The new form with the clock control placed on it
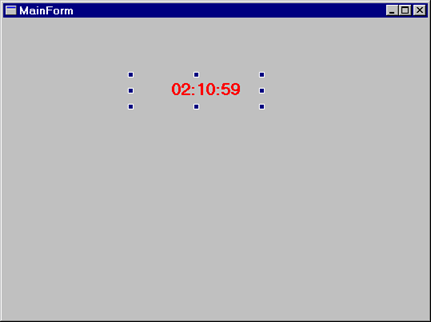
Because the background colors of the control and the new form match, you see only the time text displayed on the new form. The StaticText control on the clock control had its background color scheme set to transparent and its border turned off, so it blends in with the form.
There are a number of properties and methods of the control that are externally accessible for the control and are thus able to be manipulated at runtime from any application in which the control has been dropped into.
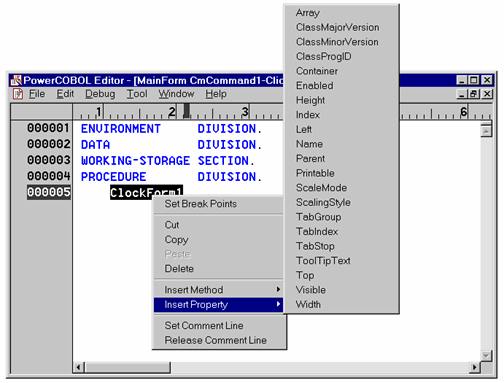
In order to determine which properties and methods are available at runtime, you enter and select the name of the control into the PowerCOBOL editor (when you are editing an event procedure, for example) and right-click on the selected control. You may then select Insert Method or Insert Property from the pop-up menu. For the clock control you have just inserted into the new form, the externally available properties are:
Figure 11.14 External Properties available for the clock control
You should now begin to realize just how powerful component level programming using controls truly is. You can drop controls into your PowerCOBOL projects from a wide variety of resources.
You may have noticed when viewing the custom controls list to find the MyClock control that there are a number of other controls available on your system.
You may now experiment with the new project you have created and dropped your external clock control onto.
When you are finished, save this project, naming it ClockTest and close it.