Start the guest domain in the multi-user mode.
# shutdown -y -g0 -i6 As the NIC, which is set to GLS and the cluster interconnects (CF), does not exist, error messages of GLS and CF appear. Ignore the messages.
Also, the following messages for the cluster resource management facility might appear, but there is no problem.
2914 A new disk device(disk ) was found.
6807 Disk device (NodeID NodeID , disk ) cannot be detected.
6836 The disk device (NodeID NodeID , disk ) has changed.
Change the network address of Web-Based Admin View.
If the IP address to be used in Web-Based Admin View is changed in the environment after the migration, see "7.1 Network address," "7.3 Management server," and "7.5 Multi-network between server and client by classified use" in the "PRIMECLUSTER Web-Based Admin View Operation Guide."
Procedure when the NICs of the cluster interconnects are different in the migration destination.
The procedure indicates as follows:
Stop CF on all nodes that constitute a cluster.
For information on how to stop CF, see "5.6 Starting and Stopping CF" in the "PRIMECLUSTER Cluster Foundation (CF) Configuration and Administration Guide."
Change the setting with the cfconfig command (execute it on all nodes that constitute a cluster).
# cfconfig -d
# cfconfig -S <CF_node_name> <Cluster_name> <Device_name> [...]
After setting CF, execute the following command to check that they have been correctly set.
# cfconfig -gStart CF on all nodes that constitute a cluster.
For information on how to start CF, see "5.6 Starting and Stopping CF" in the "PRIMECLUSTER Cluster Foundation (CF) Configuration and Administration Guide."
When executing "Load Driver," at the CF startup, clear the checkboxes of SF and GFS in the "Start CF" pop-up.
Check the CF status.
Check that all CFs are started and cluster connects are in operation in the CF main window.
Change an IP address.
When changing an IP address, change the following settings if necessary:
IP address and subnet for CIP
See "8.4 Changing a CIP Address."
When executing "Load Driver," at the CF startup, clear the checkboxes of SF and GFS in the "Start CF" pop-up.
IP address for the public LAN/administrative LAN
Change the setting with the following procedure:
Edit the /etc/inet/hosts file to change the IP address of each node.
For Solaris 11, the setting with the ipadm command is also required.
When you need to change the takeover IP address, modify the IP address to be used in the takeover IP address for the /etc/inet/hosts file of each node.
Restart the system on all nodes.
# /usr/sbin/shutdown -y -g0 -i6When the Ipaddress resource of IPv4 has been set by using the userApplication Configuration Wizard, perform the following procedure to change the takeover IP address in the resource database. When the Ipaddress resource of IPv6 is set, this procedure is unnecessary.
(1) Identify the resource of the takeover IP address to be changed in the resource database.
To identify it, use the clgettree(1) command on any one of the cluster node. The resource of the takeover IP address is the resource of the resource class name for the IP address.
Example: In the following example, the resource of the takeover IP address is the one that the resource IDs are 56 and 57.
 # /etc/opt/FJSVcluster/bin/clgettree
 Cluster 1 cluster
      Domain 2 RC2
              Shared 7 SHD_RC2
                      SHD_Host 58 config_Ipaddress0_ip1 UNKNOWN
                              IP_Address 56 hme0:1 UNKNOWN node1
                              IP_Address 57 hme0:1 UNKNOWN node2
              Node 3 node1 ON
                      Ethernet 21 hme0 UNKNOWN
                              IP_Address 56 hme0:1 UNKNOWN
                      Application 31 proc1 UNKNOWN
                      DISK 19 c0t0d0 UNKNOWN
              Node 5 node2 ON
                      Ethernet 22 hme0 UNKNOWN
                              IP_Address 57 hme0:1 UNKNOWN
                      Application 32 proc1 UNKNOWN
                      DISK 20 c0t0d0 UNKNOWN
(2) Identify the shared resource of the takeover IP address.
To identify it, use the clgettree(1) command on any one of the cluster nodes.
The shared resource of the takeover IP address is the resource of the resource class name for SHD_Host.
Example: In the example above, the shared resource of the takeover IP address is the one that the resource ID is 58.
(3) Change the takeover IP address.
Use the clsetrsc(1M) command to change it. The takeover IP address has been defined to the shared resource attribute of the one that was identified in (2) above.
Execute the clsetrsc(1M) command in the following format on each cluster node to change the takeover IP address.
# /etc/opt/FJSVcluster/sys/clsetrsc -A ip_addr=<IP_address_after_change> <Resource_ID_of_shared_resource_for_IP_address>
Example: when changing the takeover IP address of the shared resource (resource ID of the resource=58) to 10.10.10.10
# /etc/opt/FJSVcluster/sys/clsetrsc -A ip_addr=10.10.10.10 58(4) Check that the takeover IP address has been changed.
Use the clgetrsc(1) command to check it.
Execute the clgetrsc(1) command on any one of the cluster nodes in the following format to check that the takeover IP address has been changed.
# /etc/opt/FJSVcluster/sys/clgetrsc -a ip_addr IP<resource_ID_of_the_shared_resource_for_the_address>
Example: when the takeover IP address of the shared resource (resource ID of the resource=58) was changed to 10.10.10.10
# /etc/opt/FJSVcluster/sys/clgetrsc -a ip_addr 58
ip_addr 10.10.10.10
Change the SF setting in the migration destination.
Check the setting of the console asynchronous monitoring.
Execute the following command on any one of the nodes.
# /etc/opt/FJSVcluster/bin/clrccusetup -l<Execution example>
# /etc/opt/FJSVcluster/bin/clrccusetup -l
device-name cluster-host-name  IP-address host-name user-name connection-type
-----------------------------------------------------------------------------
xscf        node1              xscf2      1         xuser     ssh
xscf        node2              xscf2      1         xuser     ssh
Cancel the setting of the console asynchronous monitoring.
Specify the CF node name (cluster-host-name) displayed in 1. on any one of the nodes and execute the following command. In this procedure, all the CF node names displayed in 1. are specified.
# /etc/opt/FJSVcluster/bin/clrccusetup -d node1
# /etc/opt/FJSVcluster/bin/clrccusetup -d node2
After specifying all the CF node names on all nodes and executing the command, execute the command in 1. again to check that nothing is displayed.
# /etc/opt/FJSVcluster/bin/clrccusetup -l
#
Set the SF.
To set the SF, see "5.1.2.1 For SPARC M10."
The following values can be set here:
IP address for XSCF
IP address for the administrative LAN
Note
For the migration from SPARC Enterprise to OVM of SPARC M10, you need to add the following IP addresses:
- Asynchronous monitoring sub-LAN (server side)
- In XSCF, two IP addresses (XSCF-LAN#0/XSCF-LAN#1) and in the redundant configuration for XSCF, six IP addresses (XSCF-LAN#0/XSCF-LAN#1*2, takeover IP*2)
Delete the patrol diagnosis of userApplication.
Delete all the patrol diagnosis of userApplication. If the patrol diagnosis is not registered in the userApplication, this step is unnecessary.
# /etc/opt/FJSVcluster/bin/clspconfig -u <userApplication_name> -d
After deleting it, execute the following command to check that the settings have been deleted.
# /etc/opt/FJSVcluster/bin/clspconfig -u <userApplication_name>
<Execution example>
# /etc/opt/FJSVcluster/bin/clspconfig -u userApp_0 -d
# /etc/opt/FJSVcluster/bin/clspconfig -u userApp_0
FJSVcluster: ERROR: clspconfig: 6690: The specified userApplication or resource is not monitored. (userApplication:userApp_0)
Delete resources of the network interface card.
Use the cldelrsc command to delete resources of the network interface card.
After deleting the resources of the network interface card, execute the following command to check that no resource of the network interface card are displayed.
# /etc/opt/FJSVcluster/bin/clgettreeChange the setting of GLS.
Check that the SMF service of GLS has started with the following procedure.
# svcs -a | grep fjsvhanet
disabled       HH:MM:SS svc:/network/fjsvhanet:default
disabled       HH:MM:SS svc:/network/fjsvhanet-poll:default
If the SMF service of GLS is in "disable" state, start it.
# svcadm enable /network/fjsvhanet
# svcadm enable /network/fjsvhanet-poll
# svcs -a | grep fjsvhanet
online         HH:MM:SS svc:/network/fjsvhanet:default
online         HH:MM:SS svc:/network/fjsvhanet-poll:default
Check that the SMF service of GLS is in "online" state.
When the SMF service is started, restart the guest domain.
# shutdown -y -g0 -i6 Change the following settings on all nodes:
NIC name (such as fjgiX ->vnetX)
MAC address of the standby patrol (00:00:00:00:00:00 in the guest domain)
The following example indicates when changing the NIC used by the virtual interface sha0 from fjgi0 and fjgi2 to vnet0 and vnet1, and changing the MAC address of the standby patrol sha1 to 00:00:00:00:00:00.
How to check the setting
# /opt/FJSVhanet/usr/sbin/hanetconfig print
[IPv4,Patrol]

 Name        Hostname        Mode MAC Adder/Phys ip Interface List
+-----------+---------------+----+-----------------+-----------------------+
 sha0        192.168.0.100    d   192.168.0.1       fjgi0,fjgi2
 sha1        -                p   02:00:00:00:00:01 sha0

 Name        Hostname/prefix                   Mode Interface List
+-----------+---------------------------------+----+-----------------------+
# /opt/FJSVhanet/usr/sbin/hanethvrsc print
ifname takeover-ipv4 takeover-ipv6
+----------+----------------+----------------------------------------------+
sha0:65 192.168.0.100 -How to delete the takeover virtual interface temporarily
# /opt/FJSVhanet/usr/sbin/hanethvrsc delete -n sha0:65
hanet: 00000: information: normal end.
# /opt/FJSVhanet/usr/sbin/dsphanet
[IPv4,Patrol]
Name Status Mode CL Device
+----------+--------+----+----+------------------------------------------------+
sha0 Inactive d OFF fjgi0(OFF),fjgi2(OFF)
sha1 Inactive p OFF sha0(OFF)
[IPv6]
Name Status Mode CL Device
+----------+--------+----+----+------------------------------------------------+[Supplement]
Use the dsphanet command to check that Status is Inactive.
When the virtual interface, which Status is Active, exists, use the stphanet -n shaX command to inactivate the virtual interface. The virtual interface to be inactivated is the one that Mode is "d," "e," or "c."
How to change the setting
# /opt/FJSVhanet/usr/sbin/hanetconfig modify -n sha0 -t vnet0,vnet1
hanet: 00000: information: normal end.
# /opt/FJSVhanet/usr/sbin/hanetconfig modify -n sha1 -a 00:00:00:00:00:00
hanet: 00000: information: normal end.
# /opt/FJSVhanet/usr/sbin/hanethvrsc create -n sha0
hanet: 00000: information: normal end.
How to check the setting
# /opt/FJSVhanet/usr/sbin/hanetconfig print
[IPv4,Patrol]

 Name        Hostname        Mode MAC Adder/Phys ip Interface List
+-----------+---------------+----+-----------------+-----------------------+
 sha0        192.168.0.100    d   192.168.0.1       vnet0,vnet1
 sha1        -                p   00:00:00:00:00:00 sha0

[IPv6]

 Name        Hostname/prefix                   Mode Interface List
+-----------+---------------------------------+----+-----------------------+
# /opt/FJSVhanet/usr/sbin/hanethvrsc print
ifname takeover-ipv4 takeover-ipv6
+----------+----------------+----------------------------------------------+
sha0:65 192.168.0.100 -See
For information on how to change IP address, see "PRIMECLUSTER Global Link Services Configuration and Administration Guide: Redundant Line Control Function."
Remove a shared class forcibly.
Delete the class resources.
# /etc/opt/FJSVsdx/bin/sdxdcrsc -R -c class01
# /etc/opt/FJSVsdx/bin/sdxdcrsc -R -c class02
If a message indicating that there is no resource, ignore the message and proceed to the next step.
Modify the disk resource attribute.
# /etc/opt/FJSVsdx/bin/sdxpdrsc -R -d c0t0d0
# /etc/opt/FJSVsdx/bin/sdxpdrsc -R -d c1t0d0
Modify all the attributes of physical disks registered in the class.
Specify the disk name in the following format.
cXtXdX emcpowerX mphdX mplbX ...
If a message indicating that all the disks have been modified, ignore the message and proceed to the next step.
Check that the shared class has been deleted.
# sdxinfo -c class01
# sdxinfo -c class02
For the shared class, check it on all nodes in a cluster scope.
Delete resources of a shared disk device.
Use the cldeldevice command to delete resources of the registered shared disk device.
# /etc/opt/FJSVcluster/bin/cldeldevice -a
After deleting resources, execute the following command to check that no resources of the deleted shared disk device are displayed.
# /etc/opt/FJSVcluster/bin/clgettreeRegister resources again (clautoconfig).
# /etc/opt/FJSVcluster/bin/clautoconfig -rSet the operation for the patrol diagnosis.
If the patrol diagnosis is not set, this procedure is unnecessary.
Use the clspconfig(1M) command to set the patrol diagnosis. For procedure to set it, see "6.9 Setting Up Patrol Diagnosis."
After completing the setting, execute the following command to check that the setting value is correct.
# /etc/opt/FJSVcluster/bin/clspconfig -u <userApplication_name>
<Execution example>
# /etc/opt/FJSVcluster/bin/clspconfig -u userApp_0
ACTIVE=true
INTERVAL=360
TARGET_LAN=vnet2
TARGET_DISK=c1d0
TARGET_DISK=c1d1
TARGET_DISK=c1d2
TARGET_DISK=c1d3
Convert the GDS configuration information.
If the physical disk names are different between the migration source and migration destination, convert the GDS configuration information with the following procedure. If the names are not different, this command displays the return code "0." If there are multiple classes, covert the GDS configuration information for all classes (on any one of the nodes).
Example
Change the physical disk c0t4d1 described in the configuration file /var/tmp/Class1.conf to c1d3.
# sdxconfig Convert -e replace -c class01 -p c0t4d1=c1d3 -i /var/tmp/Class1.conf -o /var/tmp/Class1.conf -e update
# echo $?
0
Restore the GDS configuration information.
If there are multiple classes, restore it for all the classes (on the node where Step 13. was performed).
# sdxconfig Restore -c class01 -i /var/tmp/Class1.conf -e chkps
# shutdown -y -i6 -g0
After restarting the system, execute the sdxinfo command to check that the shared class object in the migration source has been restored in a local class.
Local class -> shared class
Once the configuration information is restored, it is restored in the local class even the backup source is originally in the shared class.
Use the following command to restore it in a shared class. If there are multiple classes, restore the configuration information for all classes (on the node where Step 13. was performed).
# sdxvolume -F -c class01
# sdxattr -C -c class01 -a type=shared,scope=node1:node2
Use the sdxinfo command to check that types of class01 and scope have been correctly changed.
Restore the management partition information of GFS.
Re-initiate the management partition.
Execute the following command on any one of the nodes.
# sfcsetup -c -f /dev/sfdsk/class01/rdsk/controlRe-register the node configuration information in the management partition.
Execute the following command on all nodes.
# sfcsetup -a /dev/sfdsk/class01/rdsk/controlThe path name of the management partition that has been set up can be confirmed by using the sfcsetup(1M) command with the -p option.
# sfcsetup -p
/dev/sfdsk/class01/rdsk/control
The registered node configuration information can be confirmed by using the sfcsetup(1M) command without any option.
# sfcsetup
HOSTID      CIPNAME     MP_PATH
80a4f75b    node1RMS     yes
80960096    node2RMS     yes
Start the sfcfrmd daemon.
Execute the following command on all nodes.
# sfcfrmstartRestore the management partition information.
Execute the shell script _backup_file_collected which is created by the sfcgetconf(1M) command in "15.1 Backing Up the Configuration Information of GFS/GDS" on any one of the nodes.
# sh _backup_file_
get other node information start ... end
get other node information start ... end
Check that the management partition information of GFS has been restored with the sfcinfo(1M) command and the sfcrscinfo(1M) command.
# sfcinfo -a
/dev/sfdsk/class02/dsk/volume01:
FSID special                                            size  Type  mount
   1 /dev/sfdsk/class02/dsk/volume01(11500000021)        14422  META  -----
   1 /dev/sfdsk/class02/dsk/volume01(11500000021)         5116  LOG   -----
   1 /dev/sfdsk/class02/dsk/volume01(11500000021)        95112  DATA  -----

/dev/sfdsk/class02/dsk/volume02:
FSID special                                            size  Type  mount
   2 /dev/sfdsk/class02/dsk/volume02(11500000022)        14422  META  -----
   2 /dev/sfdsk/class02/dsk/volume02(11500000022)         5116  LOG   -----
   2 /dev/sfdsk/class02/dsk/volume02(11500000022)        95112  DATA  -----
   2 /dev/sfdsk/class02/dsk/volume03(11500000023)        65512  DATA  -----
# sfcrscinfo -m -a
/dev/sfdsk/class02/dsk/volume01:
FSID MDS/AC STATE S-STATE RID-1 RID-2 RID-N hostname
1 MDS(P) stop - 0 0 0 host1
1 AC stop - 0 0 0 host1
1 MDS(S) stop - 0 0 0 host2
1 AC stop - 0 0 0 host2
/dev/sfdsk/class02/dsk/volume02:
FSID MDS/AC STATE S-STATE RID-1 RID-2 RID-N hostname
2 MDS(P) stop - 0 0 0 host2
2 AC stop - 0 0 0 host2
2 MDS(S) stop - 0 0 0 host1
2 AC stop - 0 0 0 host1Mount the GFS Shared File System.
Mount the target file system.
Note
Check the entries for the GFS Shared File System (which is the line that file system type is sfcfs) in the /etc/vfstab file are valid.
If the entry has been commented out (if the line starts with "#") delete the comment of the entry.
See
For details on how to mount the GFS Shared File System, see "11.2.4 Mount" in the "PRIMECLUSTER Global File Services Configuration and Administration Guide."
Set the system disk mirroring again.
Re-set the system disk mirroring.
See
For details on the procedure, see "Chapter 7 How to Set and Cancel System Disk Mirroring Using Commands" in the "PRIMECLUSTER Global Disk Services Configuration and Administration Guide."
Change the setting of the takeover IP address.
When you use the takeover network resource, follow "8.1.3.1 Changing the Interface Used by a Resource" and set the takeover network resource again for the network interface of after performing P2V.
Set the automatic start for RMS.
When starting RMS automatically at OS startup, perform the following setting on all nodes.
How to set
# hvsetenv HV_RCSTART 1How to check
# hvsetenv HV_RCSTART
1
Check that "1" is displayed.
Enable the RMS setting. Perform this operation on any one of the nodes that constitute a cluster.
Start the userApplication Configuration Wizard.
Right-click on the icon which means Configuration on the top of the "tree view" on the left side of the screen.
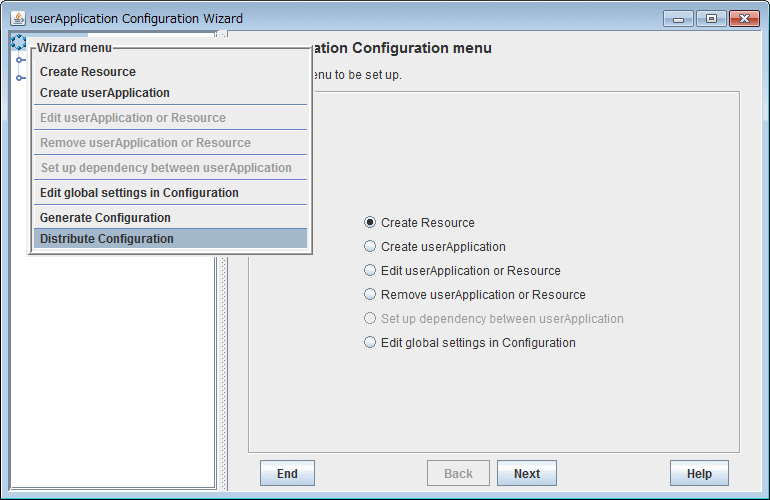
Select and left-click on "Distribute Configuration" displayed in the pull-down menu "Wizard menu."
Start RMS.
Execute the following command on all nodes to start RMS.
# hvcmCheck the RMS startup and the resource state.
Execute the following command on all nodes to check that RMS has started and the resource state.
# hvdisp -a
Local System:  node1RMS
Configuration: /opt/SMAW/SMAWRrms/build/config.us

Resource            Type    HostName            State        StateDetails
-----------------------------------------------------------------------------
node1RMS            SysNode                     Online
node2RMS            SysNode                     Online
userApp_0           userApp                     Online
Machine001_userApp_0 andOp   node2RMS
Machine000_userApp_0 andOp   node1RMS           Online
ManageProgram000_Cmdline1 gRes                  Online
ManageProgram000_Cmdline0 gRes                  Online
ManageProgram000_Cmdline2 gRes                  Online
SDISK.64            gRes                        Online
Ipaddress000_Gls0   gRes                        Online
MountPoint001_Fsystem0 gRes                     Online
MountPoint001_Fsystem1 gRes                     Online
MountPoint001_Fsystem2 gRes                     Online
Zpool000_Fsystem2   gRes                        Online
AllDiskClassesOk_Gds0 andOp                     Online
class01_Gds0        gRes                        Online