Sample 26 demonstrates a client program that uses the COBOL server program in Sample 25 with the COBOL COM client function.
For details on the COBOL COM function, refer to Chapter 24 in the "NetCOBOL User’s Guide".
Overview
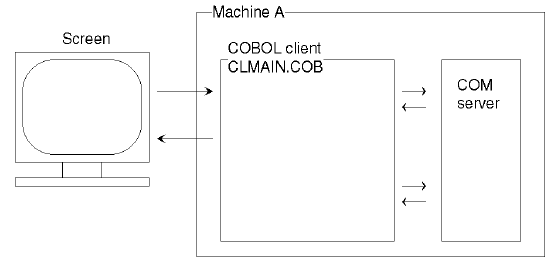
The sample program uses the COBOL server program generated in Sample 25 to create the online store application. The client program accepts data input on the screen by using the screen operation function and requests the server program to process the accepted data. The result of the server program processing is displayed on the screen.
Available Programs
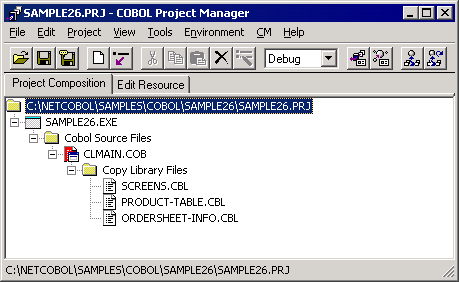
CLMAIN.COB (COBOL source program)
ORDERSHEET-INFO.CBL (COBOL library file)
PRODUCT-TABLE.CBL (COBOL library file)
SCREENS.CBL (COBOL library file)
SAMPLE26.PRJ (Project file)
SAMPLE26.CBI (compiler option file)
Applicable COBOL Functions
Screen function
COM client function
*COM-ARRAY class
Applicable COBOL Statements
The ACCEPT (screen function), DISPLAY (screen function), EVALUATE, INVOKE, IF, PERFORM, and SET statements are used.
Operations Necessary Before Executing the Program
When a COM sever in a remote network-connected machine is used, install the server information in the machine where this program is to be executed as follows:
Generate a client information installation program in the machine where the COM server is registered. For details on generation of the data, refer to the section "Installation in the Client Machine" in the "NetCOBOL User’s Guide".
Execute the client information installation program on the machine where this program is to be executed. If this program is to be executed on the same machine as the COM server, this operation is unnecessary.
Building and Rebuilding
The Project Manager's build function is used to compile and link this program.
In the following screen snapshots, it is assumed that NetCOBOL was installed in folder C:\NetCOBOL. Change the folder name C:\NetCOBOL to the name of the folder where NetCOBOL is installed on your machine.
Start the Project Manager.
Open the project file SAMPLE26.PRJ.
Select the project file and select "Compiler Options" from the "Project-Option" menu.
The "Compiler Options" dialog is displayed.
Click the COM Server button in the "Compiler Options" dialog.
The "COM Server" dialog is displayed.
Specify STORESV1.DLL (type library) for COM server name STORESV1. Check the entry, then click the OK button.
The "Compiler Options" dialog is redisplayed. Click the OK button to redisplay the Project Manager window.
Select "Build" from the "Project" menu.
After build termination, check that SAMPLE26.EXE is created.
Configuring the Server Program Execution Environment
Select "Run-time Environment Setup Tool" from the "Tools" menu of the Project Manager.
The run-time environment setup tool is displayed.
Select "Open" on the "File" menu and create an object initialization file (COBOL85.CBR) in the folder that contains the executable program (SAMPLE26.EXE).
Select the Common tab and enter data as shown below:
Specify "(80,27)" in the environment variable information @ScrnSize (logical screen size in screen operation).

If the COBOL client program is executed on the same machine as the server program, also set the server program execution environment information by specifying the ODBC information file name in environment variable information @ODBC_Inf (ODBC information file specification).
Click the Apply button.
The data is saved in the object initialization file.
Select "Exit" on the "File" menu to terminate the run-time environment setup tool.
Executing
Select "Execute" on the "Project" menu.
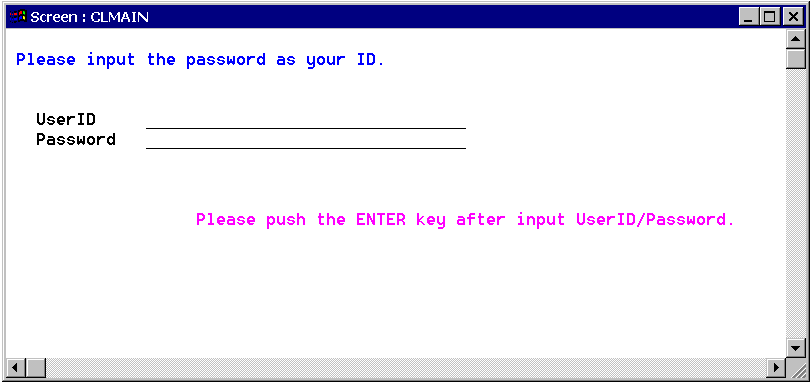
The screen shown below is displayed. Input the user ID and password and press the ENTER key (use the CURSOR or TAB key to move among the input fields). Valid user IDs are USER0001 to USER0010 and the password is the same as the user ID. Note that the entered password is not displayed.
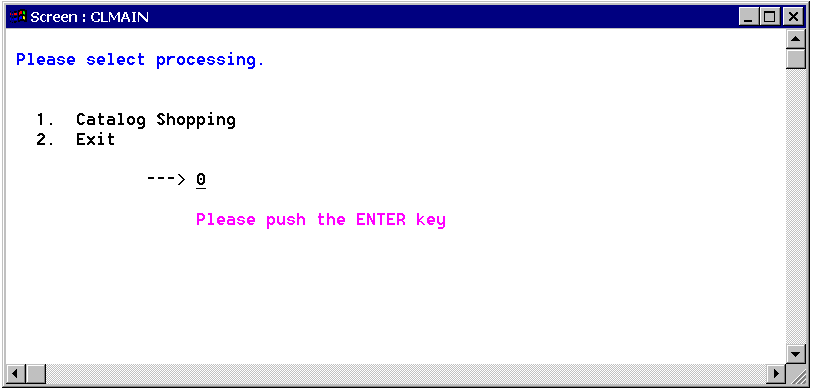
The menu screen is displayed. Input "1" and press the ENTER key.
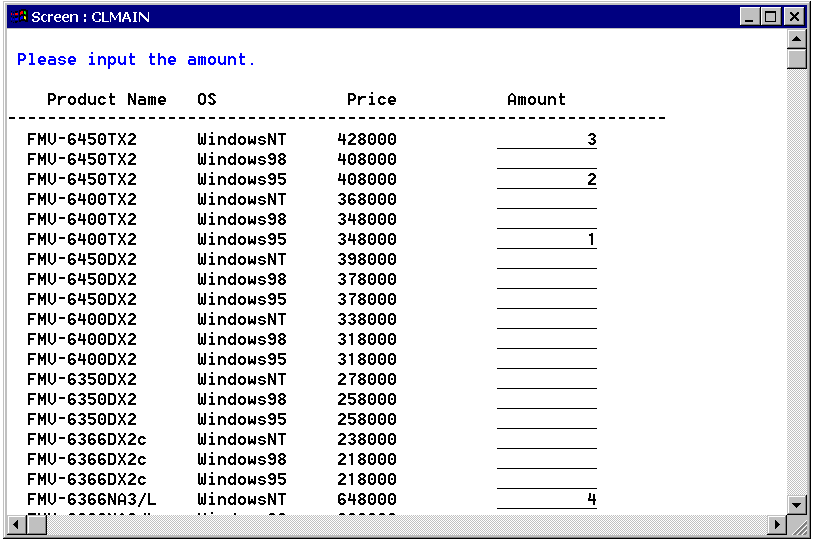
The catalog screen is displayed. Input the number of items to be ordered. Use the CURSOR or TAB key to move among the input fields. After entering the data, press the ENTER key.
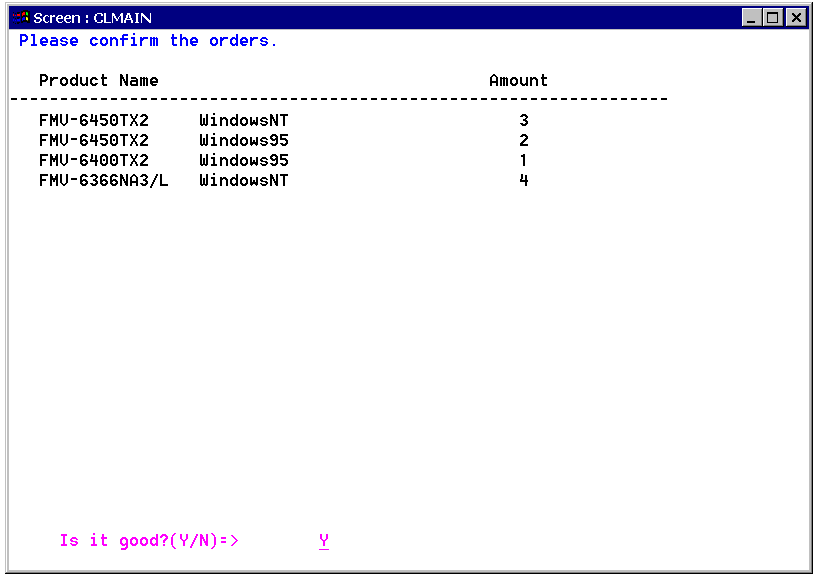
The order check screen is displayed. Input "Y" and press the ENTER key.
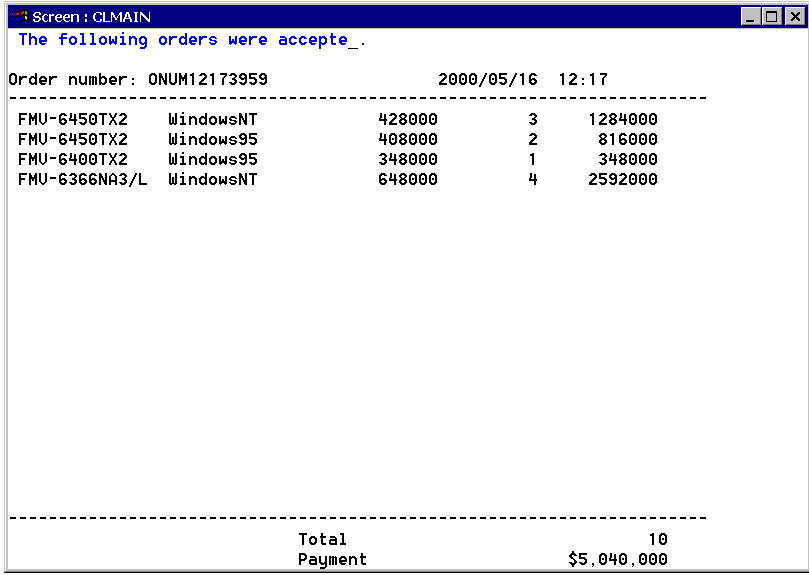
The order list screen is displayed. The (2) menu screen is redisplayed when the ENTER key is pressed.
To terminate the processing, input "2" on the menu screen and press the ENTER key.