Sample 14 demonstrates Visual Basic calling COBOL by using a simple automatic teller machine (ATM) bank account handling example.
Operating this program requires Visual Basic version 5.0 or later.
Overview
The sample program performs the following account functions:
Opening a new account
Depositing funds
Withdrawing funds
The account data, comprising account number, PIN number, name and balance, is saved in an indexed file.
The structure of the indexed file is:
Account number 9(5) *> (This is the primary record key.)
Password 9(4)
Name X(12)
Deposit 9(9)
When functions are requested from the “ATM terminal” (user screens), the record data for the account in the indexed file is updated.
Files Included in Sample 14
SAMPLE14.EXE (Visual Basic executable file)
SAMPLE14.VBP (Visual Basic project file)
SAMPLE14.BAS (Visual Basic standard module)
SAMPLE14.FRM (Visual Basic form module)
The main window for the “ATM terminal” processing.
SINKI.FRM (Visual Basic form module)
Dialog for opening a new account.
SINKCHK.FRM (Visual Basic form module)
Displays the assigned account number for a new account.
SELE.FRM (Visual Basic form module)
Account-handling dialog - shows account number, name and balance, and offers the withdrawal and deposit functions.
NYUKIN.FRM (Visual Basic form module)
Dialog for performing a deposit.
SYUKIN.FRM (Visual Basic form module)
Dialog for performing a withdrawal.
ERROR_H.FRM (Visual Basic form module)
Error message box.
K_KEN.COB (COBOL source program)
Retrieves accounts by account number.
K_SIN.COB (COBOL source program)
Opens a new account.
K_NYU.COB (COBOL source program)
Adds money deposited to an account.
K_SYU.COB (COBOL source program)
Subtracts money withdrawn from an account.
Processing Overview
The Visual Basic application starts, and subroutine JMPCINT2 (which initializes the COBOL run-time system) is called when the main form is loaded.
The Visual Basic forms manage the interface with the user - accepting input data, transaction requests and displaying output data and messages. COBOL programs are called to manage the account data in the indexed file.
When the Visual Basic application is closed, it calls subroutine JMPCINT3 (which terminates the COBOL run-time).
Following figure shows the structure of the application:

COBOL Statements used in Sample 14
The MOVE, IF, PERFORM, COMPUTE, OPEN, READ, WRITE, REWRITE, CLOSE and EXIT statements are used.
COBOL Run-time System Subroutines
The following routines are used to initialize and terminate the COBOL run-time system.
JMPCINT2
JMPCINT3
Building/Rebuilding the Program
Project manager's build function is used to create the executable program.
In the following screen snapshots, the sample program was installed to C:\NetCOBOL. Your installation folder may be different.
The project manager is started, and project file "SAMPLE14.PRJ" is opened.
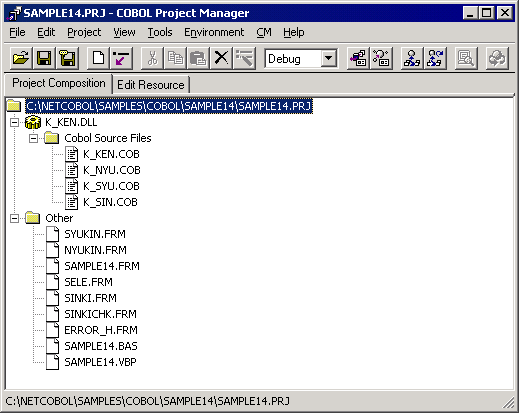
The project file is selected, and "Linker options" is selected from "Project"-"Options" menu.
The "Linker options" dialog is displayed.
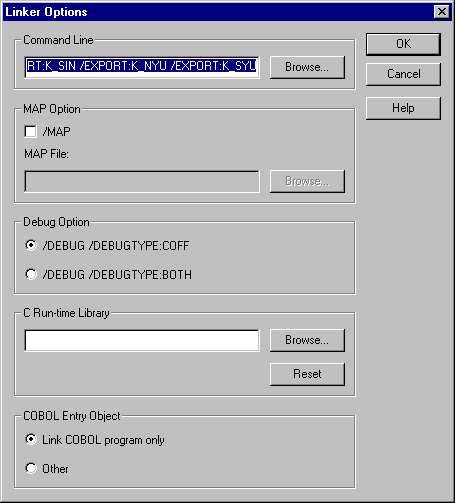
"/EXPORT:K_KEN /EXPORT:K_SIN /EXPORT:K_NYU /EXPORT:K_SYU" is specified for the "Command line" editing box. After confirms it, the OK button is clicked.
You are now returned to the Project Manager window.
Select "Build" from Project Manager's "Project" menu or click on the Build button in the Project Manager toolbar.
After the build terminates, check that K_KEN .DLL is created.
When you rebuild executable file of Visual Basic, SAMPLE14.VBP (Visual Basic project file) included in the "Other" folder of the project is selected and "Edit" is selected from the project menu.
Visual Basic starts; "Make of SAMPLE14.EXE" is selected from the file menu.
Debugging the Program
Applications containing a mixture of COBOL and Visual Basic code can be debugged under the control of both the COBOL and Visual Basic debuggers. To accomplish this, follow these steps:
Select "Run-time Environment Setup Tool" from the "Tools" menu of the Project Manager.
The run-time environment setup tool is displayed.
Select "Open" on the "File" menu and select COBOL85.CBR in the folder that contains the executable program (SAMPLE14.EXE).
Select the Common tab and enter data as shown below:
For the environment variable @CBR_ATTACH_TOOL, specify TEST.
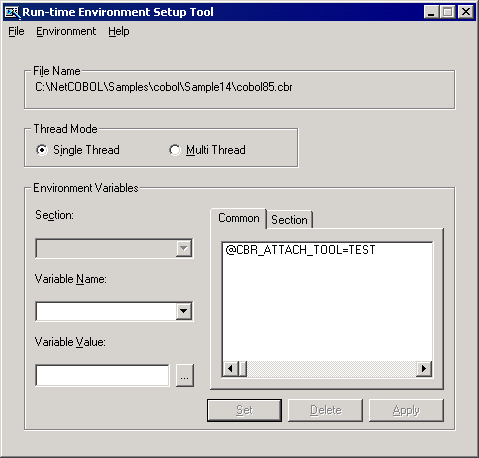
Click the Apply button.
The data is saved in the object initialization file.
Select "Exit" on the "File" menu to terminate the run-time environment setup tool.
Start Visual Basic and load the SAMPLE14.VBP project.
Start debugging the Visual Basic code when you execute the call to SAMPLE14 (the COBOL program) the COBOL debugger is invoked so that you can continue debugging in the COBOL part of the application.
When you exit from the COBOL application control returns to the Visual Basic code.
The section “H. Debugging with Visual Basic” in Chapter 1’s Quick Tour steps through this example in some detail.
For more information on this topic, see Chapter 3, “Working with Visual Basic and COBOL” and the “NetCOBOL Debugging Guide”.
Executing the Program
To execute the program:
The first application dialog is displayed:

To work with the application click on the “New Account?” button.
The New Account Information dialog is displayed:
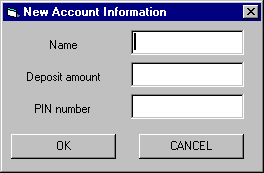
Open a new account. Type in a name (such as Alan), an amount (such as 100000) and a PIN number (such as 1234). Click the OK button.
A dialog displaying the assigned account number is displayed:
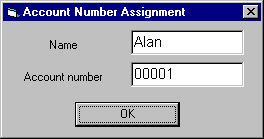
Note the account number and the PIN number you used - you will need to enter them in subsequent transactions.
Click on the OK button to return to the main Sample 14 dialog box.
You can now enter the account and PIN numbers and use the Withdrawal and Deposit functions.