Before starting the Exchange server backup, make the following preparations:
Register the hardware provider
Configure the Exchange server environment
Set up the AdvancedCopy Manager cluster
Prepare a drive letter map file
Set up the source and replica volumes
Register the hardware provider copy set
Save the hardware provider management file
Create a device definition file
Save the device definition file
Register database information
On both the business server and the backup server, execute the eternus_provider command to register the ETERNUS hardware provider. Perform this operation with the business server on all nodes that make up the cluster group.
Set up the Exchange server based on the results of the backup design.
Allocating EDB, STM, CHK, and LOG Files
Allocate the Exchange server EDB, STM, CHK, and LOG files.
Refer to "8.1.2.2 Designing Storage Groups" for details.
Installing Exchange System Management Tools
Be sure to install the Exchange server system management tools on the backup server.
If the business server has a cluster configuration, customize the Managed Server transactions at the business server.
Refer to the following manuals for transaction details:
ETERNUS SF Cluster Environment Setup Guide
The drive letter map file defines the drive letters (or mount points) to be assigned to the shadow copies (ie, backup volumes).
Create a drive letter map file with the following file name on the backup server:
<Environment directory>\etc\repl\data\EXDMAP.INI |
An example of the settings in the drive letter map file is shown below.
[DRVMAP] g1d1p1=F: g1d2p1=C:\mnt |
During backup processing, a drive letter is assigned to a backup volume based on the settings in the drive letter map file.
The drive letter assignment is not performed if there is no drive letter defined in the drive letter map file, or if the file contains a setting error (e.g., the relevant drive letter is in use, or an invalid directory is specified for a mount point, etc.)
Complete the following additional steps when performing the operations explained in "7.4 Preparations":
Register all the transaction volumes (those to which files with *.edb, *.stm, *.log, and *.chk extensions are allocated) and their backup volumes as replica volumes.
Set the transaction volumes as source volumes and the backup volumes as replica volumes. (Do not reverse the source and replica volumes.)
Set the business server (the source volume server) as an operation server (by specifying "ORG" or "BOTH" as an argument of the -o option in the replication volume information configuration command (swsrpsetvol)).
Do not specify the -u option because the restoration needs to be performed.
Specify a partition (gXdYpZ) for volume name. Do not specify a LUN (gXdY).
Execute the copy set registration command on the business server to register the relationship between transaction disks and backup disks. Execute the command in the primary node making up the cluster group.
Example:
C:\>C:\Win32app\AdvancedCopyManager\bin\eternus_copyset -set -o g1d1@ EXCHG-SVR -t g1d11@BKUP-SVR -c QOPC -g BK1 eternus_copyset set successfully completed. C:\> |
Save the hardware provider management files in case of emergency. The files to be saved are as follows:
<AdvancedCopy Manager shared-data shared-disk drive>:\etc\opt\swstorage\etc\prov_copyset.ini
<Environment directory>\etc\prov_copyset.ini
Create a device definition file on the backup server according to the following procedure:
Confirm the OLU number and physical device number of the copy destination device.
Execute the eternus_getolu command to confirm the OLU number and physical device number of the copy destination device.
Confirm the device instance IDs of all copy destination devices.
Confirm the device instance IDs as follows:
Start Computer Management.
Click Start > Management Tool > Computer Management.
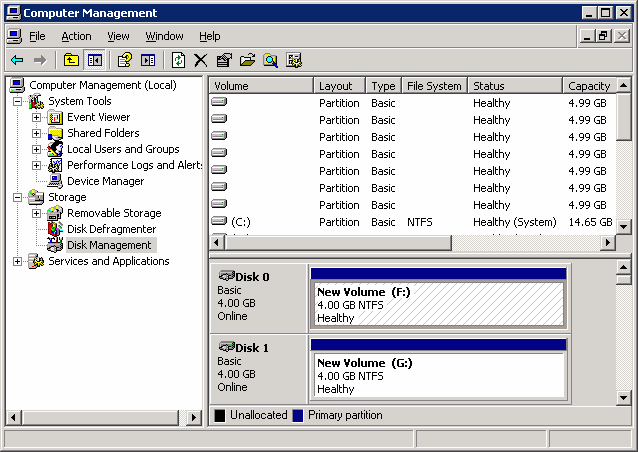
Click Disk Management from Computer Management to display the properties of the device subject to a backup. Confirm the location (Bus Number, Target ID, LUN).
From Computer Management, click Device Manager > Disk Drive to display the disk drives.
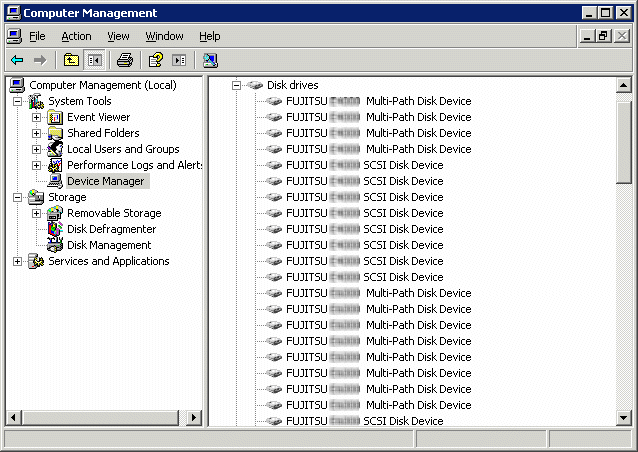
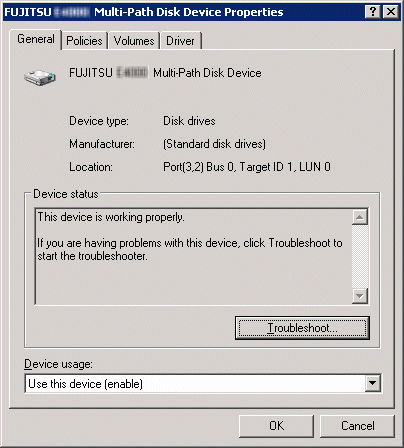
Select Disk Device (such as FUJITSU **** Multi-Path Disk Device) from [Disk Drive] to confirm the device subject to a backup.
Select Disk Device (such as FUJITSU **** Multi-Path Disk Device) and right-click, and then select Properties. Confirm that the Disk Device for which the location (Bus Number, Target ID, LUN) confirmed in b) of step 2 matches the location (Bus Number, Target ID, LUN) indicated in the displayed Properties.
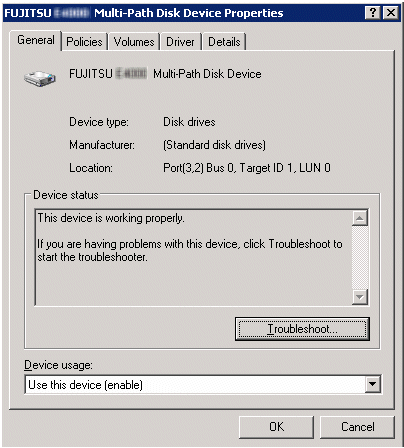
When the location that was confirmed in b) of step 2 matches a location confirmed in d) of step 2, select Detail to confirm the device instance ID.

Save the combination of the physical disk number and the device instance ID confirmed in point e) of step 2 to a text file.
The device instance ID can be displayed by executing the eternus_getins command.
Create a device definition file.
Create a device definition file using a combination of the destination device OLU number confirmed in step 1 and the device instance ID confirmed in step 2.
Name the following device definition file with notepad:
<Environment directory>\etc\eternus_hardope.def |
Enter the combination of OLU number and the device instance ID in one line in the format below.
OLU number, device instance ID <Enter> |
Example:
53,MPIO\DISK&VEN_FUJITSU&PROD_E8000&REV_0000\1&7F6AC24&0&4538393053323041232323232020202020203641303030323330333033330000 54,MPIO\DISK&VEN_FUJITSU&PROD_E8000&REV_0000\1&7F6AC24&0&4538393053323041232323232020202020203641303030323330333033330001 55,MPIO\DISK&VEN_FUJITSU&PROD_E8000&REV_0000\1&7F6AC24&0&4538393053323041232323232020202020203641303030323330333033330002 56,MPIO\DISK&VEN_FUJITSU&PROD_E8000&REV_0000\1&7F6AC24&0&4538393053323041232323232020202020203641303030323330333033330003 57,MPIO\DISK&VEN_FUJITSU&PROD_E8000&REV_0000\1&7F6AC24&0&4538393053323041232323232020202020203641303030323330333033330004 58,MPIO\DISK&VEN_FUJITSU&PROD_E8000&REV_0000\1&7F6AC24&0&4538393053323041232323232020202020203641303030323330333033330005 |
To ensure that this file is not lost, save the device definition file of the backup server.
Save the following file:
<Environment directory>\etc\eternus_hardope.def |
Register Exchange Server database information in the management file using the swsrpdbinfo_exchange command. Before backing up or restoring the Exchange Server databases, execute this command on the business server to perform an initialization. Additionally, execute this command after any change has been made to the Exchange Server configuration.
Example: This example stores the database information of the storage group FirstStorageGroup. Execute the command from the business server (EXCHG-SVR).
C:\>set SWSTGNODE=nodeAGT C:\>C:\Win32App\AdvancedCopyManager\bin\swsrpdbinfo_exchange -evs VSVR -sgname FirstStorageGroup swsrpdbinfo_exchange successfully completed C:\> |
If the business server is a non-clustered system, an Advanced Copy control disk (Access volume) must be created for the business server.
This section is not required for clustered system because the shared disk for AdvancedCopy Manager shared data is used as the Access volume.
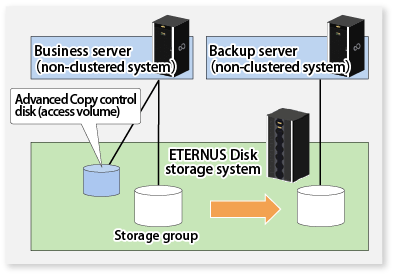
The following table shows the procedures for creating an Advanced Copy control disk.
No | Procedure | Tasks |
|---|---|---|
1 | Create a logical unit | Create a logical unit in the same disk array as the backup target Exchange Server database. The logical unit can be any size. (Since the AdvancedCopy control disk does not depend on the size of the disk, it can be created with the minimum size.) |
2 | Connect to host | Connect the created logical unit to the host. Refer to the ETERNUS Disk storage system manual for the connection procedure. |
3 | Create partitions | Create a partition in the logical unit (disk) that has been connected to the host (server). |
4 | Assign a drive letter | Assign a drive letter to the partition created in step 3. |
5 | Create a file system | Format the partition created in step 3 as NTFS. |
After the Advanced Copy control disk is created, create a new Access volume definition file under the following filename on the business server:
<Environment directory>\etc\eternus_accdrv.ini |
The format for the Access volume definition file is as follows:
Drive=<drive letter> |
The following example show an Access volume definition file entry (if the drive letter is E):
Drive=E |