This section describes how to set the PCI Hot Plug for redundant PCI.
For the procedure for setting up the PCI Hot Plug provided by PRIMEQUEST, see the following manuals:
PRIMEQUEST 480/440 Operation Manual
PRIMEQUEST 500A/500/400 SERIES REFERENCE MANUAL
PRIMEQUEST 1000 Series Administration Manual
Note
Be sure to check the hot replacement procedure in the latest manual before performing hot maintenance for NIC.
The following table shows what active operation is enabled through PCI Hot Plug.
Mode | System configuration | PCI Hot Plug | ||
|---|---|---|---|---|
Add | Remove | Swap | ||
Fast switching mode | Single system | A | A | A |
Cluster system | B (*1) | B (*2) | A | |
NIC switching mode | Single system | A | A | A |
Cluster system | B (*1) | B (*2) | A | |
GS linkage mode | Single system | N | N | A |
Cluster system | N | N | A | |
[Meaning of the symbols]
A: Active maintenance is enabled when GLS is running
B: Active maintenance is enabled when GLS is stopped
N: Not supported
Add NIC.
For details, see the manuals for PRIMEQUEST.
Add the configuration for virtual interfaces.
For details, see "5.2.1 Adding configuration".
Delete virtual interfaces.
For details, see "5.2.3 Deleting configuration".
Delete NIC.
For details, see the manuals for PRIMEQUEST.
Note
The hardware change detection tool (kudzu (1)) may be run when the system is rebooted after a NIC is added, removed, or swapped. In such cases, take appropriate action by following the steps below.
Operation | Action for Kudzu(8) |
|---|---|
Add | Ignore |
Remove | Keep Configuration |
Swap | Keep Configuration, and then Ignore |
kudzu (8) displays a window for specifying whether to add device information for the added NIC to the system. From [Configure], [Ignore], and [Do Nothing], select [Ignore].
kudzu (8) displays a window for specifying whether to delete the device information for the removed NIC from the system. From [Remove Configuration], [Keep Configuration], and [Do Nothing], select [Keep Configuration].
kudzu (8) displays a window to specify whether to delete the device information for the removed NIC from the system . Keep the device information on the system for added NICs. From [Remove Configuration], [Keep Configuration], and [Do Nothing], select [Keep Configuration]. kudzu (8) then displays a window to specify whether to add the device information for the NIC added to the system. From [Configure], [Ignore], and [Do Nothing], select [Ignore].
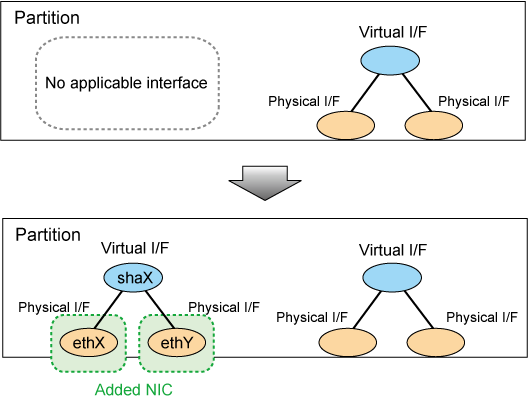
This section describes the procedure for adding NICs and creating a virtual interface to make the added NICs redundant.
Figure 6.1 Addition of a virtual interface for making the added NICs (ethX,ethY) redundant
For a Fast switching mode
Confirm that the PCI Hot Plug driver is installed.
If the PCI Hot Plug driver is not installed, install it according to the manuals for PRIMEQUEST.
PRIMEQUEST 1000 series
Confirmation procedure
# lsmod | grep pciehp pciehp 75093 0 |
Installation procedure
# /sbin/modprobe pciehp |
PRIMEQUEST 500A/500/400 series
Confirmation procedure
# lsmod | grep shpchp shpchp 203816 0 |
Installation procedure
# /sbin/modprobe shpchp |
Make sure that power to the target PCI slot is off.
For details, see the manuals for PRIMEQUEST. Note that <BUS-number_slot-number> is used for RHEL5 and SLES10 instead of <slot-number>. The same applies hereafter.
# cat /sys/bus/pci/slots/"<slot-number>"/power 0 |
Add a NIC to the PCI slot.
Turn on power to the PCI slot.
For details, see the manuals for PRIMEQUEST.
# echo 1 > /sys/bus/pci/slots/"<slot-number>"/power |
Check the hardware address.
An interface (ethX) is created for the added NIC when power is turned on. Execute the ifconfig (8) command to check the hardware address of the added NIC (HWaddr). To add more NICs, repeat steps 2 to 5.
Perform post-addition processing.
1) The added NICs must be activated at system startup. For this purpose, make the settings shown below in each interface setting file (/etc/sysconfig/network-scripts/ifcfg-eth<x>). Specify the hardware address that was checked in Step 5 for "HWADDR". Also specify "HOTPLUG=no".
ifcfg-ethX
DEVICE=ethX BOOTPROTO=static HWADDR=XX:XX:XX:XX:XX:XX HOTPLUG=no BROADCAST=XXX.XXX.XXX.XXX IPADDR=XXX.XXX.XXX.XXX NETMASK=XXX.XXX.XXX.XXX NETWORK=XXX.XXX.XXX.XXX ONBOOT=yes TYPE=Ethernet |
ifcfg-ethY
DEVICE=ethY BOOTPROTO=static HWADDR=YY:YY:YY:YY:YY:YY HOTPLUG=no BROADCAST=YYY:YYY:YYY:YYY IPADDR=YYY:YYY:YYY:YYY NETMASK=YYY:YYY:YYY:YYY NETWORK=YYY:YYY:YYY:YYY ONBOOT=yes TYPE=Ethernet |
2) Add the added NIC to the /etc/modprobe.conf file, which allows the NIC to be associated with the driver. The following is an example of /etc/modprobe.conf.
/etc/modprobe.conf
alias eth1 e1000 alias eth2 bcm5700 alias eth3 bcm5700 alias eth4 bcm5700 alias eth5 bcm5700 alias eth6 bcm5700 alias eth7 bcm5700 alias eth8 bcm5700 alias eth9 bcm5700 alias eth10 e100 alias eth11 e100 alias scsi_hostadapter mptbase alias scsi_hostadapter1 mptscsih alias usb-controller ehci-hcd alias usb-controller1 uhci-hcd alias scsi_hostadapter2 lpfc alias ethX e1000 # Add alias ethY e1000 # Add |
3) Restore the PCI Hot Plug driver. If you have installed the PCI Hot Plug driver according to 1., execute the following command to remove it.
PRIMEQUEST 1000 series
# /sbin/modprobe -r pciehp |
PRIMEQUEST 500A/500/400 series
# /sbin/modprobe -r shpchp |
4) Activate the added NICs.
# /sbin/ifup ethX # /sbin/ifup ethY |
5) If necessary, specify subnet mask information for the virtual interface.
# /opt/FJSVhanet/usr/sbin/hanetmask create -i network_address -m netmask |
6) Make the virtual interface settings to make the NICs redundant.
# /opt/FJSVhanet/usr/sbin/hanetconfig create -n shaX -m t -i ipaddress -t ethX,ethY |
7) Activate the virtual interface.
# /opt/FJSVhanet/usr/sbin/strhanet -n shaX |
For a NIC switching mode
Confirm that the PCI Hot Plug driver is installed.
If the PCI Hot Plug driver is not installed, install it according to the manuals for PRIMEQUEST.
PRIMEQUEST 1000 series
Confirmation procedure
# lsmod | grep pciehp pciehp 75093 0 |
Installation procedure
# /sbin/modprobe pciehp |
PRIMEQUEST 500A/500/400 series
Confirmation procedure
# lsmod | grep shpchp shpchp 203816 0 |
Installation procedure
# /sbin/modprobe shpchp |
Make sure that power to the target PCI slot is off.
For details, see the manuals for PRIMEQUEST. Note that <BUS-number_slot-number> is used for RHEL5 and SLES10 instead of <slot-number>. The same applies hereafter.
# cat /sys/bus/pci/slots/"<slot-number>"/power 0 |
Add a NIC to the PCI slot.
Turn on power to the PCI slot.
For details, see the manuals for PRIMEQUEST.
# echo 1 > /sys/bus/pci/slots/"<slot-number>"/power |
Check the hardware address.
An interface (ethX) is created for the added NIC when power is turned on. Execute the ifconfig (8) command to check the hardware address of the added NIC (HWaddr). To add more NICs, repeat steps 2 to 5.
Perform post-addition processing.
1) The current NIC must be activated and the standby NIC must be deactivated at system startup. For this purpose, make the settings shown below in each interface setting file (/etc/sysconfig/network-scripts/ifcfg-eth<x>). Specify the hardware address that was checked in Step 5 for "HWADDR". Specify "HOTPLUG=no" for both NICs.
ifcfg-ethX (Primary interface)
DEVICE=ethX BOOTPROTO=static HWADDR=XX:XX:XX:XX:XX:XX HOTPLUG=no BROADCAST=XXX.XXX.XXX.XXX IPADDR=XXX.XXX.XXX.XXX NETMASK=XXX.XXX.XXX.XXX NETWORK=XXX.XXX.XXX.XXX ONBOOT=yes TYPE=Ethernet |
ifcfg-ethY (Secondary interface)
DEVICE=ethY HWADDR=YY:YY:YY:YY:YY:YY HOTPLUG=no ONBOOT=yes TYPE=Ethernet |
2) Add the added NIC to the /etc/modprobe.conf file, which allows the NIC to be associated with the driver. The following is an example of /etc/modprobe.conf.
/etc/modprobe.conf
alias eth1 e1000 alias eth2 bcm5700 alias eth3 bcm5700 alias eth4 bcm5700 alias eth5 bcm5700 alias eth6 bcm5700 alias eth7 bcm5700 alias eth8 bcm5700 alias eth9 bcm5700 alias eth10 e100 alias eth11 e100 alias scsi_hostadapter mptbase alias scsi_hostadapter1 mptscsih alias usb-controller ehci-hcd alias usb-controller1 uhci-hcd alias scsi_hostadapter2 lpfc alias ethX e1000 # Add alias ethY e1000 # Add |
3) Restore the PCI Hot Plug driver. If you have installed the PCI Hot Plug driver according to 1., execute the following command to remove it.
PRIMEQUEST 1000 series
# /sbin/modprobe -r pciehp |
PRIMEQUEST 500A/500/400 series
# /sbin/modprobe -r shpchp |
4) Change the interface names of the added NICs to the names specified in the interface setting files (/etc/sysconfig/network-scripts/ifcfg-eth<x>). Specify the same interface names and MAC addresses in the nameif (8) command as those in "DEVICE" and "HWADDR" in the ifcfg-ethX and ifcfg-ethY files that were set in 1) of step 6. When the nameif (8) command is executed, the specified interface must be deactivated.
# /sbin/nameif ethX XX:XX:XX:XX:XX:XX # /sbin/nameif ethY YY:YY:YY:YY:YY:YY |
5) If necessary, specify subnet mask information for the virtual interface.
# /opt/FJSVhanet/usr/sbin/hanetmask create -i network_address -m netmask |
6) Make the virtual interface settings to make the NICs redundant.
# /opt/FJSVhanet/usr/sbin/hanetconfig create -n shaX -m d -i ipaddress1 -e ipaddress2 -t ethX,ethY |
7) Specify hub monitoring destination information.
# /opt/FJSVhanet/usr/sbin/hanetpoll create -n shaX -p ipaddr1,ipaddr2 |
8) If necessary, set the standby patrol function.
# /opt/FJSVhanet/usr/sbin/hanetconfig create -n shaY -m p -t shaX |
9) Restart GLS to enable the changed settings. This restart also activates the virtual interface and starts its monitoring.
# /opt/FJSVhanet/usr/sbin/resethanet -s |
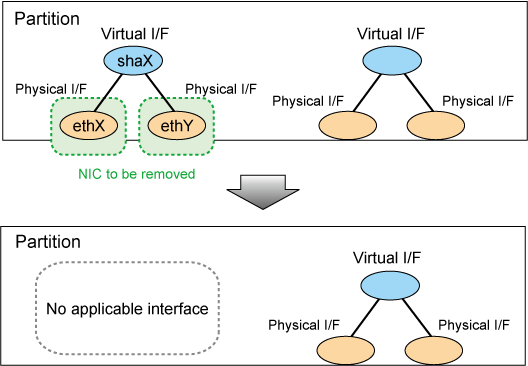
This section describes the procedure for removing NICs whose virtual interface makes them redundant.
Figure 6.2 Removing NICs whose virtual interface makes them redundant (ethX, ethY)
For a Fast switching mode
Confirm that the PCI Hot Plug driver is installed.
If the PCI Hot Plug driver is not installed, install it according to the manuals for PRIMEQUEST.
PRIMEQUEST 1000 series
Confirmation procedure
# lsmod | grep pciehp pciehp 75093 0 |
Installation procedure
# /sbin/modprobe pciehp |
PRIMEQUEST 500A/500/400 series
Confirmation procedure
# lsmod | grep shpchp shpchp 203816 0 |
Installation procedure
# /sbin/modprobe shpchp |
Prepare for removing a card.
1) Deactivate the virtual interface.
# /opt/FJSVhanet/usr/sbin/stphanet -n shaX |
2) Delete the virtual interface configuration information.
# /opt/FJSVhanet/usr/sbin/hanetconfig delete -n shaX |
3) If necessary, delete the subnet mask information about the virtual interface.
# /opt/FJSVhanet/usr/sbin/hanetmask delete -i network_address |
4) Deactivate the target NIC.
# /sbin/ifdown ethX # /sbin/ifdown ethY |
Turn off power to the target PCI slot.
The interface (ethX) is deleted when power is turned off. For details, see the manuals for PRIMEQUEST. Note that <BUS-number_slot-number> is used for RHEL5 and SLES10 instead of <slot-number>. The same applies hereafter.
# echo 0 > /sys/bus/pci/slots/"<slot-number>"/power |
Remove the NIC from the PCI slot.
To remove more NICs, repeat steps 2 to 4.
Perform post-removal processing.
1) Delete each interface setting file (/etc/sysconfig/network-scripts/ifcfg-eth<x>).
# /bin/rm /etc/sysconfig/network-scripts/ifcfg-ethX # /bin/rm /etc/sysconfig/network-scripts/ifcfg-ethY |
2) Add the added NIC to the /etc/modprobe.conf file, which allows the NIC to be associated with the driver. The following is an example of /etc/modprobe.conf.
/etc/modprobe.conf
alias eth1 e1000 alias eth2 bcm5700 alias eth3 bcm5700 alias eth4 bcm5700 alias eth5 bcm5700 alias eth6 bcm5700 alias eth7 bcm5700 alias eth8 bcm5700 alias eth9 bcm5700 alias eth10 e100 alias eth11 e100 alias scsi_hostadapter mptbase alias scsi_hostadapter1 mptscsih alias usb-controller ehci-hcd alias usb-controller1 uhci-hcd alias scsi_hostadapter2 lpfc alias ethX e1000 # Remove alias ethY e1000 # Remove |
3) Restore the PCI Hot Plug driver. If you have installed the PCI Hot Plug driver according to 1., execute the following command to remove it.
PRIMEQUEST 1000 series
# /sbin/modprobe -r pciehp |
PRIMEQUEST 500A/500/400 series
# /sbin/modprobe -r shpchp |
For a NIC switching mode
Confirm that the PCI Hot Plug driver is installed.
If the PCI Hot Plug driver is not installed, install it according to the manuals for PRIMEQUEST.
PRIMEQUEST 1000 series
Confirmation procedure
# lsmod | grep pciehp pciehp 75093 0 |
Installation procedure
# /sbin/modprobe pciehp |
PRIMEQUEST 500A/500/400 series
Confirmation procedure
# lsmod | grep shpchp shpchp 203816 0 |
Installation procedure
# /sbin/modprobe shpchp |
Prepare for removing a card.
1) Deactivate the virtual interface.
# /opt/FJSVhanet/usr/sbin/stphanet -n shaX |
2) Stop interface status monitoring.
# /bin/touch /var/opt/FJSVhanet/tmp/disable_watchif |
3) Stop hub monitoring.
# /opt/FJSVhanet/usr/sbin/hanetpoll off |
4) Delete the hub monitoring destination information.
# /opt/FJSVhanet/usr/sbin/hanetpoll delete -n shaX |
5) Delete the standby patrol function. If the standby patrol function is not used, skip this step.
# /opt/FJSVhanet/usr/sbin/hanetconfig delete -n shaY |
6) Delete the virtual interface configuration information.
# /opt/FJSVhanet/usr/sbin/hanetconfig delete -n shaX |
7) If necessary, delete the subnet mask information about the virtual interface.
# /opt/FJSVhanet/usr/sbin/hanetmask delete -i network_address |
8) Deactivate the target NIC.
# /sbin/ifdown ethX # /sbin/ifdown ethY |
Turn off power to the target PCI slot.
The interface (ethX) is deleted when power is turned off. For details, see the manuals for PRIMEQUEST. Note that <BUS-number_slot-number> is used for RHEL5 and SLES10 instead of <slot-number>. The same applies hereafter.
# echo 0 > /sys/bus/pci/slots/"<slot-number>"/power |
Remove the NIC from the PCI slot.
To remove more NICs, repeat steps 2 to 4.
Perform post-removal processing.
1) Delete each interface setting file (/etc/sysconfig/network-scripts/ifcfg-eth<x>).
# /bin/rm /etc/sysconfig/network-scripts/ifcfg-ethX # /bin/rm /etc/sysconfig/network-scripts/ifcfg-ethY |
2) Add the added NIC to the /etc/modprobe.conf file, which allows the NIC to be associated with the driver. The following is an example of /etc/modprobe.conf.
/etc/modprobe.conf
alias eth1 e1000 alias eth2 bcm5700 alias eth3 bcm5700 alias eth4 bcm5700 alias eth5 bcm5700 alias eth6 bcm5700 alias eth7 bcm5700 alias eth8 bcm5700 alias eth9 bcm5700 alias eth10 e100 alias eth11 e100 alias scsi_hostadapter mptbase alias scsi_hostadapter1 mptscsih alias usb-controller ehci-hcd alias usb-controller1 uhci-hcd alias scsi_hostadapter2 lpfc alias ethX e1000 # Remove alias ethY e1000 # Remove |
3) Restore the PCI Hot Plug driver. If you have installed the PCI Hot Plug driver according to 1., execute the following command to remove it.
PRIMEQUEST 1000 series
# /sbin/modprobe -r pciehp |
PRIMEQUEST 500A/500/400 series
# /sbin/modprobe -r shpchp |
4) Restart GLS to enable the changed settings.
# /opt/FJSVhanet/usr/sbin/resethanet -s |
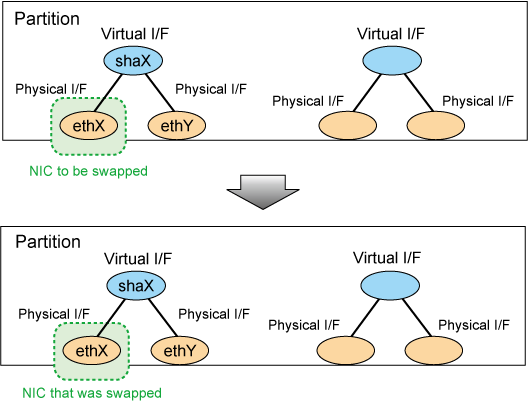
This section describes the procedure for swapping a NIC whose virtual interface makes it redundant.
Figure 6.3 Swapping a NIC whose virtual interface make it redundant (ethX)
For a Fast switching mode
Confirm that the PCI Hot Plug driver is installed.
If the PCI Hot Plug driver is not installed, install it according to the manuals for PRIMEQUEST.
PRIMEQUEST 1000 series
Confirmation procedure
# lsmod | grep pciehp pciehp 75093 0 |
Installation procedure
# /sbin/modprobe pciehp |
PRIMEQUEST 500A/500/400 series
Confirmation procedure
# lsmod | grep shpchp shpchp 203816 0 |
Installation procedure
# /sbin/modprobe shpchp |
Prepare for swapping a card.
1) From the virtual interface definition, temporarily delete the definition information about the NIC to be swapped.
# /opt/FJSVhanet/usr/sbin/hanetnic delete -n shaX -i ethX |
2) Enter the dsphanet command to confirm that the device status of the NIC is "CUT".
# /opt/FJSVhanet/usr/sbin/dsphanet
[IPv4,Patrol]
 Name       Status   Mode CL  Device
+----------+--------+----+----+------------------------------------------------+
shaX Active t OFF ethX(CUT),ethY(ON) |
3) Deactivate the NIC.
# /sbin/ifdown ethX |
Turn off power to the target PCI slot.
The interface (ethX) is deleted when power is turned off. For details, see the manuals for PRIMEQUEST. Note that <BUS-number_slot-number> is used for RHEL5 and SLES10 instead of <slot-number>. The same applies hereafter.
# echo 0 > /sys/bus/pci/slots/"<slot-number>"/power |
Swap the NIC in the PCI slot.
Backup setting files.
If you are using RHEL5 for the operating system, backup the following files.
# cp /etc/modprobe.conf /etc/modprobe.conf.bak # mv /etc/sysconfig/network-scripts/ifcfg-ethX \ /etc/sysconfig/network-scripts/ifcfg-ethX.bak |
Turn on power to the PCI slot.
For details, see the manuals for PRIMEQUEST.
# echo 1 > /sys/bus/pci/slots/"<slot-number>"/power |
Collect the current hardware information
When using RHEL5, take the following steps to collect hardware information. For details, see the manuals for PRIMEQUEST.
# /sbin/kudzu # cp /etc/modprobe.conf.bak /etc/modprobe.conf # mv /etc/sysconfig/network-scripts/ifcfg-ethX.bak \ /etc/sysconfig/network-scripts/ifcfg-ethX |
Check the hardware address.
An interface (ethX) is created for the swapped NIC when power is turned on. Execute the ifconfig (8) command to check the hardware address of the swapped NIC (HWaddr).
Perform post-swap processing.
1) Change the specified value of "HWADDR" in the interface setting file (/etc/sysconfig/network-scripts/ifcfg-eth<x>) to the hardware address of the swapped NIC that was checked in Step 6.
ifcfg-ethX
DEVICE=ethX BOOTPROTO=static HWADDR=ZZ:ZZ:ZZ:ZZ:ZZ:ZZ HOTPLUG=no BROADCAST=XXX.XXX.XXX.XXX IPADDR=XXX.XXX.XXX.XXX NETMASK=XXX.XXX.XXX.XXX NETWORK=XXX.XXX.XXX.XXX ONBOOT=yes TYPE=Ethernet |
2) Restore the PCI Hot Plug driver. If you have installed the PCI Hot Plug driver according to 1., execute the following command to remove it.
PRIMEQUEST 1000 series
# /sbin/modprobe -r pciehp |
PRIMEQUEST 500A/500/400 series
# /sbin/modprobe -r shpchp |
3) Activate the swapped NIC.
# /sbin/ifup ethX |
4) Restore the NIC definition that was temporarily deleted prior to swapping in 1) of Step 2).
# /opt/FJSVhanet/usr/sbin/hanetnic add -n shaX -i ethX |
5) Enter the dsphanet command to confirm that the device status of the swapped NIC is "ON".
# /opt/FJSVhanet/usr/sbin/dsphanet
[IPv4,Patrol]
 Name       Status   Mode CL  Device
+----------+--------+----+----+------------------------------------------------+
shaX Active t OFF ethX(ON),ethY(ON) |
For a NIC switching mode
Confirm that the PCI Hot Plug driver is installed.
If the PCI Hot Plug driver is not installed, install it according to the manuals for PRIMEQUEST.
PRIMEQUEST 1000 series
Confirmation procedure
# lsmod | grep pciehp pciehp 75093 0 |
Installation procedure
# /sbin/modprobe pciehp |
PRIMEQUEST 500A/500/400 series
Confirmation procedure
# lsmod | grep shpchp shpchp 203816 0 |
Installation procedure
# /sbin/modprobe shpchp |
Prepare for swapping a card.
1) Stop hub monitoring.
# /opt/FJSVhanet/usr/sbin/hanetpoll off |
2) Stop standby patrol monitoring. If the standby patrol function is not used, skip this step.
# /opt/FJSVhanet/usr/sbin/stpptl -n shaY |
3) Enter the dsphanet command to check the status of the NIC to be swapped. The NIC must be in a different state from that of an active NIC (the NIC must be in the "OFF" or "STOP" state). If the NIC is active, follow Step 4 to switch its state to standby.
# /opt/FJSVhanet/usr/sbin/dsphanet
[IPv4,Patrol]
 Name       Status   Mode CL  Device
+----------+--------+----+----+------------------------------------------------+
shaX Active d OFF ethX(ON),ethY(OFF) |
4) If the NIC is an active NIC, switch its state to standby. After the switch, enter the dsphanet command to confirm that the NIC is a standby NIC(OFF).
# /opt/FJSVhanet/usr/sbin/hanetnic change -n shaX |
# /opt/FJSVhanet/usr/sbin/dsphanet
[IPv4,Patrol]
 Name       Status   Mode CL  Device
+----------+--------+----+----+------------------------------------------------+
shaX Active d OFF ethX(OFF),ethY(ON) |
5) Stop interface status monitoring.
# /bin/touch /var/opt/FJSVhanet/tmp/disable_watchif |
6) Deactivate the NIC.
# /sbin/ifdown ethX |
Turn off power to the target PCI slot.
The interface (ethX) is deleted when power is turned off. For details, see the manuals for PRIMEQUEST. Note that <BUS-number_slot-number> is used for RHEL5 and SLES10 instead of <slot-number>. The same applies hereafter.
# echo 0 > /sys/bus/pci/slots/"<slot-number>"/power |
Swap the NIC in the PCI slot.
Backup setting files.
If you are using RHEL5 for the operating system, backup the following files.
# cp /etc/modprobe.conf /etc/modprobe.conf.bak # mv /etc/sysconfig/network-scripts/ifcfg-ethX \ /etc/sysconfig/network-scripts/ifcfg-ethX.bak |
Turn on power to the PCI slot.
For details, see the manuals for PRIMEQUEST.
# echo 1 > /sys/bus/pci/slots/"<slot-number>"/power |
Collect the current hardware information
When using RHEL5, take the following steps to collect hardware information. For details, see the manuals for PRIMEQUEST.
# /sbin/kudzu # cp /etc/modprobe.conf.bak /etc/modprobe.conf # mv /etc/sysconfig/network-scripts/ifcfg-ethX.bak \ /etc/sysconfig/network-scripts/ifcfg-ethX |
Check the hardware address.
An interface (ethX) is created for the swapped NIC when power is turned on. Execute the ifconfig (8) command to check the hardware address of the swapped NIC (HWaddr).
Perform post-swap processing.
1) Change the specified value of "HWADDR" in the interface setting file (/etc/sysconfig/network-scripts/ifcfg-eth<x>) to the hardware address of the swapped NIC that was checked in Step 5.
ifcfg-ethX (NIC that was swapped)
DEVICE=ethX BOOTPROTO=static HWADDR=ZZ:ZZ:ZZ:ZZ:ZZ:ZZ HOTPLUG=no BROADCAST=XXX.XXX.XXX.XXX IPADDR=XXX.XXX.XXX.XXX NETMASK=XXX.XXX.XXX.XXX NETWORK=XXX.XXX.XXX.XXX ONBOOT=yes TYPE=Ethernet |
2) Change the interface name of the swapped NIC to the name specified in the interface setting file (/etc/sysconfig/network-scripts/ifcfg-eth<x>). Specify the same interface name and hardware address in the nameif (8) command as those in "DEVICE" and "HWADDR" in the ifcfg-ethX file that was set in 1) of step 6. When the nameif (8) command is executed, the specified interface must be deactivated.
# /sbin/nameif ethX ZZ:ZZ:ZZ:ZZ:ZZ:ZZ |
3) Set the state of the swapped NIC to that of a standby NIC of GLS. Confirm that an IPv4 address is not assigned and the "UP" and "NOARP" flags are set.
# /sbin/ifconfig ethX 0 -arp up
# /sbin/ifconfig ethX
ethX      Link encap:Ethernet  HWaddr ZZ:ZZ:ZZ:ZZ:ZZ:ZZ
          inet6 addr: fe80::XXXXXXXXXXXXXXXX/64 Scope:Link
UP BROADCAST NOARP MULTICAST MTU:1500 Metric:1 |
4) If necessary, fail-back the NIC.
# /opt/FJSVhanet/usr/sbin/hanetnic change -n shaX |
5) Start standby patrol monitoring. If the standby patrol function is not used, skip this step.
# /opt/FJSVhanet/usr/sbin/strptl -n shaY |
6) Restart hub monitoring.
# /opt/FJSVhanet/usr/sbin/hanetpoll on |
7) Restart interface status monitoring.
# /bin/rm /var/opt/FJSVhanet/tmp/disable_watchif |
8) Restore the PCI Hot Plug driver. If you have installed the PCI Hot Plug driver according to 1., execute the following command to remove it.
PRIMEQUEST 1000 series
# /sbin/modprobe -r pciehp |
PRIMEQUEST 500A/500/400 series
# /sbin/modprobe -r shpchp |
For a GS linkage mode
Confirm that the PCI Hot Plug driver is installed.
If the PCI Hot Plug driver is not installed, install it according to the manuals for PRIMEQUEST.
PRIMEQUEST 1000 series
Confirmation procedure
# lsmod | grep pciehp pciehp 75093 0 |
Installation procedure
# /sbin/modprobe pciehp |
PRIMEQUEST 500A/500/400 series
Confirmation procedure
# lsmod | grep shpchp shpchp 203816 0 |
Installation procedure
# /sbin/modprobe shpchp |
Prepare for swapping a card.
1) From the virtual interface definition, temporarily delete the definition information about the NIC to be swapped.
# /opt/FJSVhanet/usr/sbin/hanetnic delete -n shaX -i ethX |
2) Enter the dsphanet command to confirm that the device status of the NIC is "CUT".
# /opt/FJSVhanet/usr/sbin/dsphanet
[IPv4,Patrol]
 Name       Status   Mode CL  Device
+----------+--------+----+----+------------------------------------------------+
shaX Active c OFF ethX(CUT),ethY(ON) |
Turn off power to the target PCI slot.
The interface (ethX) is deleted when power is turned off. For details, see the manuals for PRIMEQUEST. Note that <BUS-number_slot-number> is used for RHEL5 and SLES10 instead of <slot-number>. The same applies hereafter.
# echo 0 > /sys/bus/pci/slots/"<slot-number>"/power |
Swap the NIC in the PCI slot.
Backup setting files.
If you are using RHEL5 for the operating system, backup the following files.
# cp /etc/modprobe.conf /etc/modprobe.conf.bak # mv /etc/sysconfig/network-scripts/ifcfg-ethX \ /etc/sysconfig/network-scripts/ifcfg-ethX.bak |
Turn on power to the PCI slot.
For details, see the manuals for PRIMEQUEST.
# echo 1 > /sys/bus/pci/slots/"<slot-number>"/power |
Collect the current hardware information
When using RHEL5, take the following steps to collect hardware information. For details, see the manuals for PRIMEQUEST.
# /sbin/kudzu # cp /etc/modprobe.conf.bak /etc/modprobe.conf # mv /etc/sysconfig/network-scripts/ifcfg-ethX.bak \ /etc/sysconfig/network-scripts/ifcfg-ethX |
Check the hardware address.
An interface (ethX) is created for the swapped NIC when power is turned on. Execute the ifconfig (8) command to check the hardware address of the swapped NIC (HWaddr).
Perform post-swap processing.
1) Change the specified value of "HWADDR" in the interface setting file (/etc/sysconfig/network-scripts/ifcfg-eth<x>) to the hardware address of the swapped NIC that was checked in Step 6.
ifcfg-ethX
DEVICE=ethX BOOTPROTO=static HWADDR=ZZ:ZZ:ZZ:ZZ:ZZ:ZZ HOTPLUG=no BROADCAST=XXX.XXX.XXX.XXX IPADDR=XXX.XXX.XXX.XXX NETMASK=XXX.XXX.XXX.XXX NETWORK=XXX.XXX.XXX.XXX ONBOOT=yes TYPE=Ethernet |
2) Change the interface name of the swapped NIC to the name specified in the interface setting file (/etc/sysconfig/network-scripts/ifcfg-eth<x>). Specify the same interface name and hardware address in the nameif (8) command as those in "DEVICE" and "HWADDR" in the ifcfg-ethX file that was set in 1) of step 6. When the nameif (8) command is executed, the specified interface must be deactivated.
# /sbin/nameif ethX ZZ:ZZ:ZZ:ZZ:ZZ:ZZ |
3) Restore the NIC definition that was temporarily deleted prior to swapping in 1) of Step 2).
# /opt/FJSVhanet/usr/sbin/hanetnic add -n shaX -i ethX |
4) Enter the dsphanet command to confirm that the device status of the swapped NIC is "ON".
# /opt/FJSVhanet/usr/sbin/dsphanet
[IPv4,Patrol]
 Name       Status   Mode CL  Device
+----------+--------+----+----+------------------------------------------------+
shaX Active t OFF ethX(ON),ethY(ON) |
5) Restore the PCI Hot Plug driver. If you have installed the PCI Hot Plug driver according to 1., execute the following command to remove it.
PRIMEQUEST 1000 series
# /sbin/modprobe -r pciehp |
PRIMEQUEST 500A/500/400 series
# /sbin/modprobe -r shpchp |