The Job Execution Control can manage demand job in job folders. By registering multiple related job in a single job folder, these job can be managed. The following describes procedure to register job in job folders.
Registering job folders
The following describes how to register job folders. Up to 255 job folders can be registered.
Procedure
Creating a job folder
Create a job folder for storing demand job information in a desired local path on the server.
Setting access rights
Assign the following access rights to the job folder path to enable Systemwalker Operation Manager to browse or update the job folder.
User ID: Administrators group
Access rights: Change or full-control
User ID: All users
Access rights: Read and write
Displaying the Define Job Folder dialog box
Select Jobs from the Job Selection window of the Systemwalker Operation Manager window. Then, select Create New >> Job Folder from the File menu. The Define Job Folder dialog box will appear. Enter necessary information and click OK. The job folder name will appear under Jobs in the Job Selection window.
Figure 5.1 Define Job Folder dialog box
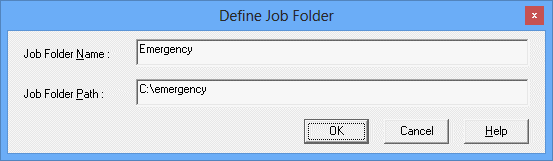
Specifies the name of the job folder.
Selects an existing file name (Windows system) or an existing directory name (UNIX system) as the target to be defined as a job folder. Specify an existing folder or directory name in the full path. [UNIX version]
Creating and registering job in job folders
The following describes procedure to create and register job in job folders.
Procedure
Displaying the Edit Job Information/Submit dialog box
Select a job folder from Jobs in the job selection window of the Systemwalker Operation Manager window. Then, select Create New >> Job File of File menu (or select Create New >> Job File from the pop-up menu displayed by right-clicking).
Figure 5.2 Edit Job Information/Submit dialog box - Basic information sheet
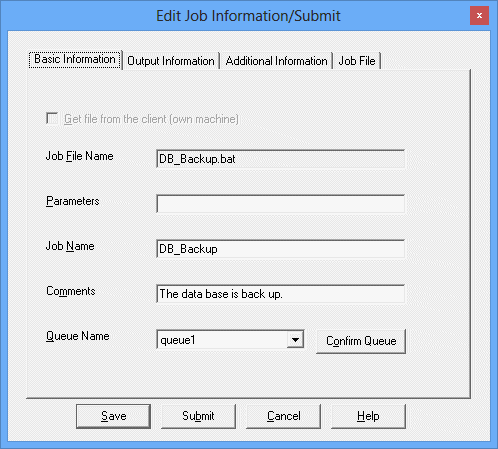
Basic information such as job file name, job name, and queue for job submission destination can be edited.
This option is available only when the Non-Folder-Managed Job is selected.
Job file names displayed vary depending on the display operations.
If this is displayed by selecting Create New >> Job File in the Select/Submit Job window, specify a job file name to be created.
If this is displayed by selecting an existing job file in the Select/Submit Job window, the name of the selected job file will be displayed.
Also, do not specify the qsub command of Job Execution Control or batch files/shell scripts calling the qsub command.
Displays the parameter to be passed to the job.
Displays the job name.
Displays the comment describing the Comments.
Displays the queue name.
Displays the Display/Operate Queues dialog box in which you can confirm the queue status.
Figure 5.3 Edit Job Information/Submit dialog box - Output Information sheet
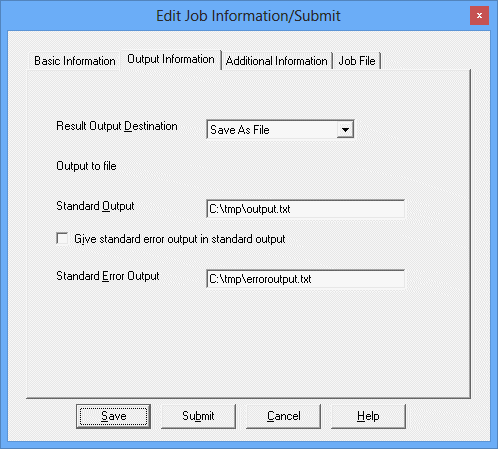
Output destination of job results, standard output files and standard error output files can be specified.
Selects whether to output the job results to files.
Save As File:
A result file will be created upon completion of job execution.
No Save:
No result file will be created. Selecting this option will disable the Save to File field.
Specifies the standard output destination file name with a full path.
When checked, standard error output will be sent to standard output. Checking this option disables the Standard Error Output input area.
Specifies the standard error output destination file name with a full path.
Figure 5.4 Edit Job Information/Submit dialog box - Additional Information sheet
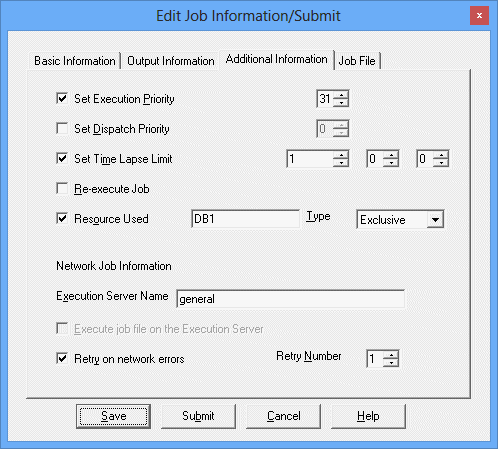
Detailed information such as execution priority ranking can be edited.
Specifies execution priority ranking within the queue.
Specifies job execution priority.
Specifies elapsed execution time limit.
Specifies whether to restart after the system shutdown.
Specifies a resource name to useSpecify it within 64 bytes. English alphanumeric characters, "_" (under bar) and "-" (hyphen) are available.
Selects a usage attribute (shared/occupied) of selected resource.
It is possible to submit a job as a network job and send an execution request to any server other than the currently-connected server. Specify a host name of another server to execute the job.
This option is available only when the Non-Folder-Managed Job is selected.
Specifies whether to retry upon a line failure during network job execution.
Specifies a retry count when the Retry after Line Failure check box is checked.
Figure 5.5 Edit Job Information/Submit dialog box - Job File sheet
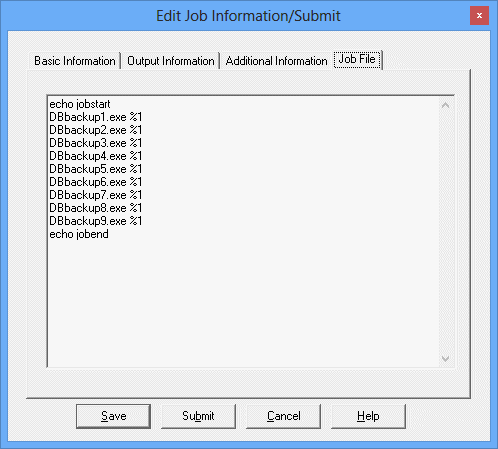
It is possible to edit job files such as batch files and JCLs (Windows system) or shell scripts and JCLs (UNIX system).
Job files displayed vary depending on the display operations.
If this is displayed by selecting Create New >> Job File in the Select/Submit Job window, edit the job file.
If this is displayed by selecting an existing job file in the Select/Submit Job window, the contents of the selected job file will be displayed.
Setting information on the job to be registered
Enter the job information to be registered and click Save.
Information
Number of jobs to be registered in a job folder
Number of jobs that can be registered in a job folder is not limited. However, more registered jobs can make management more difficult.
In Systemwalker Operation Manager, the number of jobs that can be displayed in the Select/Submit Job window is limited to 4096. Therefore, make sure the number of jobs to be registered in a job folder is up to 4096.
Information
Job execution rights [Windows version]
Normally the execution right of the submitted job belongs to the logon account of the Job Execution Control service on the server, but it is possible to grant it to the user who has actually submitted the job by environment definition (selecting Execute jobs under the respective job owner's authority in the Options sheet of the Define Operating Information window).
Executes all the jobs with the owner right.
Renaming a job folder
The following describes procedure to change a registered job folder name.
Procedure
Displaying the Rename Job Folder dialog box
Select the desired job folder from the Job Selection window of the Systemwalker Operation Manager window. Then, select Modify from the File menu (or select Modify from the pop-up menu displayed by right-clicking the mouse).
Changing the job folder name
Specify a new name in the Rename Job Folder dialog box, then click OK.
Figure 5.6 Rename Job Folder dialog box

Displays the current job folder name.
Specifies a new name.
Browsing job folder information
The following describes procedure to browse the job folder information.
Procedure
Displaying the Refer Job Folder Information dialog box
Select the desired job folder from the Job Selection window of the Systemwalker Operation Manager window. Then, select Properties from the File menu (or select Properties from the pop-up menu displayed by right-clicking).
Figure 5.7 Refer Job Folder Information dialog box
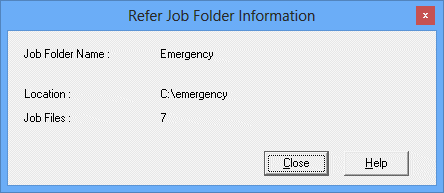
Displays the job folder name.
Displays the location where the job folder actually exists with a full path.
Displays the number of job files managed under the job folder.
Deleting a job folder
The following describes how to delete a job folder.
Procedure
Select the desired job folder from the Job Selection window of the Systemwalker Operation Manager window. Then, select Delete from the File menu.
The job folder will be deleted from the Job Selection window, but the actual folder/directory will not be deleted.