This section explains how to import and export information from a Systemwalker Operation Manager client window.
Privileges needed for execution
To import or export information, the user who connects to the Systemwalker Operation Manager server must be one of the following:
A user with administrator privileges
A system administrator (a member of the Administrators group or the superuser)
An Operation Manager user with administrator privileges [UNIX version]
A user who has update rights or change rights with respect to the project
This section explains the procedure used to import a job net definition CSV file or group definition CSV file to the Systemwalker Operation Manager server from a Systemwalker Operation Manager client window.
Point
You can define multiple items of definition information in a single job net definition CSV file or group definition CSV file. Defining multiple items of definition information in a single CSV file and thereby reducing the number of CSV files to be imported can reduce the import time.
Note
When you use batch transfer, the CSV files to be imported are transferred in a batch from a Systemwalker Operation Manager client to the Systemwalker Operation Manager server. Therefore, at least the following disk space is required:
Disk space equal to the total size of the CSV files to be imported on both the Systemwalker Operation Manager client and the Systemwalker Operation Manager server.
If the disk space is insufficient, transfer of the CSV files may fail. Therefore, using the above explanation as a guide, secure the required disk space beforehand.
You cannot include registration and change definition information in the same definition file. If a single definition file contains both registration and change definition information, the definition file will cause an error and import will be skipped.
If a definition CSV file is imported into a project that have job nets with identical names already registered, the definitions in the imported CSV file will be overwritten for each of the job nets that have identical names.
For example, if a project contains job nets named A, B and C, and three CSV files define job nets named C, D and E respectively, job net C will be overwritten and the project will end up with job nets A, B, C, D and E registered.
Only projects in the Job Selection window can be selected as an import destination. If the Master Schedule Management function is enabled, only the master project in the Job Selection window can be selected.
For nested job nets, begin importing job nets at the deepest level first. For example, if a job net structure has three levels, import the third level first, then the second level and finally the top level. An error will occur if the import process commences from a level above the deepest level.
When importing group definition CSV files, import job net definition CSV files containing the job nets within a group first and then the group definition CSV files. If a group definition CSV file is imported when the relevant job nets do not exist, an error will occur.
Procedure
Select the import destination project.
Connect to the Systemwalker Operation Manager server that contains the CSV file to be imported and select the import destination project in the job selection window of the Systemwalker Operation Manager window. If the Master Schedule Management function is enabled, select a master project.
Display the Systemwalker Operation Manager Import window.
Select Import from the File menu or click the right mouse button and select Import from the pop-up menu.
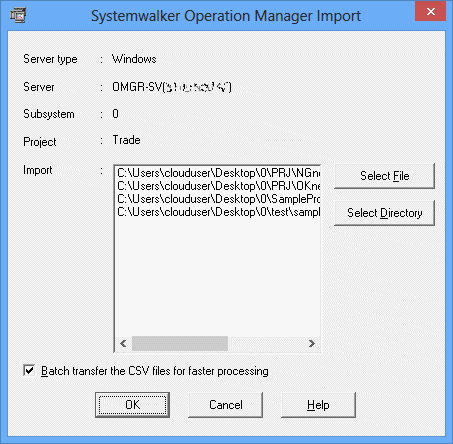
Figure 4.70 Systemwalker Operation Manager Import window

These sections display information about the import destination.
Displays the selected CSV file and directory.
Displays the Open and Browse for Folder dialog boxes.
Specify this item to batch transfer CSV files and speed up processing. This item is enabled by default.
When this item is specified, you cannot cancel processing for individual CSV files.
Select the CSV file.
Select the job net definition CSV file or group definition CSV file to be imported.
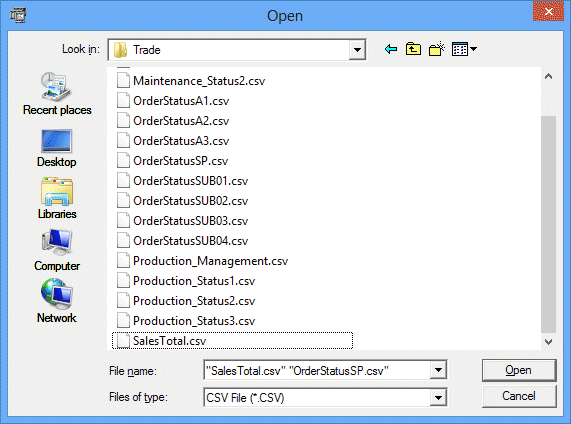
To select the CSV file, click the Select File button in the Systemwalker Operation Manager Import window.
The Open dialog box will be displayed.
Figure 4.71 Open dialog box

Select one or more files and click the Open button. Multiple CSV files can be selected at the same time.
The selected CSV file(s) will be added to the Systemwalker Operation Manager Import window.
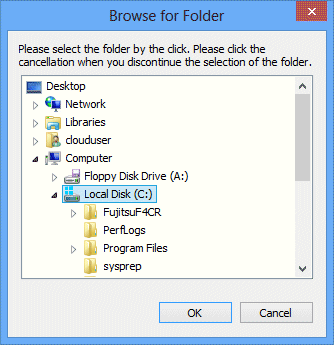
To select all the CSV files in a directory, click the Select Directory button in the Systemwalker Operation Manager Import window.
The Browse for Folder dialog box will be displayed.
Figure 4.72 Browse for Folder dialog box

Select a directory and click the OK button.
The selected directory will be added to the Systemwalker Operation Manager Import window.
Note
The only file types that can be specified for importation are CSV files with the extension "csv" or "CSV". If a directory is specified, only the files in that directory with the extension "csv" or "CSV" will be imported.
Up to 1,000 files can be imported at a time by using the Systemwalker Operation Manager Import window.
No more than 260 bytes can be specified for the absolute path to the file that is selected using the Open and Browse for Folder dialog boxes.
Import the files.
In the Systemwalker Operation Manager Import window, click OK to start importing.
The progress is displayed in a dialog box while import processing is running.
Clicking Cancel in the dialog box cancels import processing.
During batch transfer, import processing is not canceled until all CSV files have been transferred. Batch transfer may therefore not be canceled straight away. If Cancel is grayed out, you cannot cancel processing.
Note
CSV files are imported one by one. If an error occurs while a CSV file is being processed, that file will be skipped and the importation process will continue from the following file.
The dialog box displayed during import processing depends on whether Batch transfer the CSV files for faster processing is specified.
Check results.
The definition information will be imported into the selected project. When the import process is complete, the application associated with text files (*.txt) on the client operating system will run automatically to display the import results.
Import results will be stored in the following text file:
Systemwalker Operation Manage client installation directory |
The following is an example of execution result output:
Subsystem number=0
Project name= Sales

C:\OMGR_Definition\DEF1\Jnet1\Jnet001.csv
MpJobsch: ERROR: 6071: Systemwalker MpJobsch failed to open the definition file.

C:\OMGR_Definition\DEF1\Jnet1\Jnet002.csv
MpJobsch: ERROR: 7072:The keyword is incorrect. XXXX line.

C:\OMGR_Definition\DEF1\Jnet1\Jnet0031.csv
MpJobsch: INFO: 2300: XXXX command ended normally.
                                                     :
                                                     :
Remarks: Messages are output for each CSV file that is processed. Because the jobschcsvtodef and jobschsetnet/jobschsetgrp commands are executed during the import process, command execution result messages will be output.
Refer to "Import execution result file" in the Systemwalker Operation Manager Reference Guide and "Messages Output by Jobscheduler Command" and "Text messages that are output during import processing" in the Systemwalker Operation Manager Message Guide for details on the information contained in execution results.
The text file containing the execution results will be overwritten during the next import process.
This section explains the procedure used to export definition information relating to Systemwalker Operation Manager server jobs/job nets and groups to CSV files using a Systemwalker Operation Manager client window.
Export target range
The following objects can be selected individually as the target range of job/job net definition information or group definition information to be exported. :
Job nets
Parent job nets
Child job nets
Master linked job nets
Groups
Projects
Subsystems
The definition information for the target range of job nets or groups will be exported individually.
Created CSV file names
CSV files are created with the following names.
Job net name.CSV
Group name.CSV
If a file of the same name already exists in the export definition specified in the Systemwalker Operation Manager Export window, a number will be appended to the end of the file name as shown in the following example. Job net names that are distinguished by case in UNIX, such as two files named "ABC" and "abc", would be indistinguishable when exported to a Windows platform, so a number is appended to the file name to avoid the problem of duplicate files.
job net name_1.csv
CSV file output format
CSV files are output in the following directory structure:
<Export destination directory>
  |-<Subsystem number>
        |-<Project name>
        |   |-Job net definition CSV file
        |   |-Job net definition CSV file
        |   |            :
        |   |            :
        |   |-Group definition CSV file
        |   |-Group definition CSV file
        |
        |-<Project name>
                    :
                    :
Note
When you use batch transfer, the CSV files to be exported are transferred in a batch from the Systemwalker Operation Manager server to a Systemwalker Operation Manager client. Therefore, at least the following disk space is required:
Disk space equal to the total size of the exported CSV files on the Systemwalker Operation Manager server
If the disk space is insufficient, transfer of the CSV files may fail. Therefore, using the above explanation as a guide, secure the required disk space beforehand.
Procedure
Select the export target range.
Connect to the Systemwalker Operation Manager server where the definition information to be exported is located and select the export target range in the Job Selection pane of the Systemwalker Operation Manager window. The following objects can be specified individually as definition information export ranges:
Job nets
Parent job nets
Child job nets
Master linked job nets
Groups
Projects
Subsystems
Systemwalker Operation Manager Export window.
Select Export from the File menu or click the right mouse button and select Export from the pop-up menu.
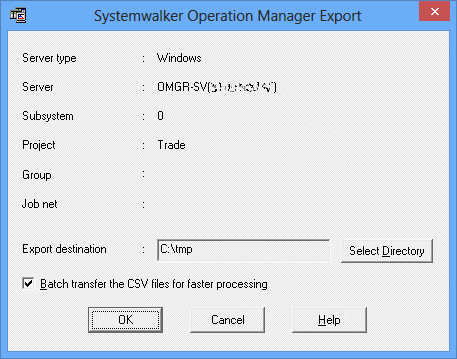
Figure 4.73 Systemwalker Operation Manager Export window

These sections display information about the export target range.
Displays the selected export destination directory.
Displays the Browse for Folder dialog box.
Specify this item to batch transfer CSV files and speed up processing. This item is enabled by default.
When this item is specified, you cannot cancel processing for individual CSV files.
Specify the export destination.
Use one of the following methods to specify the export destination directory:
Enter the export destination directory into the Export destination field of the Systemwalker Operation Manager Export window directly.
The name of the export destination directory can be up to 200 bytes long. An error will occur if a longer name is specified.
Click the Select Directory button and specify the target directory name in the Browse for Folder dialog box.
Figure 4.74 Browse for Folder dialog box

Select a directory and click the OK button.
The selected directory will be added to the Systemwalker Operation Manager Export window.
Export the files
In the Systemwalker Operation Manager Export window, click OK to start exporting.
The progress is displayed in a dialog box while export processing is running.
Clicking Cancel in the dialog box cancels export processing.
During batch transfer, export processing is not canceled until all definition files have been output. Batch transfer may therefore not be canceled straight away. If Cancel is grayed out, you cannot cancel processing.
Note
An error will occur if the name of a CSV file created by the export process exceeds 256 bytes.
Items of job net or group definition information are exported from the export target range one by one. If an error occurs while an item of definition information is being processed, that item will be skipped and the export process will continue from the following item of definition information.
The dialog box displayed during export processing depends on whether Batch transfer the CSV files for faster processing is specified.
If you connect to a Systemwalker Operation Manager server running a version prior to V13.3.0, and the definition information to be exported contains double quotes, the double quotes may disappear after the definition information is exported, or importing the definition information may fail.
In this case, use a spreadsheet program such as Excel to edit the CSV file created during the export processing so that double quotes can be displayed, and then import the CSV file.
Check results.
CSV files will be created in the selected directory.
When the export process is complete, the application associated with text files (*.txt) on the client operating system will run automatically to display the export results.
Export results will be stored in the following text file:
Systemwalker Operation Manager client installation directory |
The following is an example of execution result output:
Subsystem number=0
Project name= Sales

Job net name=WorkRecord
CSV file name=D:\Sales\WorkRecord_8.csv
Completed successfully

Job net name = JNET001
CSV file name = C:\0\Project\NetG1.csv
The export process has been completed successfully.
                                                    :
                                                    :
Remarks: Messages are output for each job net or group that is processed. Because the jobschprint and jobschdetocsv commands are executed during the export process, command execution result messages will be output.
Refer to "Export execution result file" in the Systemwalker Operation Manager Reference Guide and "Messages Output by Jobscheduler Command" and "Text messages that are output during export processing" in the Systemwalker Operation Manager Message Guide for details on the information contained in execution results.
The text file containing the execution results will be overwritten during the next export process.