In workbench, you can develop JavaBeans, which is a type of Java application.
JavaBeans is a standard that is the basis for creating components of Java classes, and it is a generic name for these components. Each of these components is referred to as a Bean.
This lesson describes how to combine a JBK integer field and spin button to develop a new Bean.
Creating a Java Application Project
Start the workbench.
Select [File] > [New] > [Project] from the menu bar.
The [New Project] wizard is displayed. Select [Java Application Project] from the tree.
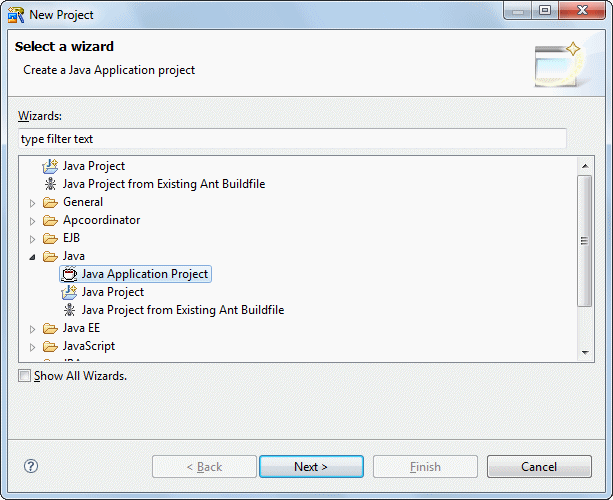
Click [Next].
The [Java Application Project] page is displayed.
Enter the following project information:
Setup Items | Setup Content |
|---|---|
Project name | SpinBoxBean |
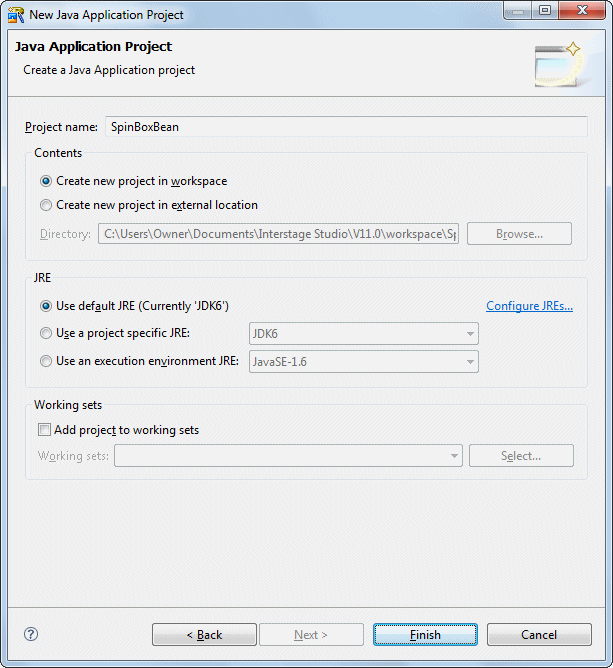
Click [Finish].
Point
About Bean types
Interstage Studio classifies Beans into the two types described below. Both can be defined in workbench.
Uni Bean
This Bean has simple functions, such as for text fields and buttons. When a Uni Bean is created, an existing Uni Bean, such as one for a text field (JTextField), is inherited, and additional functions are added to it.
If you specify a class that has no view for the base class, the Bean is called an Invisible Bean. The Bean inherits java.lang.Object and others. Because an Invisible Bean has no view, it can be edited in an editor in the same way as for ordinary source.
Compound Bean
This Bean consists of two or more Beans. You can create a Compound Bean in Java Form Designer by pasting Beans into panels (JPanel or Panel) for the form layout. Depending on the container type, use JPanel for lightweight components, and use Panel for heavyweight components.
Creating a Java Form
The next step is to create a Compound Bean. Select [File] > [New] > [Other] from the menu bar in workbench. Then, select [Java] > [GUI] > [Form] from the tree in the [New] wizard that appears.
If you are creating a Uni Bean or Invisible Bean, select [JavaBeans] here. In this example, however, select [Form] because you are creating a Compound Bean.
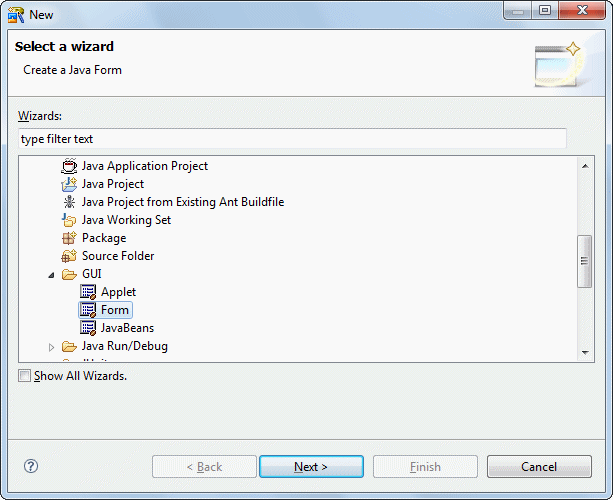
Click [Next].
The [Java Form Information] page is displayed.
Enter information as follows.
Setup Items | Setup Content |
|---|---|
Package | myapp.javabeans |
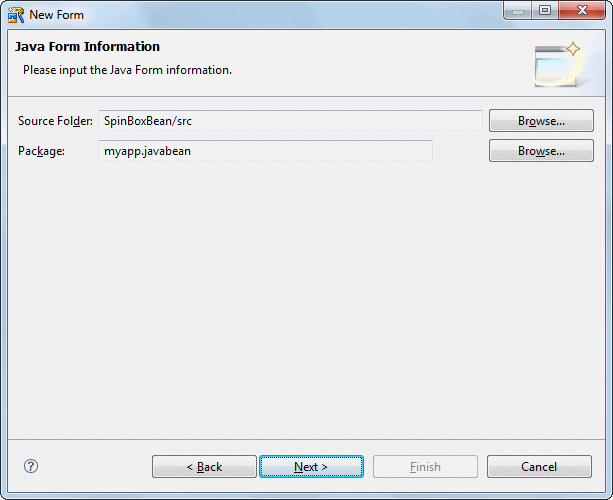
Click [Next].
The [New Java Form] wizard is displayed.
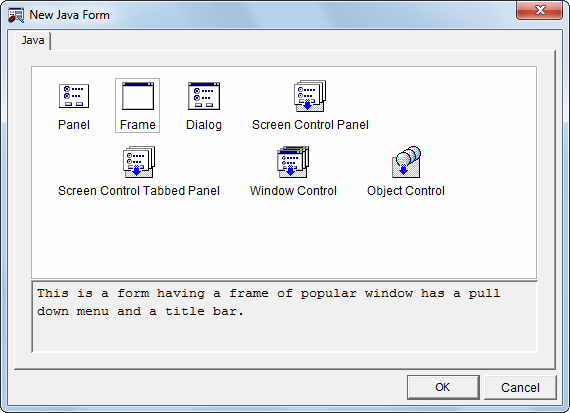
Select the type of form that you want to create. Select [Panel] on the [Java] tab, then click [OK].
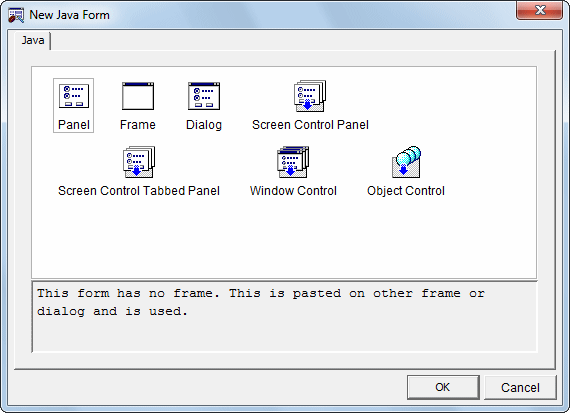
Create a new panel format form.
Enter information as follows.
Setup Items | Setup Content |
|---|---|
Java Form name | SpinBoxBean |
Base class | javax.swing.JPanel |
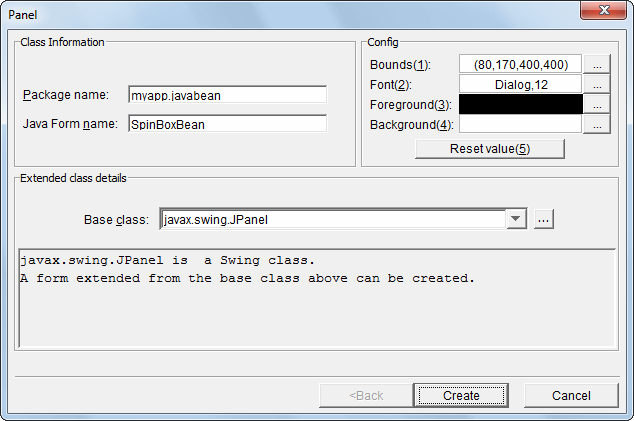
Click [Create].
Java Form Designer starts. Using Java Form Designer, place Beans, set properties (attributes), and code the flow of processes to complete the form.
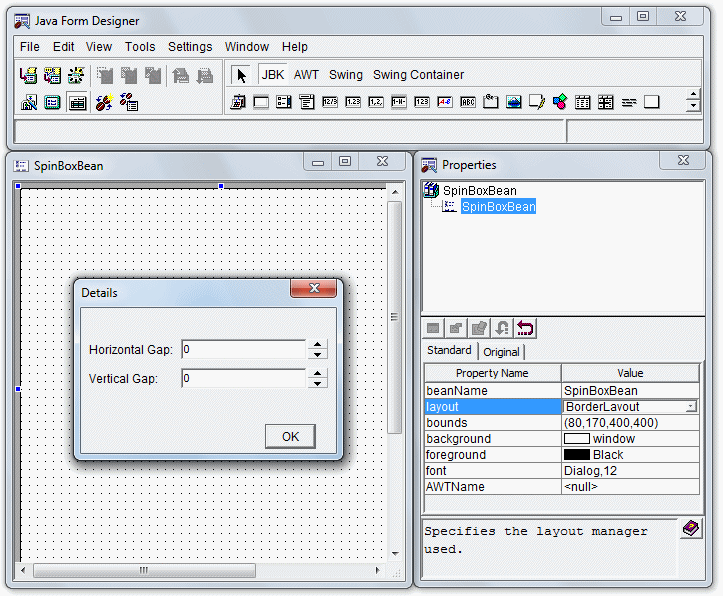
Modify frame properties.
Specify "BorderLayout" for the property of layout.
Specify 0 as the horizontal gap and vertical intervals, then click [OK].
Place the integer field Bean.
If [JBK] is not selected on the Object Palette, click [JBK].
Click [[Integer Field] on the Object Palette to select it. Place it on the Java Form by dragging it with the mouse.
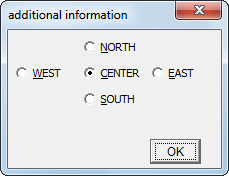
Use "BorderLayout" to place the Bean.
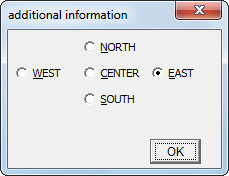
The Bean can be placed in any direction with "BorderLayout". The directions are called "NORTH" for up, "SOUTH" for down, "WEST" for left, "EAST" for right, and "CENTER" for the center.
Select [CENTER], then click [OK].
Place the spin button Bean.
Click [Spin Button] on the Object Palette to select it. Place it on the Java Form by dragging it with the mouse.
Select [EAST], then click [OK].
Two Beans are pasted as shown below.

Defining BeanInfo
BeanInfo is external interface information for programs that use Beans as components. Using BeanInfo Definition, define such information as properties, methods, and events.
Start BeanInfo Definition from workbench. To start workbench, select [View] > [Java Editor] from the Java Form Designer menu bar.
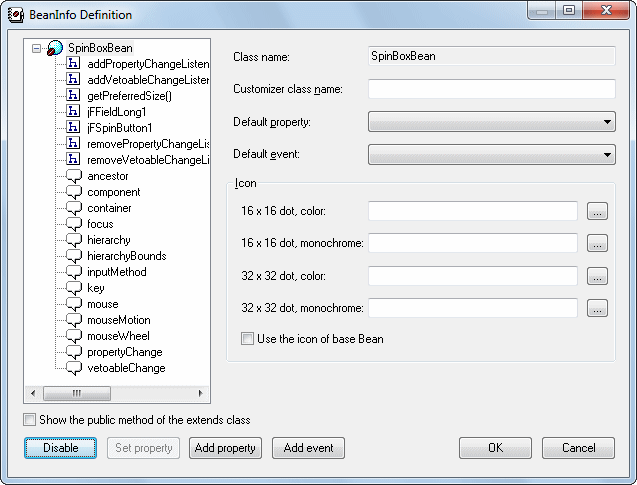
Select [Edit] > [Define BeanInfo] > [BeanInfo Definition] from the workbench menu bar to call BeanInfo Definition.
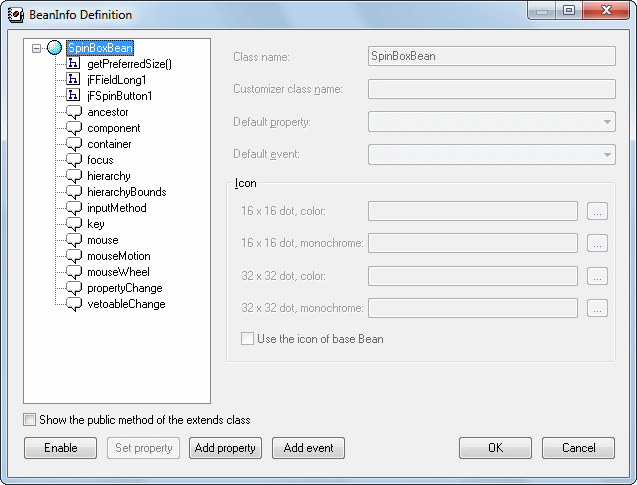
With "SpinBoxBean" selected, click [Enable].
Point
About icons
Using BeanInfo Definition, you can specify icons for created Beans.
Create an image file with the icon in advance, using any paint tool. The icon image file must be in the GIF or JPEG format. Add it to the project as follows: Click [File] > [Import] from the workbench menu bar. From [File system] in the [Import] dialog, import the image file to the project.
In order to have Bean icons displayed on the Object Palette and in the Properties window component tree in workbench, use the image file specified as "16 x 16 dot, Color."
Specification of the icon image file can be omitted. If you do not specify an icon image file, default icons provided by workbench are used.
Next, define properties.
Prepare the following two properties:
Property Name | Type | Explanation |
|---|---|---|
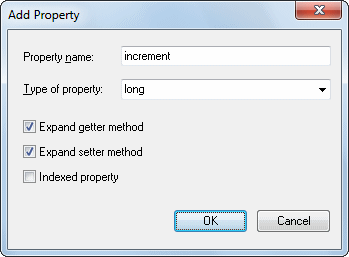
increment | long | Spin button incremental value |
value | long | Integer field value |
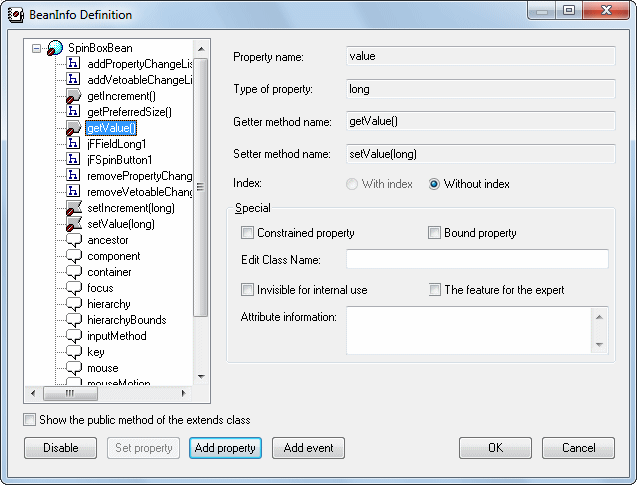
Click [Add property] in the BeanInfo Definition dialog.
Specify as shown in the following dialog, then click [OK]:
Add value properties in the same way.
Click [Add property] in the BeanInfo Definition dialog.
Specify as shown in the following dialog, then click [OK]:

The properties are added as shown below.
Click [OK]. The BeanInfo Definition dialog closes.
Coding an event process
Click the [SpinBoxBean.java] tab in the editor area to make the Java editor active.
Since the JBK class is used, add the import keyword.
Add the text shown below in red.
import com.fujitsu.jbk.gui.JFSpinButton;Add a field that contains the incremental value to the class.
Add the increment field above the constructor of the SpinBoxBean class. Add the text shown below in red.
//@@Form Design Information end

long increment = 1;
/**
 * The form is constructed.
 */
public SpinBoxBean() {
}
Point
Change prohibition part which is managed by Java Form Designer
Java Forms include sources for calling screen (Bean) information and event processes. Because Java Form Designer is used to manage the sources, changing the sources is prohibited.
These sources that must not be changed are enclosed by comments in blue, as shown below.
public class SpinBoxBean extends javax.swing.JPanel {
    //@@Form Design Information start

      - Sources that are managed with Java Form Designer and that must not be changed -

    //@@Form Design Information end
Code the getIncrement method process.
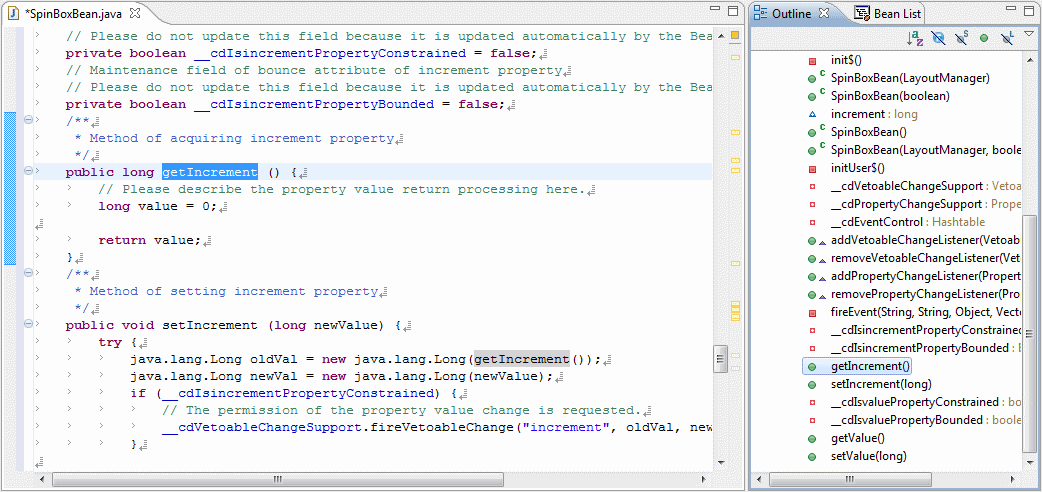
Add the process to getIncrement, which is the increment property getter method. Add the text shown below in red.
public long getIncrement() {
    // Please describe the property value return processing here.
    long value = 0;
    value = increment;
    return value;
}
Point
Scrolling in Java editor
To easily scroll to a method or field you want to edit in Java editor, you can use the [Outline] view.
Clicking "getIncrement()" in the [Outline] view causes the Java editor display to scroll to the getIncrement method.
Code the setIncrement method process.
Add the process to setIncrement, which is the increment property setter method. Add the text shown below in red.
public void setIncrement(long newValue) {
    try {
        java.lang.Long oldVal = new java.lang.Long(getIncrement());
        java.lang.Long newVal = new java.lang.Long(newValue);
        if( __cdIsincrementPropertyConstrained ) {
            // The permission of the property value change is requested.
            __cdVetoableChangeSupport.fireVetoableChange("increment",oldVal,newVal);
        }

        // Please describe the property value set processing here.
        increment = newValue;

        if( __cdIsincrementPropertyBounded ) {
            // The property value change is notified.
            __cdPropertyChangeSupport.firePropertyChange("increment",oldVal,newVal);
        }
    }
    catch(java.beans.PropertyVetoException e) {
    }
}
Code the getValue method process.
Add the process to getValue, which is the value property getter method. Add the text shown below in red.
public long getValue() {
    // Please describe the property value return processing here.
    long value = 0;
    value = jFFieldLong1.getValue();
    return value;
}
Code the setValue method process.
Add the process to setValue, which is the value property setter method. Add the text shown below in red.
public void setValue(long newValue) {
    try {
        java.lang.Long oldVal = new java.lang.Long(getValue());
        java.lang.Long newVal = new java.lang.Long(newValue);
        if( __cdIsvaluePropertyConstrained ) {
            // The permission of the property value change is requested.
            __cdVetoableChangeSupport.fireVetoableChange("value",oldVal,newVal);
        }

        // Please describe the property value set processing here.
        jFFieldLong1.setValue(newValue);

        if( __cdIsvaluePropertyBounded ) {
            // The property value change is notified.
            __cdPropertyChangeSupport.firePropertyChange("value",oldVal,newVal);
        }
    }
    catch(java.beans.PropertyVetoException e) {
    }
}
To code the process in which a specific event occurs, display the [Bean List] view.
Select [Window] > [Show View] > [Other] from the menu bar. The [Show View] dialog is displayed. Select [Java] > [Bean List], then click [OK].
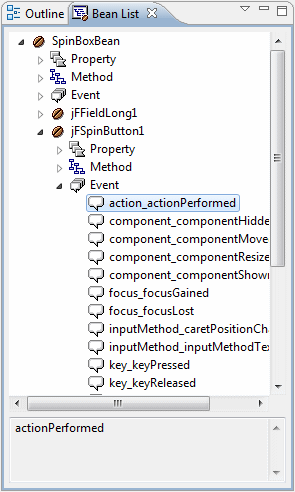
Code the process in which the spin button is clicked.
Double-click [SpinBoxBean] > [jFSpinButton1] > [Event] > [action_actionPerformed] in the [Bean List] view.
An event process creation confirmation dialog is displayed. Click [Yes].
When the processing procedure of "jFSpinButton1_action_actionPerformed$" is displayed, add the text shown below in red.
    public void jFSpinButton1_action_actionPerformed$(java.awt.event.ActionEvent e) {
        if (!defaultEventProc(e)) {
            // The procedure when the event is generated is described below.
            if (e.getActionCommand() == JFSpinButton.UP){
                // If the Up button is clicked.
                jFFieldLong1.setValue(jFFieldLong1.getValue() + increment);
            }
            if (e.getActionCommand() == JFSpinButton.DOWN){
                // If the Down button is clicked.
                jFFieldLong1.setValue(jFFieldLong1.getValue() - increment);
            }
        }
    }
Save the Java Form.
Select [File] > [Save] from the workbench menu bar. Select [File] > [Exit] from the Java Form Designer menu to close the Java Form.
Building
Building is executed automatically when resource files (such as the Java files) are saved if the [Build Automatically] item is enabled in the [Project] menu.
If [Build Automatically] is disabled, right-click on the project and select [Build Project] or select [Build Project] in the [Project] menu.
A JAR file is required so create it.
Use the export wizard to create the JAR file.
Select [File] > [Export] to start the export wizard.
Select [Java] > [JAR file] in the export wizard.

The JAR export wizard is displayed.
Select [SpinBoxBean] > [src] and [_beaninfo_src] folders in [Select the resources to export] and enter the following settings.
After setting the information, click [Finish].
Setup Items | Setup Content |
|---|---|
Select the resources to export | src/ _beaninfo_src/ |
Export generated class files and resources | Checked |
JAR file | SpinBoxBean/SpinBoxBean.jar |
Compress the contents of the JAR file | Checked |
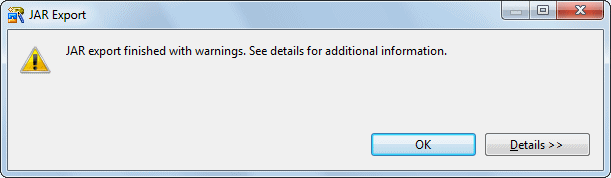
The following message is output when exporting JAR, but this does not indicate a problem.
Creating a Java Application Project (creating a program to test the spin button)
Create a separate project to test the created SpinBoxBean.
Select [File] > [New] > [Project] from the menu bar.
The [New Project] wizard is displayed. Select [Java Application Project] from the tree.
Click [Next].
The [Java Application Project] page is displayed. Enter the following project information:
Setup Items | Setup Content |
|---|---|
Project name | SpinBoxTest |
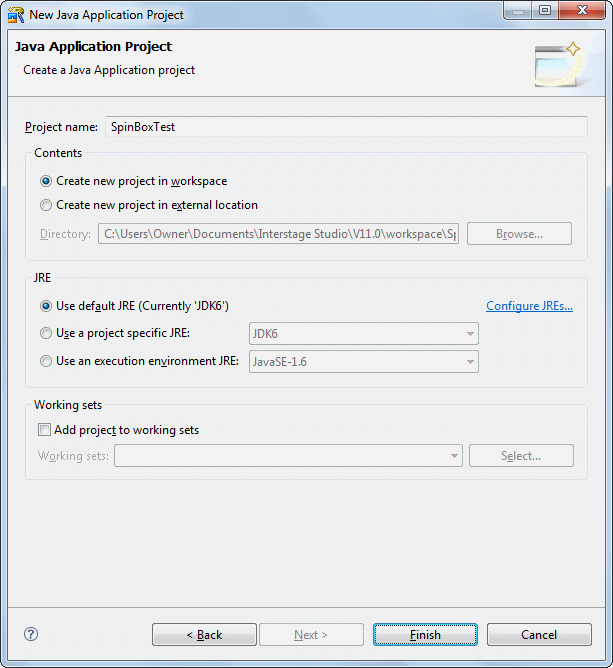
Click [Finish]
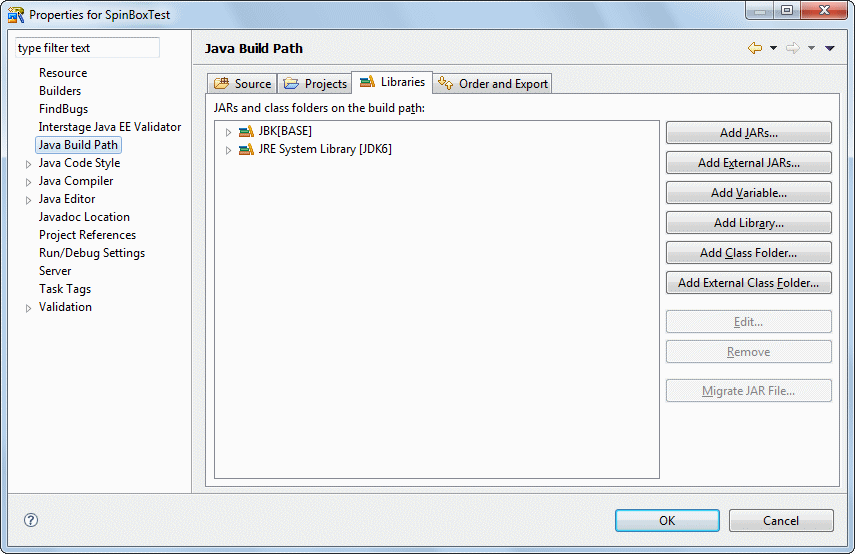
Select and right-click the created project, and then select [Properties] from the context menu that appears. When the [Properties] dialog box appears, select [Java Build Path] from the tree in the left pane. The [Java Build Path] page is displayed.
Because this project uses the Bean that you created, add the "SpinBoxBean.jar" file in the "SpinBoxBean" project to the build path.
Click the [Libraries] tab.
Clicking [Add JARs] displays the [JAR Selection] dialog. Click [SpinBoxBean] > [SpinBoxBean.jar] in [Choose the archives to be added to the build path].
Click [OK].
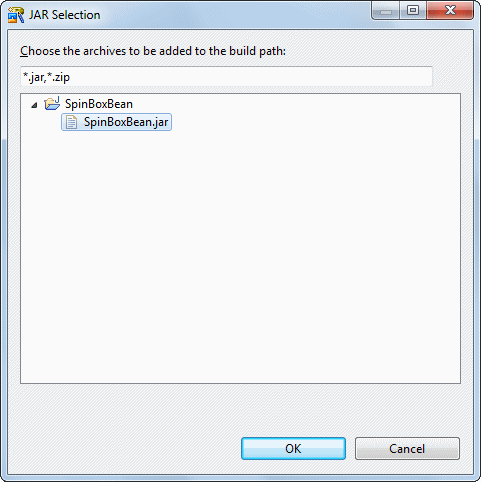
[SpinBoxBean.jar] is added.
Click [OK].

The next step is to create a class of the form and an executable class that will display the form. Select [File] > [New] > [Other] from the menu bar in workbench. Then, select [Java] > [GUI] > [Form] from the tree in the [New] wizard that appears.
Click [Next].
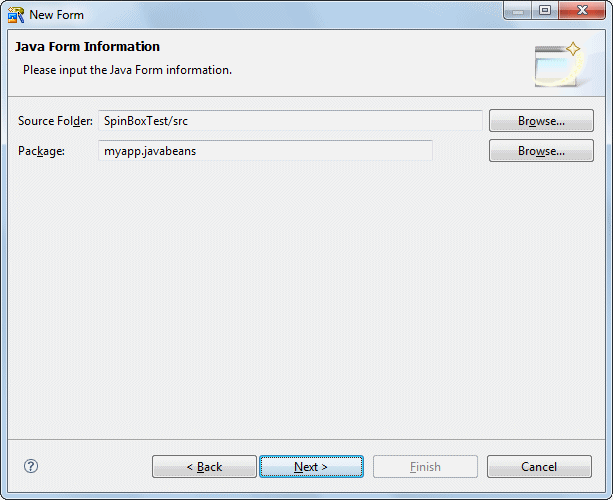
The [Java Form Information] page is displayed.
Enter information as follow.
Setup Items | Setup Content |
|---|---|
Source folder | SpinBoxTest/src |
Package | mayapp.javabeans |
Click [Next].
The [New Java Form] dialog box is displayed.
Select [Frame], and Click [Next].
The [Frame] dialog is displayed.
On this page, specify the required information to create the frame.
Enter information as follow.
Setup Items | Setup Content |
|---|---|
Package name | myapp.javabeans |
Java Form name | Frame1 |
Base class | Javax.swing.JFrame |
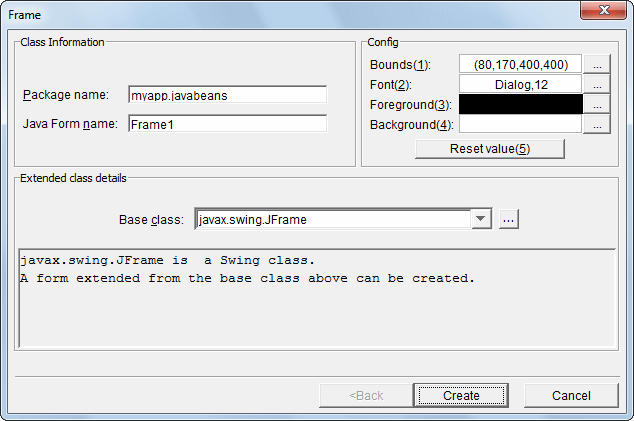
Click [Create].
Create a class of the form and an executable class that will display the form.
Select [File] > [New] > [Class] from the menu bar.
The [Java Class] page is displayed.
On this page, specify the basic information to create the Java class.
Enter information as follow.
Setup Items | Setup Content |
|---|---|
Source folder | SpinBoxTest/src |
Package | myapp.javabeans |
Name | SpinBoxTest |
Inherited abstract methods | Checked |
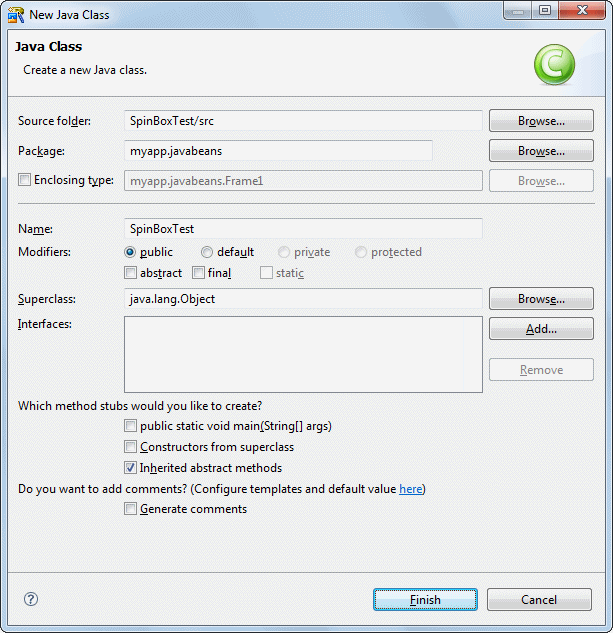
Click [Finish].
The source created in the [Java Editor] is displayed.
Edit the source that was created. Add the parts in red.
package myapp.javabeans;

public class SpinBoxTest {
    //Constructor
    public SpinBoxTest() {
    }

    public void run(String[] args) {
        //Create new form project
        Frame1 form = new Frame1();
        //Show form
        form.setVisible(true);
    }

    //Main process
    public static void main(String[] args) {
        // Create SpinBoxTest class instance
        SpinBoxTest object = new SpinBoxTest();
        // Call run method of the SpinBoxTest class instance
        object.run(args);
    }
}
Registering a Bean
Open [Frame1.java] in Java Form Designer.
To display the context menu, right-click [SpinBoxTest] > [src] > [myapp.javabeans] > [Frame1.java] in the [Package Explorer] view of workbench. Then, select [Open With] > [Graphical Editor].
In Java Form Designer, register the Bean that you created. This enables you to paste the new Bean into a Java Form in the same way as a JBK Bean and other Beans.
Select [Settings] > [Bean Registration] from the Java Form Designer menu bar.
The [Bean Registration] dialog box is displayed.
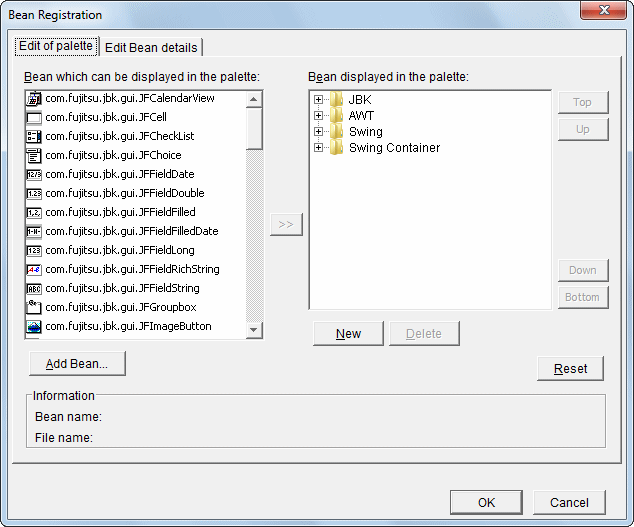
Click [New]. Enter "MyBean".
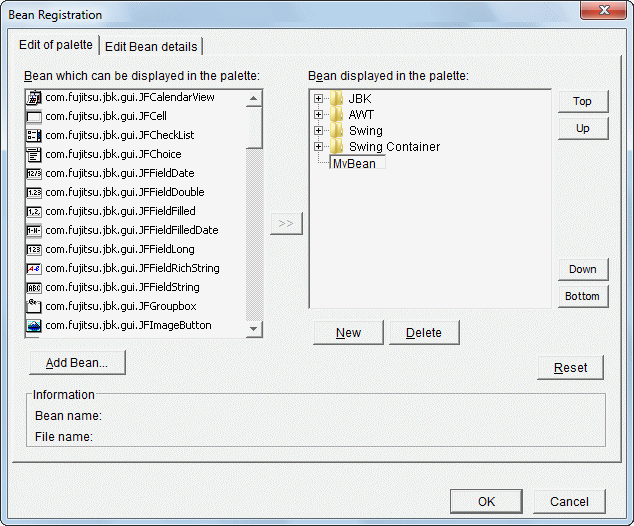
Next, click [Add Bean]. The [Add Bean] dialog box is displayed.
Specify "SpinBoxBean," which you created. Select [Specifies class name], and click the [...] button.
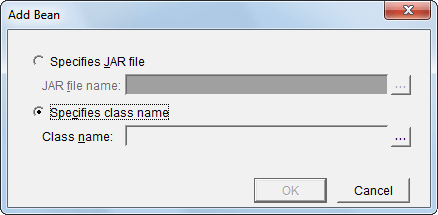
The [Reference to class] dialog box is displayed.
Enter "spin" in the [Select an item to open] list box to bring up [SpinBoxBean] in [Matching items] and select it.
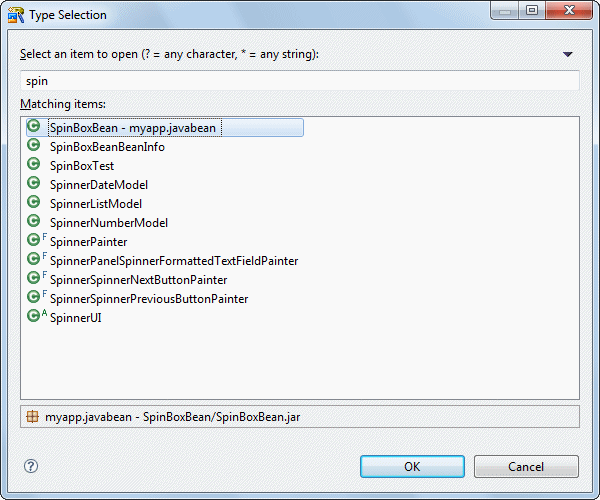
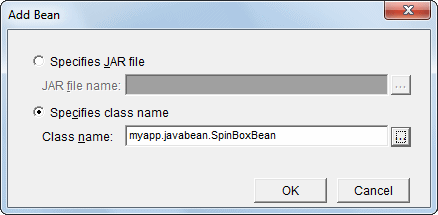
"SpinBoxBean" is set in [Class name].
Click [OK].
Select the added "myapp.javabeans.SpinBoxBean" in [Bean which can be displayed in the palette] and "MyBean" in [Bean displayed in the palette], then click [>>].
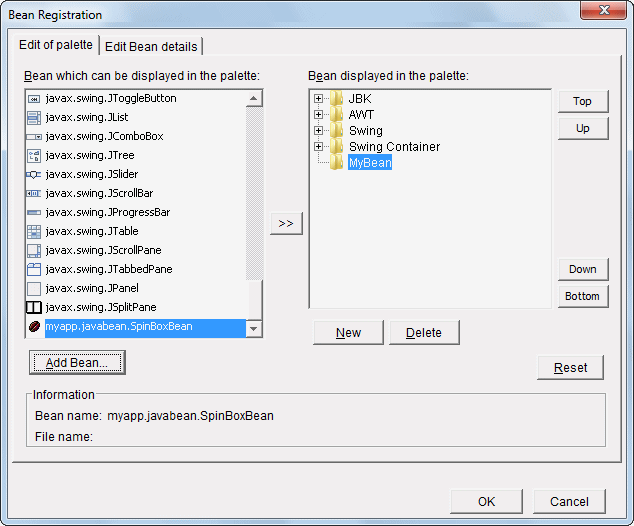
SpinBoxBean is registered in MyBean.
After this, you can paste SpinBoxBean into Java Forms.

Click [OK] to close the Registration Bean dialog.
Editing a Java Form
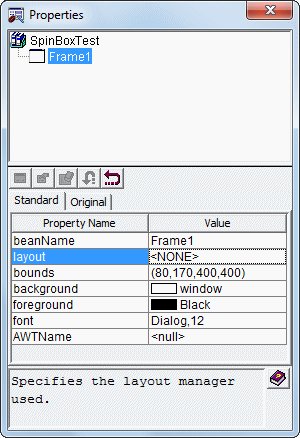
Change the [layout] property of [Frame1] to [<NONE>].
Paste the SpinBoxBean.
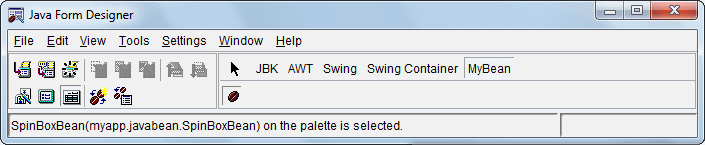
Click [MyBean] on the Object Palette to select it, then click [SpinBoxBean]. Note that if you specified an icon in its BeanInfo definition, that icon is displayed on the Object Palette. In this tutorial, you did not specify any additional icons, so only default icons are displayed on the Object Palette.
Place the Bean on the Java Form by dragging it with the mouse.
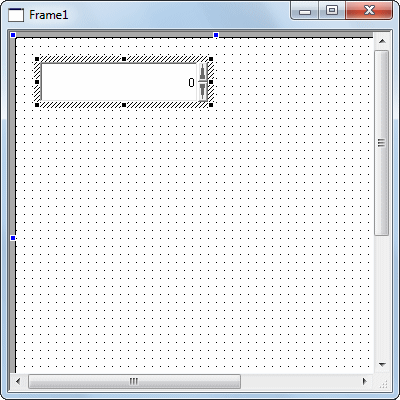
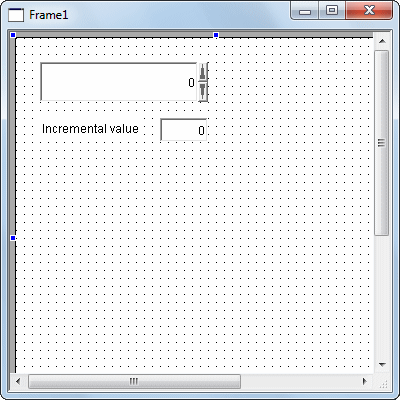
Paste JBK [Multiple-Line Label]. On the property sheet, specify "Incremental value" for the property of text.
Paste JBK [Integer Field].
The screen has the following appearance:
Coding an event process
Modify the Frame1 initUser$ method. Click the [Frame1.java] tab in the workbench editor area to make [Frame.1.java] active.
Code the initUser$ method process.
Add the process for setting initial values to an integer field (jFFieldLong1). Add the text shown in red.
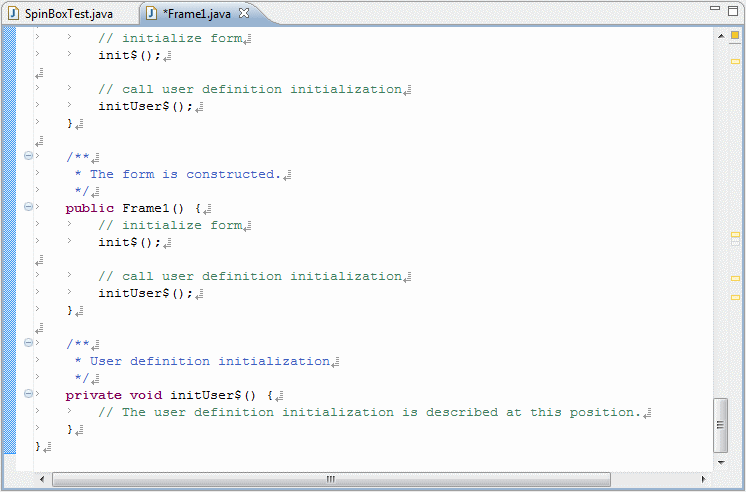
    protected void initUser$() {
        // The user definition initialization is described at this position.
        jFFieldLong1.setValue(SpinBoxBean1.getIncrement());
    }
Code the process in the action event of the integer field (jFFieldLong1).
Double-click [Frame1] > [jFFieldLong1] > [Event] > [action_actionPerformed] in the [Bean List] view.
An event process creation confirmation dialog is displayed. Click "Yes".
The processing procedure of "jFFieldLong1_action_actionPerformed$" is displayed. Add the text shown in red.
    public void jFFieldLong1_action_actionPerformed$(java.awt.event.ActionEvent e) {
        if (!defaultEventProc(e)) {
            // The procedure when the event is generated is described below.
            SpinBoxBean1.setIncrement(jFFieldLong1.getValue());
        }
    }
Code the process such that the application ends when the frame closes.
When the frame closes, a window event occurs. In the "window_windowClosed" event, code a process corresponding to the window event.
Double-click [Frame1] > [Event] > [window_windowClosed] in the [Bean List] view.
An event process creation confirmation dialog is displayed. Click "Yes."
The processing procedure of "Frame1_window_windowClosed$" is displayed. Add the text shown in red.
    public void Frame1_window_windowClosed$(java.awt.event.WindowEvent e) {
        if(!defaultEventProc(e)) {
            // The procedure when the event is generated is described below
            System.exit(0);
        }
    }
Save the Java Form.
Select [File] > [Save] from the Java Form Designer menu.
Select [File] > [Exit] from the menu to close the Java Form.
Building
Building is executed automatically when resource files (such as the Java files) are saved if the [Build Automatically] item is enabled in the [Project] menu.
If [Build Automatically] is disabled, right-click on the project and select [Build Project] or select [Build Project] in the [Project] menu.
Note
Cleaning of a SpinBoxBean project
An attempt to clean and build a SpinBoxBean project may fail. This is because SpinBoxBean.jar cannot be deleted since Java Form Designer is using this file. In such cases, exit Java Form Designer and close the SpinBoxTest project.
A JAR file is required so create it.
Use the export wizard to create the JAR file.
Select [File] > [Export] to start the export wizard.
Select [Java] > [JAR file] in the export wizard.
The JAR export wizard is displayed.
Select [SpinBoxTest] > [src] folder in [Select the resources to export] and enter the following settings.
After setting the information, click [Finish].
Setup Items | Setup Content |
|---|---|
Select the resources to export | src/ |
Export generated class files and resources | Checked |
JAR file | SpinBoxTest/SpinBoxTest.jar |
Compress the contents of the JAR file | Checked |
The following message is output when exporting JAR, but this does not indicate a problem.
Running
Select the file (class) to be executed. Click [SpinBoxTest] > [src] > [myapp.javabeans] > [SpinBoxTest.java] in the [Package Explorer] view of workbench.
Select [Run] > [Run As] > [Java Application] from the menu bar. As a result, the application starts, and the Java Form is displayed.

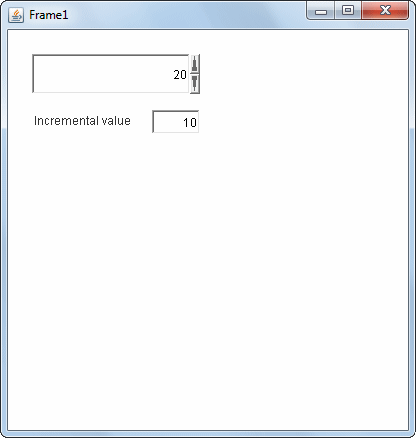
Specify "10" as the incremental value, and press the [Enter] key.
Click the spin button, and confirm that the value changes by 10 units.
Click the Close [X] button on the title bar to close the application.