When the volume group configuration does not satisfy the conditions for operation in units of volume groups, replication can be performed by operation in units of physical disks.
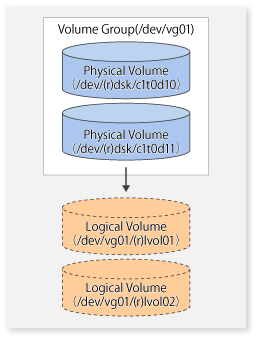
When backup is performed in units of physical disks, volume group integrity must be maintained and, therefore, all physical disks in the volume group must be operated synchronously.
Point
Physical volumes that should be operated synchronously can be checked by using the Web Console or stgxfwcmdispdev (Device information display command).
Note
For operation in a cluster configuration, the device name (/dev/(r)dsk/c#t#d#) of the physical disks that comprise the volume group must be the same at all servers that comprise the cluster, and the ETERNUS Disk storage system's disk indicated by the device name must be the same.
Figure 6.49 Sample configuration for operation in units of physical disks
To use the replica volume after replication in the situation when a source volume is a volume group, the replica volume must have the same logical volume configuration as the source volume and must be a volume group of the same physical size.
The volume group configuration information file must be restored during replication post-processing. Confirm that the volume group configuration file has been saved. It is usually saved to the following location:
/etc/lvmconf/<volume-group-name>.conf |
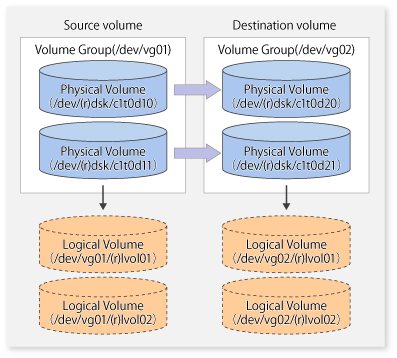
When configuring the source and replica volumes, specify all of the physical disks in the volume group.
# /opt/FJSVswsrp/bin/swsrpsetvol /dev/dsk/c1t0d10 /dev/dsk/c1t0d20
swsrpsetvol completed
# /opt/FJSVswsrp/bin/swsrpsetvol /dev/dsk/c1t0d11 /dev/dsk/c1t0d21
swsrpsetvol completed
#
Perform the operation by synchronizing all physical disks in the volume group.
Perform the required pre-processing and post-processing work for each volume group before and after (respectively) the replication. Disable pre-processing and post-processing when operating individual physical disks.
(Perform pre-processing for the source and target volumes.)

# /opt/FJSVswsrp/bin/swsrpmake -f -t /dev/dsk/c1t0d10 /dev/dsk/c1t0d20
FROM=/dev/dsk/c1t0d10@SV1, TO=/dev/dsk/c1t0d20@SV1 swsrpmake completed
# /opt/FJSVswsrp/bin/swsrpmake -f -t /dev/dsk/c1t0d11 /dev/dsk/c1t0d21
FROM=/dev/dsk/c1t0d11@SV1, TO=/dev/dsk/c1t0d21@SV1 swsrpmake completed
#

(Perform post-processing for the source and target volumes.)
(Perform pre-processing for the target volume.)

# /opt/FJSVswsrp/bin/swsrpstartsync -t /dev/dsk/c1t0d10 /dev/dsk/c1t0d20
FROM=/dev/dsk/c1t0d10@SV1, TO=/dev/dsk/c1t0d20@SV1 swsrpstartsync completed
# /opt/FJSVswsrp/bin/swsrpstartsync -t /dev/dsk/c1t0d11 /dev/dsk/c1t0d21
FROM=/dev/dsk/c1t0d11@SV1, TO=/dev/dsk/c1t0d21@SV1 swsrpstartsync completed
#

(After state of equivalency upkeep)
(Perform pre-processing for the source volume.)

# /opt/FJSVswsrp/bin/swsrpmake -f -t /dev/dsk/c1t0d10 /dev/dsk/c1t0d20
FROM=/dev/dsk/c1t0d10@SV1, TO=/dev/dsk/c1t0d20@SV1 swsrpmake completed
# /opt/FJSVswsrp/bin/swsrpmake -f -t /dev/dsk/c1t0d11 /dev/dsk/c1t0d21
FROM=/dev/dsk/c1t0d11@SV1, TO=/dev/dsk/c1t0d21@SV1 swsrpmake completed
#

(Perform post-processing for the source and target volumes.)
The table below summarizes the pre-processing and post-processing work to be performed before and after replication.
Pre-processing | Post-processing | |
|---|---|---|
Source |
| If file systems are included, remount the volumes that were unmounted by pre-processing. |
Target volume |
|
|
Reconfiguring the volume group
Reconfigure the volume group as follows:
Deactivate the volume group.
# /usr/sbin/vgchange -a n /dev/vg02
#
Restore volume group configuration information.
# /usr/sbin/vgcfgrestore -n /dev/vg02 /dev/rdsk/c1t0d20
# /usr/sbin/vgcfgrestore -n /dev/vg02 /dev/rdsk/c1t0d21
#
Reactivate the volume group.
When cluster operation is enabled:
# /usr/sbin/vgchange -c y /dev/vg02
# /usr/sbin/vgchange -a e /dev/vg02
When cluster operation is disabled:
# /usr/sbin/vgchange -a y /dev/vg02
#
Reconfigure shared mode volume groups using the following procedure:
Stop the volume group (on all nodes involved in the transaction).
# /usr/sbin/vgchange -a n /dev/vg02 # |
Restore volume group configuration information (on the node where the volume group was created).
# /usr/sbin/vgcfgrestore -n /dev/vg02 /dev/rdsk/c1t0d20 # /usr/sbin/vgcfgrestore -n /dev/vg02 /dev/rdsk/c1t0d21 # |
Mark the volume group as shareable (on the node where the volume group was created).
# /usr/sbin/vgchange -S y -c y /dev/vg02 # |
Start the volume group (on all nodes involved in the transaction).
# /usr/sbin/vgchange -a s /dev/vg02 # |
Note
After performing replication, you have to reconfigure the volume group; otherwise, there may be output of a PV-LINK message to the system log.
[Example of output]
Feb 28 11:58:06 lavender vmunix: LVM: VG 64 0x220000: PVLink 31 0x140100 Wrong Disk!: PVID or VGID on the disk does not match with that in the kernel.
Likewise, if you have set PV-LINK messages to be monitored by Storage Cruiser's failure monitoring, you will be notified of an "Error" level event.
If you want to suppress such event notifications, referring to the customization procedure, edit the "SNMP Trap XML configuration file" of Storage Cruiser's agent.
Also note that PV-LINK messages may also be output for operations other than of AdvancedCopy Manager.
[Customization procedure]
Edit the "SNMP Trap XML configuration file" for Storage Cruiser's agent.
[File to be edited]
/etc/opt/FJSVssage/snmpth/1_3_6_1_4_1_211_4_1_3_21_2_4.xml
[Contents to be edited]
Commentate the following portions according to the XML rules:
<TrapType type="ST1" flag="001111" cf="1000" level="E" msg="%s">
  <ARG index="0" VBIndex="2"/>
  <MSG key=".*LVM: .*PVLink.*!.*" />
</TrapType>
[Example of editing]
Below example shows how to commentate by inserting the red text portions.
In the example, PV-Link messages that match the regular expression ".*LVM: .*PVLink.*!.*" will be exempt from failure monitoring in Storage Cruiser.
<?xml version="1.0" encoding="UTF-8"?>
<!DOCTYPE SNMPTrapControl[
<!ATTLIST TrapType type ID #REQUIRED>
]>
<SNMPTrapControl name="LVM" ver="1.0">
  <TrapType type="ST1" flag="001111" cf="1000" level="E" msg="%s">
    <ARG index="0" VBIndex="2"/>
    <MSG key=".*LVM: Path.*" />
  </TrapType>
<!-- COMMENT Start ================================================
  <TrapType type="ST1" flag="001111" cf="1000" level="E" msg="%s">
    <ARG index="0" VBIndex="2"/>
    <MSG key=".*LVM: .*PVLink.*!.*" />
  </TrapType>
=================================================== COMMENT End -->
</SNMPTrapControl>
Restart Storage Cruiser's agent.
For information on restarting methods, refer to the ETERNUS SF Storage Cruiser Operation Guide.