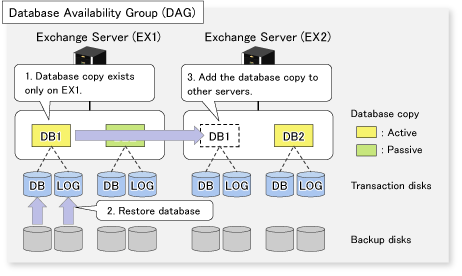
Perform restore from the backup data on the server on which backup was performed.
Figure 8.57 Restore of Exchange database

Let the database copy of a target database exist only on a restore destination server.
Using AdvancedCopy Manager, restore the database.
For more information about restore, refer to "8.2.5 Restoration".
Add the database copy to other servers than the restore destination server.
Let the database copy of a target database exist only on a restore destination server.
Stop the Microsoft Exchange Search Host Controller service on the restore destination server.
However, in consideration of the impact of stopping this service, recommend to take the action.
Using AdvancedCopy Manager, restore the database.
For more information about restore, refer to "8.2.5 Restoration".
Start the Microsoft Exchange Search Host Controller service on the restore destination server.
Add the database copy to other servers than the restore destination server.
Note
Backup data cannot be restored to any other server than the server on which backup was performed.
Perform restore from the DB1 that was backed up on EX1.
Activate the database copy of DB1 on EX1.
Move-ActiveMailboxDatabase DB1 -ActivateOnServer EX1 |
Delete the database copy of DB1 on EX2.
Remove-MailboxDatabaseCopy -Identity DB1\EX2 |
Delete the database file and log file in DB1 on EX2.
Perform pre-restore operation on EX1.
Permit to restore the database from backup.
Set-MailboxDatabase -Identity DB1 -AllowFileRestore $true |
Dismount DB1.
Dismount-Database -Identity DB1 |
If QuickOPC is in use for backup, stop the QuickOPC session.
C:\Win32app\AdvancedCopyManager\bin\swsrpshadowadm_exchange stopqopc -dbname DB1 |
For Exchange Server 2013, stop theMicrosoft Exchange Search Host Controller service on the restore destination server. However, in consideration of the impact of stopping this service, recommend to take the action.
Perform restore of DB1 on EX1.
In the case of Point-in-Time restoration:
C:\Win32app\AdvancedCopyManager\bin\swsrpvssrestore_exchange -dbname DB1 -point |
in the case of roll-forward restoration:
C:\Win32app\AdvancedCopyManager\bin\swsrpvssrestore_exchange -dbname DB1 -roll |
Perform post-restore operation on EX1.
For Exchange Server 2013, start the Microsoft Exchange Search Host Controller service on the restore destination server after restore is performed.
Mount DB1.
If the roll-forward restoration was performed at step 5, it is necessary to delete or rename the CHK file before performing this step. For more information, refer to "8.2.5.4.3 Mounting the database".
Mount-Database -Identity DB1 |
Add the database copy of DB1 to EX2.
Add-MailboxDatabaseCopy -Identity DB1 -MailboxServer EX2 |
Perform restore from the DB2 that was backed up on EX1.
Activate the database copy of DB2 on EX1.
Move-ActiveMailboxDatabase DB2 -ActivateOnServer EX1 |
Delete the database copy of DB2 on EX2.
Remove-MailboxDatabaseCopy -Identity DB2\EX2 |
Delete the database file and log file in DB2 on EX2.
Perform pre-restore operation on EX1.
Permit to restore the database from backup.
Set-MailboxDatabase -Identity DB2 -AllowFileRestore $true |
Dismount DB2.
Dismount-Database -Identity DB2 |
If QuickOPC is in use for backup, stop the QuickOPC session.
C:\Win32app\AdvancedCopyManager\bin\swsrpshadowadm_exchange stopqopc -dbname DB2 |
For Exchange Server 2013, stop the Microsoft Exchange Search Host Controller service on the restore destination server. However, in consideration of the impact of stopping this service, recommend to take the action.
Perform restore of DB2 on EX1.
In the case of Point-in-Time restoration:
C:\Win32app\AdvancedCopyManager\bin\swsrpvssrestore_exchange -dbname DB2 -point |
in the case of roll-forward restoration:
C:\Win32app\AdvancedCopyManager\bin\swsrpvssrestore_exchange -dbname DB2 -roll |
Perform post-restore operation on EX1.
For Exchange Server 2013, start the Microsoft Exchange Search Host Controller service on the restore destination server after restore is performed.
Mount DB2.
If the roll-forward restoration was performed at step 5, it is necessary to delete or rename the CHK file before performing this step. For more information, refer to "8.2.5.4.3 Mounting the database".
Mount-Database -Identity DB2 |
Add the database copy of DB2 to EX2.
Add-MailboxDatabaseCopy -Identity DB2 -MailboxServer EX2 |
If no database copy of DB1 is available in DAG due to a double failure, perform restore from the backup data obtained on EX1.
Delete the database copy of DB1 on EX2.
Remove-MailboxDatabaseCopy -Identity DB1\EX2 |
Delete the database file and log file in DB1 on EX2.
Delete the database copy of DB1 on EX1.
Remove-MailboxDatabase -Identity DB1 |
Delete the database file and log file in DB1 on EX1.
Create DB1 with the same configuration as before failure on EX1.
Perform pre-restore operation.
Permit to restore the database from backup.
Set-MailboxDatabase -Identity DB1 -AllowFileRestore $true |
Dismount DB1. This procedure, when at procedure 5 DB1 is mounted only, is necessary.
Dismount-Database -Identity DB1 |
If QuickOPC is in use for backup, stop the QuickOPC session.
C:\Win32app\AdvancedCopyManager\bin\swsrpshadowadm_exchange stopqopc -dbname DB1 |
Perform restore of DB1 on EX1.
Point-in-Time restoration:
C:\Win32app\AdvancedCopyManager\bin\swsrpvssrestore_exchange -dbname DB1 -point |
Mount DB1.
Mount-Database -Identity DB1 |
Add the database copy of DB1 to EX2.
Add-MailboxDatabaseCopy -Identity DB1 -MailboxServer EX2 |
Check the mount status of DB1 database.
Get-MailboxDatabaseCopyStatus -Identity DB1 |
Dismount the DB1 database if mounted.
Dismount-Database -Identity DB1 |
Delete the database copy of DB1 on EX2.
Remove-MailboxDatabaseCopy -Identity DB1\EX2 |
If any folder of database file or log file for DB1 exists on EX1 or EX2, delete it manually.
Perform pre-restore operation.
Permit to restore the database from backup.
Set-MailboxDatabase -Identity DB1 -AllowFileRestore $true |
If QuickOPC is in use for backup, stop the QuickOPC session.
C:\Win32app\AdvancedCopyManager\bin\swsrpshadowadm_exchange stopqopc -dbname DB1 |
For Exchange Server 2013, stop the Microsoft Exchange Search Host Controller service on the restore destination server. However, in consideration of the impact of stopping this service, recommend to take the action.
Perform restore of DB1 on EX1.
Point-in-Time restoration:
C:\Win32app\AdvancedCopyManager\bin\swsrpvssrestore_exchange -dbname DB1 -point |
Perform post-restore operation on EX1.
For Exchange Server 2013, start the Microsoft Exchange Search Host Controller service on the restore destination server after restore is performed.
Mount DB1.
Mount-Database -Identity DB1 |
Add the database copy of DB1 to EX2.
Add-MailboxDatabaseCopy -Identity DB1 -MailboxServer EX2 |