Set up a Managed Server transaction using the procedure below.
Note
For Windows Server 2012, install the Failover Cluster Command Interface before performing the cluster setup.
The Windows "Computer Browser service" must be activated if a user belonging to the Administrators of the domain wants to perform customization for the Windows version of MSCS/WSFC.
Do not use the Telnet Server service.
Reactivate the primary node.
Offline group as required.
To add a Managed Server transaction to an existing cluster group, switch the cluster group offline using the Cluster Administrator (for MSCS) or the Failover Cluster Manager (for WSFC). This step is not required if a new cluster group is being created.
Leave the shared disk for AdvancedCopy Manager shared data online.
Refer to the MSCS/WSFC manuals for Windows for information on how to stop the cluster group and how to vary the shared disk online.
Acquire the ownership rights on MSCS/WSFC.
Acquire the ownership rights for the Quorum disk and the shared disk used by AdvancedCopy Manager and the ownership rights for the cluster group on the primary node using the Cluster Administrator (for MSCS) or the Failover Cluster Manager (for WSFC). Refer to MSCS/WSFC manuals for Windows for information on how to acquire ownership rights.
Execute the cluster setup command.
Execute the following cluster setup command on the primary node:
When executing in Management Server
programDir\ACM\bin\stgclset_mscs |
When executing in Managed Server
programDir\bin\stgclset_mscs |
Select the node type and shared disk.
The initial window of the cluster setup command will be displayed.
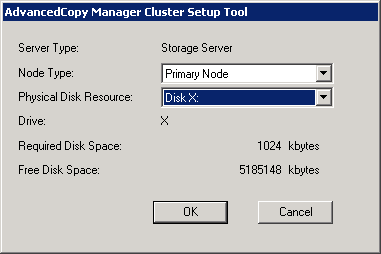
Each item is explained below. Make the required entries and then click OK.
Item | Explanation |
|---|---|
Server Type | Confirm that the server is a "Storage Server". |
Node Type | Select "Primary Node". |
Physical Disk Resource | Select the resource for the shared disk for AdvancedCopy Manager shared data that was prepared in "7.3 Confirmation of items". |
Drive | The drive letter corresponding to the physical disk resource is displayed. |
Required Disk Space | The minimum disk size required for the shared data is displayed. Use the calculated shared disk size for the required disk size. Make sure that there is enough free space. |
Free Disk Space | The amount of free disk space of the specified drive is displayed. |
Set the cluster information for the primary node.
The setting screen of the cluster setup command will be displayed. A displayed screen may vary from operating system to operating system.
For Windows Server 2003

Each item is explained below. Make the required entries and then click OK.
Item | Explanation |
|---|---|
Server Type | Confirm that the server is a "Storage Server". |
Node Type | Confirm that the node is "Primary Node". |
Drive | The drive letter corresponding to the physical disk resource is displayed. |
Logical Node Name | Enter the logical node name as defined in "7.3 Confirmation of items". |
Service name | Enter the service name as defined in "7.3 Confirmation of items". |
Cluster Name | Enter the cluster name as confirmed in "7.3 Confirmation of items". |
IP Address | Enter the logical IP address as defined in "7.3 Confirmation of items". |
Create New IP Address Resource | If the IP address entered above is a new IP address, select this button. Enter information for the following three items only if this button has been selected.
|
An existing IP address resource will be used | If the IP address entered above is an IP address inherited from an existing cluster group, select this button. Enter information for the following item only if this button has been selected.
|
Storage Management Server Operation | Do not select this item for setting the Managed Server transaction. |
For Windows Server 2008 or later
The following screen is for Windows Server 2008. A screen name may vary from operating system to operating system.
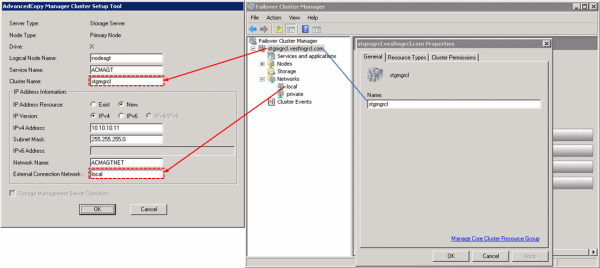
Each item is explained below. Make the required entries and then click OK.
Item | Explanation |
|---|---|
Server Type | Confirm that the server is a "Storage Server". |
Node Type | Confirm that the node is "Primary Node". |
Drive | The drive letter corresponding to the physical disk resource is displayed. |
Logical Node Name | Enter the logical node name as defined in "7.3 Confirmation of items". |
Cluster Name | Enter the cluster name as confirmed in "7.3 Confirmation of items". |
IP Address Resource |
|
IP Version | Select the IP version of Managed Server IP address. |
IPv4 Address | Enter the logical IP address (IPv4) as defined in "7.3 Confirmation of items" when using IPv4 to operate the Managed Server. |
Subnet Mask | Enter the subnet mask of the IP address in the IPv4 Address, when "New" is selected in the IP Address Resource and "IPv4" is selected in the IP Version. |
IPv6 Address | Enter the logical IP address (IPv6) as defined in "7.3 Confirmation of items" when using IPv4 to operate the Managed Server. The specified IPv6 address should one that is usable with WSFC. |
Network Name | Enter the network name as confirmed in "7.3 Confirmation of items" when "New" is selected in the IP Address Resource. |
External Connection Network | Enter the external connection network name as confirmed in "7.3 Confirmation of items", when "New" is selected in the IP Address Resource and "IPv4" is selected in the IP Version. |
Storage Management Server Operation | Do not select this item for setting the Managed Server transaction. |
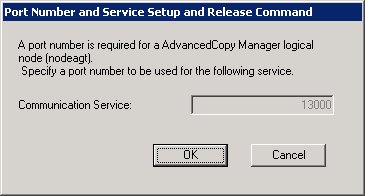
Set the port number and service.
The following page will be displayed. If the port number and service has already been set, this page is not displayed.
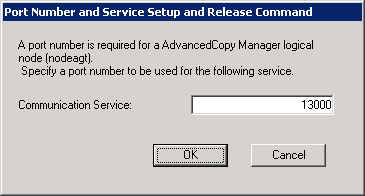
The item is explained below. Make the required entries and then click OK.
Item | Explanation |
|---|---|
Communication Service | Enter the port number for the transaction communication service as defined in "7.3 Confirmation of items". |
The port number and service settings have been completed.
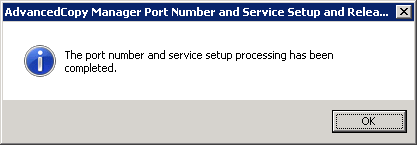
Click OK.
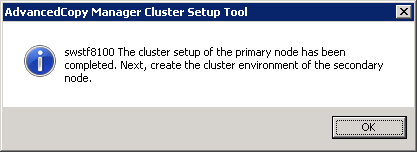
The cluster setup of the primary node has been completed.
When the cluster setup completion window is displayed, click OK. Continue by setting up the secondary node.
Reactivate the secondary node A.
Acquire cluster group ownership on the secondary node A.
Acquire the ownership rights for cluster group on the secondary node A on the Windows version of MSCS/WSFC, using the Cluster Administrator (for MSCS) or the Failover Cluster Manager (for WSFC). Refer to MSCS/WSFC manuals for Windows for information on how to acquire ownership rights.
Execute the cluster setup command.
Execute the following cluster setup command on the secondary node:
When executing in Management Server
programDir\ACM\bin\stgclset_mscs |
When executing in Managed Server
programDir\bin\stgclset_mscs |
Select the node type and shared disk.
The initial window of the cluster setup command will be displayed.

Each item is explained below. Make the required entries and then click OK.
Item | Explanation |
|---|---|
Server Type | Confirm that the server is a "Storage Server". |
Node Type | Select "Secondary Node". |
Physical Disk Resource | Select the resource for the shared disk for AdvancedCopy Manager shared data that was prepared in "7.3 Confirmation of items". |
Drive | The drive letter corresponding to the physical disk resource is displayed. |
Required Disk Space | The minimum disk size required for the cluster environment is displayed. |
Free Disk Space | The amount of free disk space of the specified drive is displayed. |
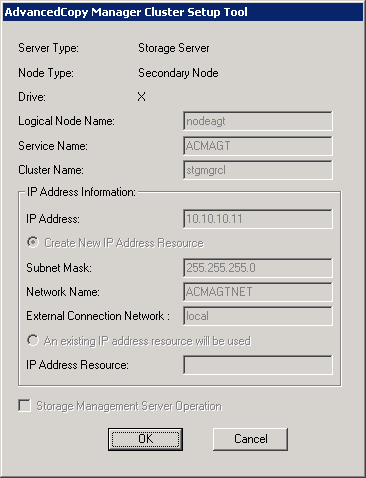
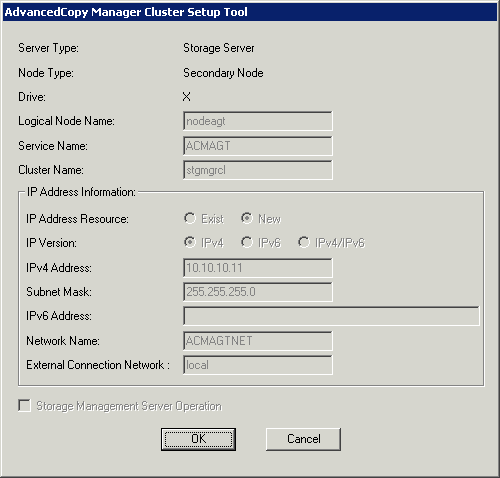
Set the cluster information for the secondary node A.
The values set for the primary node will be displayed in the following page (The Node type is displayed as a "Secondary Node"). After confirming each item, click OK.
For Windows Server 2003
For Windows Server 2008 or later
Set the port number and service.
The following page will be displayed. The same value as those set for the primary node is displayed. If a port number and service has already been set, this page is not displayed.
Click OK.
The port number and service settings have been completed.
Click OK.
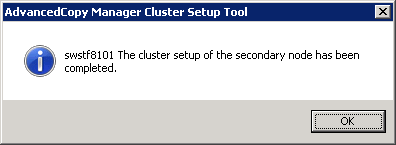
The cluster setup of the secondary node has been completed.
When the cluster setup completion window is displayed, click OK.
If the clustered system is the 1:1 standby system, the Mutual standby system and the n:1 standby system, proceed to step 27.
If the system is the Cascade topology, proceed to step 18.
Reactivate the secondary node B.
Note
When the secondary node B consists of two or more nodes, perform from step 18 to step 26 on all of the secondary nodes B.
Acquiring cluster group ownership on the secondary node B.
Acquire the ownership rights for cluster group on the secondary node B on the Windows version of MSCS/WSFC, using the Cluster Administrator (for MSCS) or the Failover Cluster Manager (for WSFC). Refer to MSCS/WSFC manuals for Windows for information on how to acquire ownership rights.
Execute the cluster setup command.
Execute the following cluster setup command on the secondary node B:
When executing in Management Server
programDir\ACM\bin\stgclset_mscs |
When executing in Managed Server
programDir\bin\stgclset_mscs |
Select the node type and shared disk.
The initial window of the cluster setup command will be displayed.
Each item is explained below. Make the required entries and then click OK.
Item | Explanation |
|---|---|
Server Type | Confirm that the server is a "Storage Server". |
Node Type | Select "Secondary Node". |
Physical Disk Resource | Select the resource of the shared disk for AdvancedCopy Manager shared data. Select the same resource as that selected for the primary node. |
Drive | The drive letter corresponding to the physical disk resource is displayed. |
Required Disk Space | The minimum disk size required for the AdvancedCopy Manager cluster environment is displayed. |
Free Disk Space | The amount of free disk space of the specified drive is displayed. |
Confirm the addition of the secondary node.
A confirmation dialog box for adding a secondary node to a cascade topology is displayed. Confirm that the service is for a cascade topology, and then click Yes.
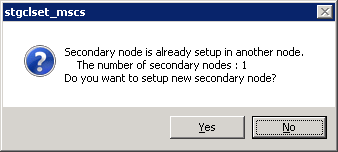
The number of secondary nodes already set up is displayed at the item "The number of secondary nodes".
Note
Note that the default is No (cancellation of processing).
Set the cluster information for the secondary node B.
The values set for the primary node will be displayed in the following page (The Node type is displayed as a "Secondary Node"). After confirming each item, click OK.
For Windows Server 2003
For Windows Server 2008 or later
Set the port number and service.
The following page will be displayed. The same value as those set for the primary node is displayed. If a port number and service has already been set, this page is not displayed.
Click OK.
The port number and service settings have been completed.
Click OK.
The cluster setup of the secondary node B has been completed.
When the cluster setup completion window is displayed, click OK.
Note
If more secondary nodes B remain (steps from step 18 to step 26 have not been performed on them), perform from step 18 in the remaining nodes. When operation from step 18 to step 26 is completed for all secondary nodes B, go to step 27.
If necessary, specify the resource dependency and the ownership rights required for execution.
Set the dependency of the resource.
Add a business disk resource to the dependency of the following resources by using Cluster Administrator (for MSCS) or Failover Cluster Manager (for WSFC).
AdvancedCopy COM Service_logicalNodeName
Note
When a volume is added, or when it is deleted, it is necessary to again set up the above-mentioned dependency. Refer to "Notes on Cluster Operation" in the ETERNUS SF AdvancedCopy Manager Operation Guide (for Windows) for information about this.
If the number of clustered system nodes is greater than the number of cluster group nodes (such as in an n:1 standby system), change the ownership rights required for execution.
Using Cluster Administrator (for MSCS) or Failover Cluster Manager (for WSFC), change the property information (ownership rights required for execution) of the AdvancedCopy Manager resources belonging to the cluster group for only the nodes operating in the cluster group. Refer to the Windows version of MSCS/WSFC manuals for information on how to change the ownership rights required for execution. The property information must be changed for the following resources:
AdvancedCopy COM Service_logicalNodeName
AdvancedCopy IP Address logical node name (if "Create New IP Address Resource" has been selected with the cluster setup command of AdvancedCopy Manager or "New" has been selected in the " IP Address Resource")
AdvancedCopy Network logical node name (if "Create New IP Address Resource" has been selected with the cluster setup command of AdvancedCopy Manager or "New" has been selected in the " IP Address Resource")
Shared disk for AdvancedCopy Manager shared data
Backup volume or replica volume
Online the AdvancedCopy Manager service on the primary node.
Use Cluster Administrator (for MSCS) or Failover Cluster Manager (for WSFC) to take the cluster group whose settings have been completed online and to start AdvancedCopy Manager service.
Back up the environment.
As a safeguard against accidental loss of data or file corruption, back up the data environment on the shared disk for AdvancedCopy Manager shared data.
Using the copy function (for example, Windows Explorer), back up the following folders on the shared disk for AdvancedCopy Manager shared data.
Drive of the shared disk for AdvancedCopy Manager shared data:\etc
Drive of the shared disk for AdvancedCopy Manager shared data:\var
Verify the operation node.
Using Cluster Administrator (for MSCS) or Failover Cluster Manager (for WSFC), verify that the cluster group operates on the node.
Create an environment for the Managed Server transaction.
Create an environment for the replication operation or backup operations, which is executed in AdvancedCopy Manager, in a Managed Server transaction.
Refer to the ETERNUS SF AdvancedCopy Manager Operation Guide (for Windows) to create the environment for Managed Server transactions according to the operation type.
Note
When adding a Managed Server transaction to a Managed Server, execute the stgxfwcmaddsrv command. Refer to "stgxfwcmaddsrv (Server information addition command)" in the ETERNUS SF AdvancedCopy Manager Operation Guide relevant to the OS of the Management Server for information on the command.
Refer to "2.4.2 Cluster transaction and local transaction" for information on the specified argument for command option.
Reboot all nodes.
If the secondary node in n:1 standby operation was already completely installed and customized (including the reboot) earlier, reboot only the primary node.