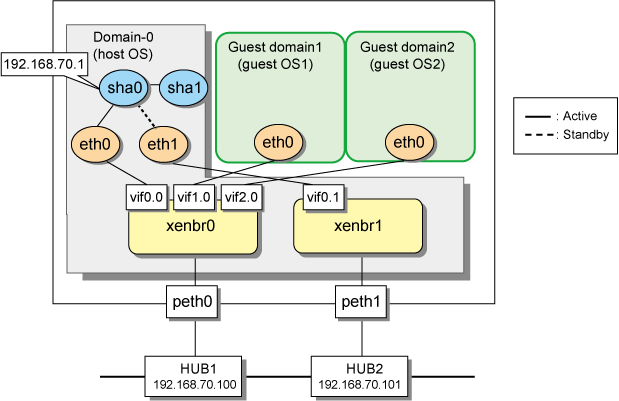
This section describes a configuration setup example for the following network configuration.

1) Setting up the virtual network
1-1) Define virtual bridges (xenbr0, xenbr1). For details, see the RHEL manuals.
Contents of /etc/xen/scripts/network-bridge-gls
#!/bin/sh
#
# Sample of Create/Delete virtual bridge
#
# $1 start : Create virtual bridge
#    stop  : Delete virtual bridge
#    status: Display virtual bridge information

# Exit if anything goes wrong
#set -e

command=$1
xenscript=/etc/xen/scripts/network-bridge
glsxenscript=/opt/FJSVhanet/local/sbin/hanetxen

# op_start:subscript for start operation #
op_start () {
$xenscript $command vifnum=0 netdev=eth0
$xenscript $command vifnum=1 netdev=eth1}
# op_stop:subscript for stop operation #
op_stop () {
# same operation as start
op_start
}
case "$command" in
start)
# Create your virtual bridge
$glsxenscript stop
op_start
$glsxenscript start
;;
stop)
# Delete virtual bridge
$glsxenscript stop
op_stop
;;
*)
echo "Unknown command: $command" >&2
echo 'Valid commands are: start, stop, status' >&2
exit 1
esac |
Note
In the line of "$xenscript $command vifnum=X netdev=ethX", specify the same value for the number (X) specified by vifnum and the number (X) of the device name (ethX) specified by netdev.
1-2) Save the script in "/etc/xen/scripts".
# cp network-bridge-gls /etc/xen/scripts # cd /etc/xen/scripts # chmod +x network-bridge-gls |
1-3) Register with the xend service.
Contents of /etc/xen/xend-config.sxp
# Your default ethernet device is used as the outgoing interface, by default.
# To use a different one (e.g. eth1) use
#
(omitted)
#
(network-script network-bridge-gls) |
1-4) Edit the domain configuration file
The network interface for the guest OS should be connected to the primary virtual bridge (xenbr0) that you set in "3-1)". The following shows an example of the domain configuration file. Set the virtual bridge name in the "vif" parameter. For details on the domain configuration file, see the RHEL manuals.
Contents of /etc/xen/domain name (domain configuration file)
vif=["mac=XX:XX:XX:XX:XX:XX,bridge=xenbr0"] |
2) Setting up the network on the host OS
2-1) Define the IP addresses and host names you use in the /etc/hosts file.
192.168.70.1 hosta # virtual IP address of the host OS 192.168.70.100 swhub1 # IP address of the primary monitoring destination's HUB 192.168.70.101 swhub2 # IP address of the secondary monitoring destination's HUB |
2-2) Type IP addresses in the /etc/sysconfig/network-scripts/ifcfg-ethX(X = 0, 1) file.
Contents of /etc/sysconfig/network-scripts/ifcfg-eth0
DEVICE=eth0 BOOTPROTO=static HWADDR=XX:XX:XX:XX:XX:XX HOTPLUG=no BROADCAST=192.168.70.255 IPADDR=192.168.70.2 NETMASK=255.255.255.0 NETWORK=192.168.70.0 ONBOOT=yes TYPE=Ethernet |
Contents of /etc/sysconfig/network-scripts/ifcfg-eth1
DEVICE=eth1 BOOTPROTO=static HWADDR=XX:XX:XX:XX:XX:XX HOTPLUG=no ONBOOT=yes TYPE=Ethernet |
2-3) Configure the /etc/sysconfig/network file to enable the network setting.
NETWORKING=yes NETWORKING_IPV6=no |
2-4) Reboot
To enable the network settings for Domain-0, execute the following command and reboot the system. After rebooting the system, use the ifconfig command to check that eth0 is activated.
/sbin/shutdown -r now
3) Having GLS recognize the virtual network configuration
3-1) Set values in the configuration file of the virtual network.
Contents of /etc/opt/FJSVhanet/script/conf/eth0_eth1.conf
PRI_BR=xenbr0 SEC_BR=xenbr1 PRI_OUT_IF=peth0 SEC_OUT_IF=peth1 |
Note
Set the values in the configuration file for a virtual network for each redundant physical interface. When you name the configuration file of the virtual network, put an underscore between the names of the redundant physical interfaces, and".conf" at the end. Other forms of names are invalid. In addition, only alphanumeric characters and periods can be used in the string after the "=" for each setting. If you use characters other than the above, the setting will be invalid.
3-2) Copy the script for switching virtual networks to enable the redundant line control function.
cd /etc/opt/FJSVhanet/script/xen
cp -p eth_eth.xen.sam eth0_eth1
Note
Create the script for associating the virtual machine function with GLS for each redundant physical interface. When you name the script file for associating the virtual machine function with GLS, put an underscore between the names of the redundant physical interfaces. Other forms of names are invalid.
4) Setting the redundant line switching mode
4-1) Setting subnet masks
/opt/FJSVhanet/usr/sbin/hanetmask create -i 192.168.70.0 -m 255.255.255.0
4-2) Setting the virtual interface
/opt/FJSVhanet/usr/sbin/hanetconfig create -n sha0 -m e -i 192.168.70.1 -t eth0,eth1
Note
Make sure to set the same physical IP address that has been set in /etc/sysconfig/network-scripts/ifcfg-eth0 as the physical IP address to be specified in the '-i' option.
4-3) Setting HUB monitoring function
/opt/FJSVhanet/usr/sbin/hanetpoll create -n sha0 -p 192.168.70.100,192.168.70.101 -b off
4-4) Setting the standby patrol
/opt/FJSVhanet/usr/sbin/hanetconfig create -n sha1 -m p -t sha0
4-5) Activating the virtual interface
/opt/FJSVhanet/usr/sbin/strhanet
4-6) Starting HUB monitoring
/opt/FJSVhanet/usr/sbin/hanetpoll on
5) Setting up a guest OS
Set up an IP address. Edit the "/etc/sysconfig/network-scripts/ifcfg-ethX" file as you would for the host OS.