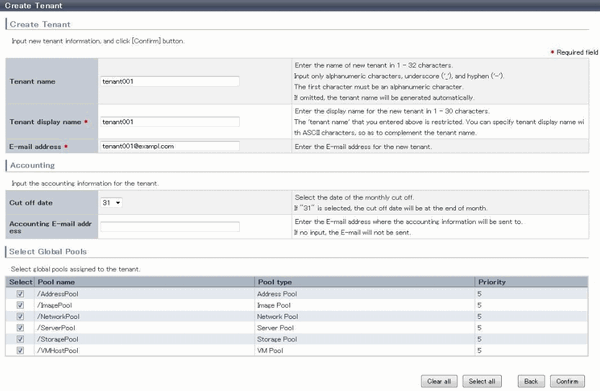
The Create Tenant window can be used to create a new tenant.
Perform the following steps to create a tenant:
Click the Create tenant button on the Tenant List window.
The Create Tenant window is displayed.
In the Create Tenant window, specify the information for the tenant being created.

Item | Explanation | |
|---|---|---|
Tenant name | Specify the name of the tenant being created. Specify a character string of up to 32 characters consisting of single-byte alphanumerics, hyphens (-), and underscores (_), and starting with a single-byte alphanumeric. | |
Tenant display name | Specify the display name of the tenant being created. Specify a character string of up to 30 characters. The display name is the name displayed on the use status window and other windows. | |
E-mail address | Use up to 64 characters to specify the e-mail address or mailing list of the administrator of the tenant being created. | |
Select Global Pools | Select a global pool that can be used from the tenant being created. | |
Pool name | Displays the resource pool name. | |
Pool type | Displays the resource pool type.
| |
Priority | Displays the resource pool priority when resources are selected automatically during L-Server creation. | |
Accounting | Enter information related to tenant charges. | |
Cut off date | Specify the day for monthly closing processing. | |
Accounting E-mail address | Specify the email address to send the usage charges. | |
Point
The Email address item in the preceding table is used as the destination to notify the following Tenant Administrator operations:
User registration
User modification
User deletion
User password change
The operations for tenant users can be monitored by specifying the e-mail address of Infrastructure Administrator or tenant representative.
The changed password is notified in user password change, so specify the reliable email address.
The Destination email address item of the preceding table is used to send usage charges that are calculated from L-Platform usage and accounting information.
Note
When Solaris containers are being used and when one of the following applies, do not specify strings starting with "SUNW" for the tenant name:
When the server ID is to be used in the L-Server name as the method for setting resource names
When the host name is to be used in the L-Server name as part of a resource naming convention, and the host name setting for the virtual server is to use the tenant name and a serial number
When "tenant name + serial number" is used in the host name setting of the virtual server, specify tenant names using alphanumeric characters and hyphens. Tenant names consisting solely of numbers are not allowed.
Refer to "19.4 Setting the Host Names for Virtual Servers" in the "Setup Guide CE" for information on the host name setting for the virtual server. Refer to "19.5 Setting the Method for Setting Resource Names" in the "Setup Guide CE" for information on resource naming conventions.
Click the Confirm button.
The confirmation window is displayed.
Check the tenant information, and then click the Create button.
The completion window is displayed.
Click the Back to Tenant List button to return to the Tenant List window.