Email messages can be sent using the SendEmail Java Action. You can use this Java Action, for example, to notify anyone that a process or an activity has been started.
You can also attach logs or reports of processes, along with the email.
You can assign SendEmail to any node and to the process definition itself. When using Email Nodes, this is the only Java Action that can be assigned.
To send emails:
Click the empty space in the Process Definition editor or select the node to which you want to assign the Java Action, to display the Properties view for the process definition or the node respectively.
Select the Action Set tab. Click Add corresponding to the position where you want to add the Java Action. The Action Type List dialog is displayed.
If the Action Type List dialog is displayed, expand Notification Actions and double click SendEmail.
This operation is not required for Email Nodes.
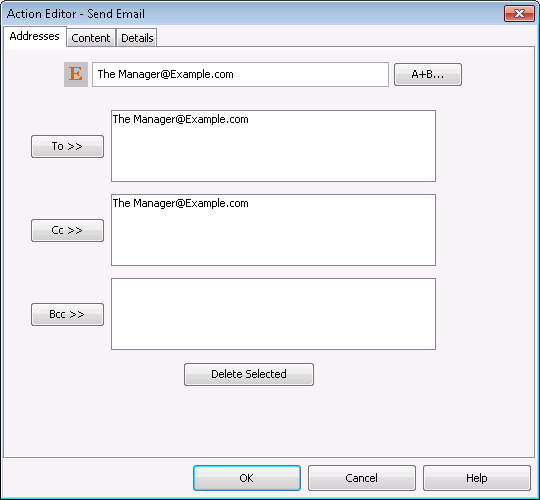
On the Addresses tab, in the Action Editor - Send Email dialog, specify the users to which emails are to be sent.
Specify a JavaScript expression for the address.
You can type a constant (that is, an email address), select a User Defined Attribute (UDA) that has an address as its value, or build a complex JavaScript expression that evaluates to an address. For details, refer to section 11.14 Defining JavaScript Expressions.
Note
If you select a UDA, the UDA must be of type STRING. Otherwise an error will occur when the Java Action is executed.
Click To, Cc, or Bcc depending on how you want the message to be addressed.
If you want to remove an address, select it and click Delete Selected.
Figure 11.31 Using Addresses
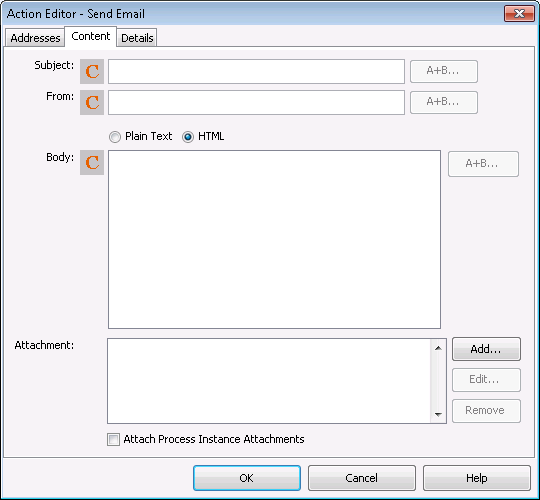
On the Content tab, specify JavaScript expressions for the Subject and From fields and the message body. Select the format in which you want the email to be sent.
Figure 11.32 Specifying Email Content
Optional: To send an attachment with the email:
Click the Add button located near the Attachment field. Attachment dialog is displayed.
Note
You can select an attachment in the Attachment field and click Edit to edit it or click Remove to remove the selected attachment. When you select an attachment and click Edit, Attachment dialog is displayed.
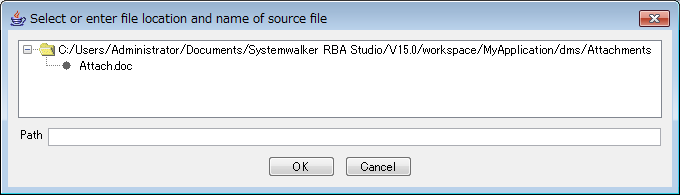
Attach a file using either the Browse button or the expression mode button. To attach a file by browsing, click the Browse button. Select or enter file location and name of source file dialog is displayed. This dialog displays the tree view of the files in dms folder of the application. You can browse the file that you want to attach with the email using this dialog. You can also enter the path to the file in the Path field and select the required file in the dialog.
Note
Refer 11.14 Defining JavaScript Expressions for more information about expression mode button.
Figure 11.33 Attaching File
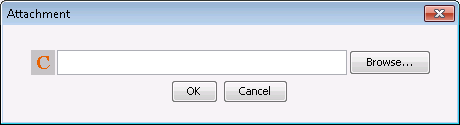
Figure 11.34 Browsing for Attachment
Note
The value of attachment is specified by the relative path from the route of the application project. The wild-card cannot be used. For example, dms/Attachments/abc.doc or uda.get("DMSattachment") + ".txt".
Click OK on Attachment dialog.
Optional: On the Action Editor - Send Email dialog, select the Attach Process Instance Attachments checkbox to attach the process instances with the email.
On the Details tab, type a descriptive name and your notes for the Java Action in Action Name and Notes fields respectively.
Click OK.