The procedure is as follows:
Select [Information disclosure analysis] in the [Report Output Tool] window.
→ The following window is displayed.

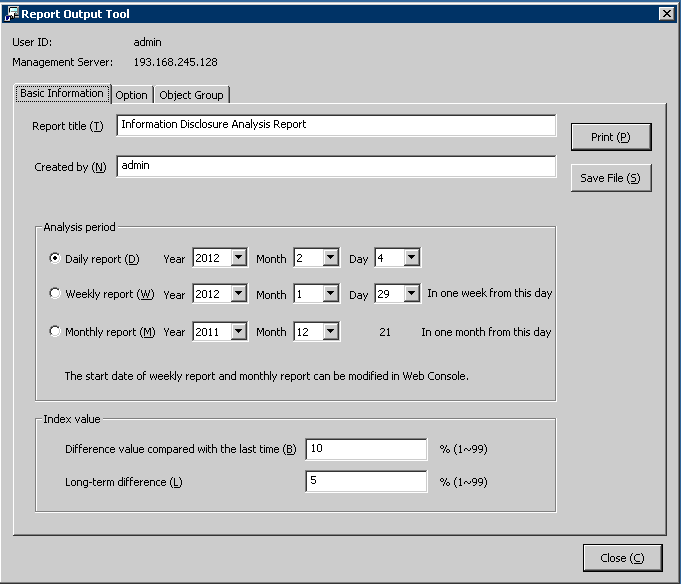
User ID: This is the login user ID.
Management Server: This is the IP address of the Management Server on which the report output logs are saved.
Set the items of each tab.
The settings of each tab will be saved in the Log Analyzer Server as inherent information of the login user when [Print] or [Save File] is performed. The saved information will be displayed at next startup.
Set the following items.
Input Item | Content | |
|---|---|---|
[Report title] | Specify the title (up to 64 characters) of report to be output. | |
[Created by] | Specify creator (up to 40 characters) of report. | |
[Analysis period] | [Daily report] | Specify the aggregation target of daily report. The default setting is the day before the login day. |
[Weekly report] | Specify the aggregation target of weekly report. The default setting is the last start day of weekly report. | |
[Monthly report] | Specify the month of aggregation target of monthly report. The default setting is the latest start day of monthly report. | |
[Index value] | [Difference value compared with the last time] | As the standard index value of information disclosure risk, when a certain degree of change has occurred since last report output, specify to judge whether it has deteriorated or improved within the range of “1~99” percent. |
[Long-term difference] | As the standard index value of information disclosure risk, when a certain degree of change has occurred during the last ten times of diagnosis output by report, specify to judge whether it has deteriorated or improved within the range of “1~99” percent. | |
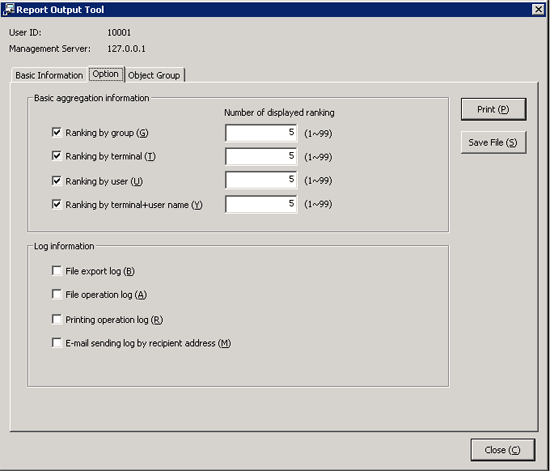
Set the following items.

Select the ranking items to be output to report.
Please make sure to select more than one item (All items are selected in default).
Item Name | Description |
|---|---|
[Ranking by group] | Display the result of aggregation by group with the worst ranking based on number of cases. |
[Ranking by terminal] | Display the result of aggregation by terminal with the worst ranking based on number of cases. |
[Ranking by user] | Display the result of aggregation by user name with the worst ranking based on number of cases. Even if the same user name appears in different terminals, it will be processed as the same user. |
[Ranking by terminal+user name] | Display the result of aggregation by terminal + user name with the worst ranking based on number of cases. Even if the same user name appears in different terminals, it will be processed separately. |
[Log Information]
Select when outputting the logs used in the aggregation of ranking (All items are selected in default).
The Information disclosure analysis report is a single file output in CSV format.
Item Name | Description |
|---|---|
[File export log] | Output file export log as a single file. |
[File operation log] | Output file operation log as a single file. |
[Printing operation log] | Output printing log as a single file. |
[E-mail sending log by recipient address] | Output logs of e-mail sending by recipient address as a single file. |
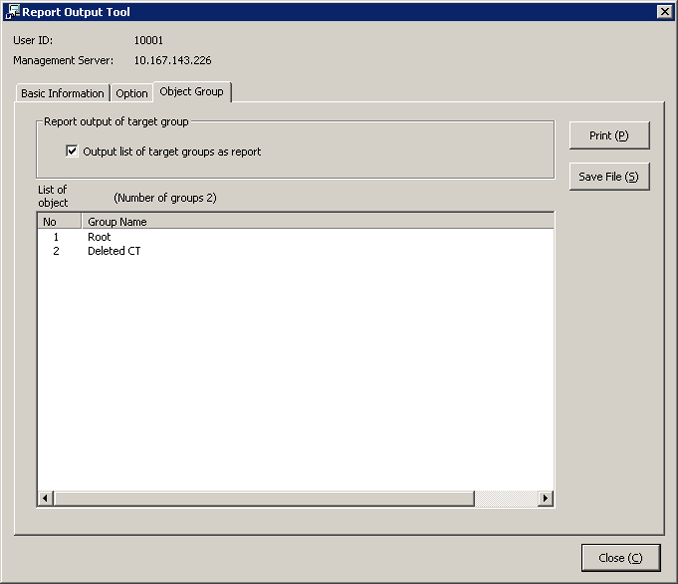
Set the following items.

Item Name | Description |
|---|---|
[Report output of target group] |
|
[List of object] | The department of the log analysis target and its subordinate units will be output to report. The total number of set departments is displayed beside the title. |
Click the [Print] or [Save File] button.
Note
Please do not operate Microsoft® Excel in the process of report output
Please do not perform the [New] and [Open] operation of Microsoft® Excel file during the report output process, as report output may not be performed normally.
In addition, please confirm whether Microsoft® Excel was started correctly before the report output. When Microsoft® Excel is not started correctly, problems such as the report output process taking too much time and being unable to finish will occur.
[When clicking the [Print] button]
Print the generated report and logs used for the aggregation of ranking.
In the displayed [Print] window, set the printer and print the report.
Point
The Printing Dialog Box may hide behind the Report Output Tool.
When the Printing Dialog Box has not displayed after a long time, it may be hidden behind the Report Output Tool.
[When clicking the [Save File] button]
Save the generated report and logs used for the aggregation of ranking as a file.
Note
Please save the output report to a safe place
The output report may contain personal information and system configuration information. Please specify a folder that has been implemented sufficient security policy as the target for saving the file.
[Example]
Set the access authority of folder to allow only the administrator to view.
In the displayed saving window, specify the destination for saving and click the [Save] button.
Each file will be saved with the following name.
[Report File]
Default Name: Leak_ [Analysis Period] _ [Start Date of Analysis Period].xls
(When a file with same name exists, the confirmation dialog for overwriting will be displayed.)
Analysis period
Daily report: daily
Weekly report: weekly
Monthly report: monthly
Start date of analysis time: YYYYMMDD (date set in [Analysis Period] of the [Basic Information] tab)
[CSV File of Log]
Log Type | CSV File Name |
|---|---|
File export | Leak_Log_Filebringout_YYYYMMDD.csv |
File Operation | Leak_Log_Fileaccess_YYYYMMDD.csv |
Printing Operation | Leak_Log_Print_YYYYMMDD.csv |
E-mail Sending Log by Recipient Address | Leak_Log_Mailsend_YYYYMMDD.csv |
When a file with same name exists, the number with () will be added to the end of file name.
Example: Leak_Log_Filebringout_YYYYMMDD (2).csv
The following will be are (3) and (4), etc.
Note
Please confirm UNICODE character in Internet Explorer®
When the UNICODE characters (including JIS2004) that do not correspond to the Shift JIS font are used in the log data, they will be displayed in the HTML Escape format in the CSV file.
Please open the following HTML files using Internet Explorer®, and confirm the font of JIS2004 that contains UNICODE character:
・File location: HTML folder under the target folder for saving report file.
・File name: it has the same name as CSV file (The extension is “.html”.).
The content that is same as the log data that is output to the CSV file will be displayed in this HTML file.