When allocating a department administrator, the department administrator should be allocated to a group after the configuration information tree has been created. (If the list of department administrators has been registered through the Server Settings Tool during the installation of Systemwalker Desktop Keeper.)
After the application has started, the department administrator can be registered again and allocated by using the Server Settings Tool.
For the registration method please refer to the “Set Administrator’ Information” of “Systemwalker Desktop Keeper Installation Guide”.
Only the system administrator can allocate a department administrator.
Even if any subgroup exists under the CT group (user group) in which the department administrator has been set, the same department administrator will be set automatically.
Though the department administrator can be confirmed in the group where it has been set, it cannot be displayed in the subgroup even if it is expected to be confirmed.
The department administrator can create groups, set policies and register users for the CT/user of the group and its subgroup in which it is set as the department administrator. For operations that can be performed by the department administrator and the scope of operation, please refer to “Function Available for Each Type of Administrator” of “Systemwalker Desktop Keeper Installation Guide”.
When the department administrator is set for user group only, but not for CT group, the department administrator cannot view logs. When the group tree displayed in Log Viewer is CT group tree, the logs in each CT can be viewed. Therefore, please set the department administrator in CT group in order to view logs.
As to the client (CT) displayed in the following locations of the configuration information tree, the department administrator cannot be set (if a group is created in the following locations, the department administrator can be set for this group). Therefore, only the system administrator can move and delete the client (CT) displayed in the following locations.
Directly under the Root directory
Directly under domain group
Directly under Local group
In a 3-level system structure, set department administrator in which the server is determined by the settings in the [System Settings] window of [Server Settings Tool].
When linking with Active Directory | When Active Directory Linkage is not performed | |
|---|---|---|
To manage user information collectively in Master Management Server | To manage user information on each Management Server | |
Set in Master Management Server. (Notes) | Set in Master Management Server. (Notes) | Set in each Management Server. |
Notes: If it cannot be used due to troubles in the Master Management Server, settings can be performed in the Management Server. However, the settings in the Management Server will be overwritten by the latest information in the Master Management Server in the following cases:
When restarting SWLevelControlService/SWServerService
When performing Active Directory Linkage
When updating [Administrator Information Settings] in Server Settings Tool
When setting in the Management Console connected with the Master Management Server (but only the department which has been set can be updated)
Point
To search the operation logs in Citrix XenApp client more efficiently
If the administrator of the Citrix XenApp Server has been set, the department administrator of the Citrix XenApp Server group can audit all the operations on the Citrix XenApp Server.
In addition, when the Citrix XenApp Server group and CT group exist in this department, both the department administrators of the two groups can know the operations on the Citrix XenApp client and the client (CT).
The following are two methods for allocating a department administrator.
Allocate using GUI
Allocate collectively using CSV files
During operation, the Management Console must be authorized with [Import CSV files]. Authority can be set in [Detailed Authority] in the [Administrator Information Settings] window of the Server Settings Tool.
CSV files of allocated department administrator must be created in advance.
At first, the department administrator information is exported in CSV format in the Management Console to get the format of the CVS file. Add the added department administrator to the file.
When allocating multiple department administrators to the same CT group (user group), please copy the records of target groups and record the logon ID of department administrator.
[Examples of Creation]
The boldface part after the second line (the fifth item is “Logon ID of Department Administrator”) is the newly added information in CSV file.
"Depth", "Group ID", "Group Name", "Processing Flag", "Logon ID of Department Administrator", "User Name of Department Administrator", "Access Authority", "Detailed Authority - Management Console 1", “Detailed Authority - Management Console 2", "Detailed Authority - Management Console 3", "Detailed Authority - Management Console 4", "Detailed Authority - Management Console 5", " Detailed Authority - Management Console 6", " Detailed Authority - Management Console 7", " Detailed Authority - Management Console 8", "Detailed Authority - Log Viewer 1", "Detailed Authority - Log Viewer 2", "Detailed Authority - Log Viewer 3", "Detailed Authority - Log Viewer 4", "Detailed Authority - Log Viewer 5", "Detailed Authority - Log Viewer 6", "Detailed Authority - Log Viewer 7", "Detailed Authority - Log Viewer 8", "Notes"
"1", "8F10E643-2E93-4c5d-820E-D4A3322130A7", "Planning Department", " ", "Moriyama", " ", " ", " ", " ", " ", " ", " ", " ", " ", " ", " ", " ", " ", " ", " ", " ", " ", " ", " "
"2", "7F9CB48C-DA30-45d7-9E86-08E95994AF1C", "Planning Department", " ", "Lin", " ", " ", " ", " ", " ", " ", " ", " ", " ", " ", " ", " ", " ", " ", " ", " ", " ", " ", " "
"2", "7F9CB48C-DA30-45d7-9E86-08E95994AF1D", "Planning Department", " ", " ", " ", " ", " ", " ", " ", " ", " ", " ", " ", " ", " ", " ", " ", " ", " ", " ", " ", " ", " "
For details of CSV files, please refer to “File Reference” of “Systemwalker Desktop Keeper Reference Manual”.
Also, the authority of the department administrator must be set for the department administrator that logs on to CSV files. Authority is set in the [Administrator Information Settings] window of Server Settings Tool. For details, please refer to “Set Administrator’ Information” of “Systemwalker Desktop Keeper Installation Guide”.
Allocate using GUI
This section describes how to allocate department administrator using GUI.
Start [Management Console].
Use the user ID and password of administrator to logon.
Select a CT group to set department administrator from the CT group tree.
Select [Set Department Administrator of CT Group] from the [File] menu.
→ The [Set Department Administrator of CT Group] window is displayed.
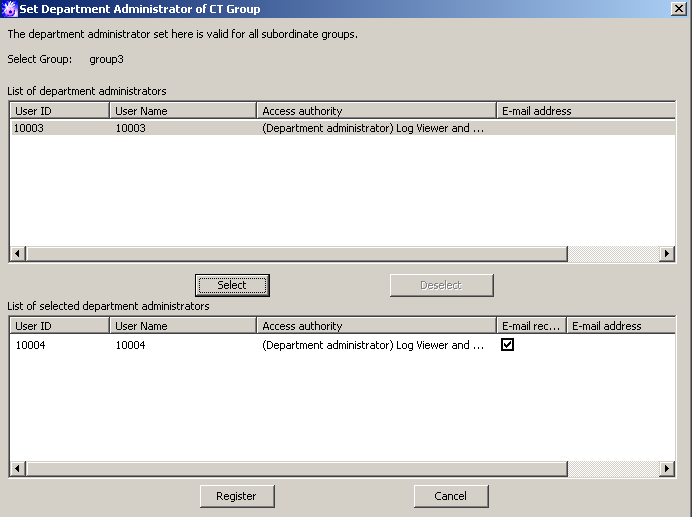
Select the department administrator to be set from [List of department administrators] and click the [Select] button.
→ The selected department administrator is displayed in [List of Selected department administrators].
Please set [E-mail receiving].
If selected (initial value): an administrator notification E-mail will sent to the registered department administrator.
If not selected: an administrator notification E-mail will not be sent.
If [Administrator Notification Settings] has not been set in the Server Settings Tool, the E-mail will not be sent even if it is selected.
Click the [Register] button.
→ The confirmation window is displayed.
Click the [OK] button.
Start [Management Console].
User the user ID and password of the system administrator to logon.
Select [User Policy Settings] from the [User Settings] menu.
→ The [User Policy Settings] window is displayed.
Select a user group to set the department administrator from the user group tree.
Select [Set Department Administrator of User Group] from the [File] menu.
→ The [Set Department Administrator of User Group] is displayed.
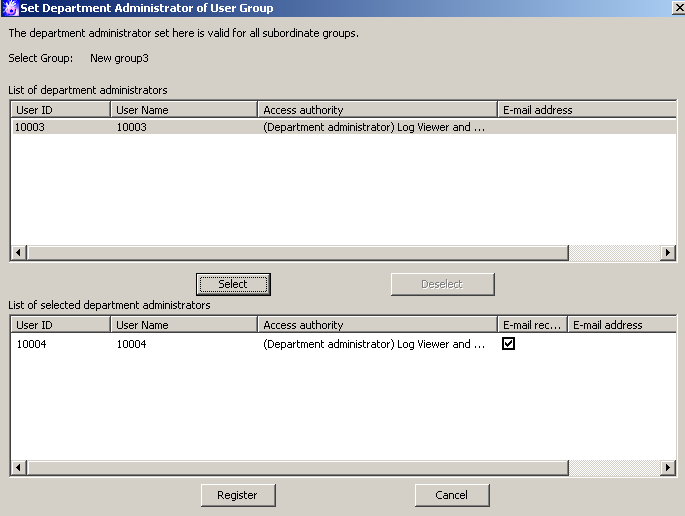
Select the department administrator to be set from [List of department administrator] and click the [Select] button.
→ The selected department administrator is displayed in [List of Selected department administrator].
Please set [E-mail receiving].
If selected (initial value): an administrator notification E-mail will be sent to the registered department administrator.
If not selected: an administrator notification E-mail will not be sent.
If [Administrator Notification Settings] has not been set in the Server Settings Tool, the E-mail will not be sent even if it is selected.
Click the [Register] button.
→ The confirmation window is displayed.
Click the [OK] button.
Allocate collectively using CSV files
This section describes how to allocate department administrators collectively using CSV files.
Start [Management Console].
Use the user ID and password of the system administrator to logon.
Select [Import Department Administrator of CT Group in CSV Format] from the [File] menu.
→ The [Specify a file for importing department administrator of CT group] window is displayed.

[Import File] (required): Specify the CVS file with defined department administrator information with the full path.
[Result Log file] (required): Specify the file for saving operation result with full path.
[When result log file exists]: When a current result log file exists, please make sure to set it.
[Add]: Select it to add a record to the existing result log file.
[Overwrite]: Select it to overwrite the existing result log file.
Set the above information and click the [Start Import] button.
→ The [Display the Status of CSV Importing Configuration Information] window is displayed.
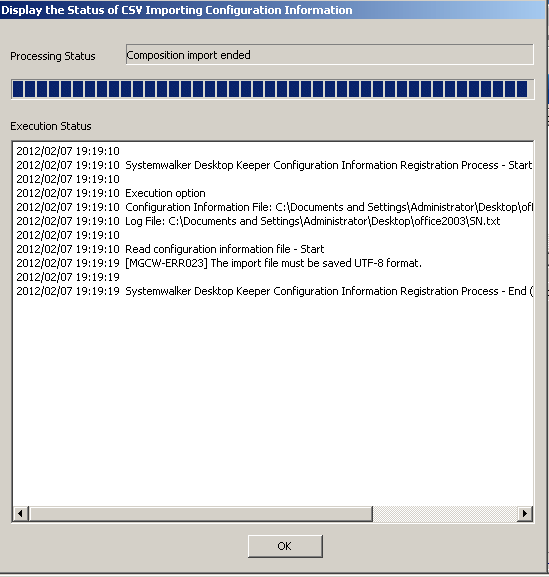
After department administrator information has been registered to the database, [Registering] will change to [Registration completed]. Click the [OK] button.
Start [Management Console].
Use the user ID and password of the system administrator to logon.
Select [User Policy Settings] from the [User settings] menu.
→ The [User Policy Settings] window is displayed.
Select [Import Department Administrator Information of User Group in CSV Format] from the [File] menu.
→ The [Specify a file for importing department administrator of user group] window is displayed.
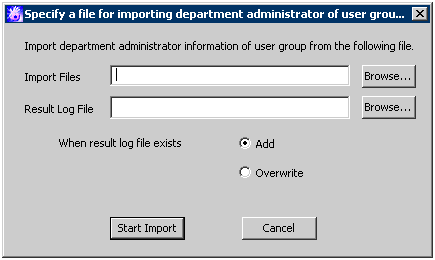
[Import File] (required): Specify the CVS file with defined department administrator information with the full path.
[Result Log File] (required): Specify the file for saving operation result with full path.
[When result log file exists]: When a current result log file exists, please make sure to set it.
[Add]: Select it to add a record to the existing result log file.
[Overwrite]: Select it to overwrite the existing result log file.
Set the above information and click the [Start Import] button.
→ The [Display the Status of Importing User Information in CSV Format] window is displayed.
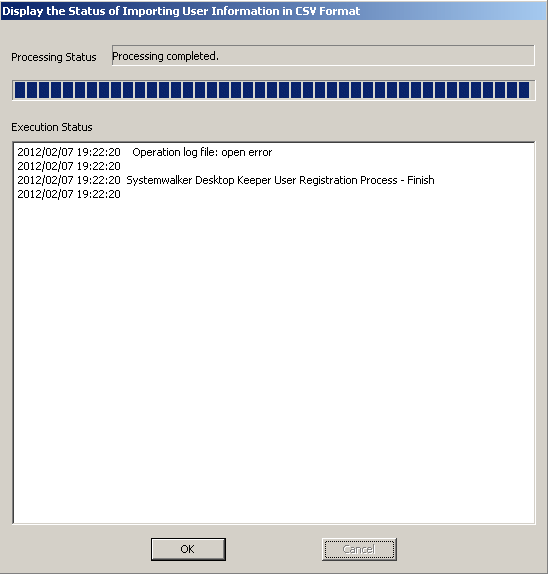
After department administrator information has been registered to the database, [Registering] will change to [Registration completed]. Click the [OK] button.