Set the file to distribution file. The file that has been set as the distribution file can be distributed to CT.
Note
The files registered in the “File Distribution” function will not be displayed in the software download window of CT. Start, stop, re-distribution and result confirmation are performed in the Main Menu.
Set the file to be distributed.
The procedure is as follows.
Log in to the Main Menu, and click the [Distribution] button.
→ The initial window of [File Distribution] will be displayed.
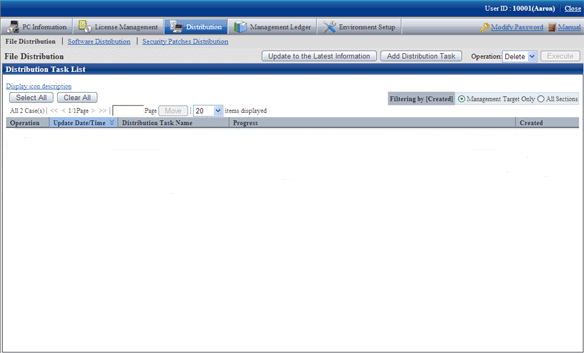
Description of button is shown below.
Button Name | Description |
|---|---|
Update to the Latest Information | Update to the latest information. |
Add Distribution Task | Add the task for distributing file. |
Operation list/execution | Select the check box of distribution task list and this button will be enabled. For the distribution task selected in the check box, select the content expected to be executed from the operation list and click the Execute button. The processing of distribution task will be started. There are following options in the operation list.
|
Description of the items in the "Distribution Task List" is as follows.
Item | Description |
|---|---|
Operation (check box) | When processing such as deletion is required, select the distribution task to be operated. |
Update Date/Time | Display the date and time when distribution tasks are registered and updated. |
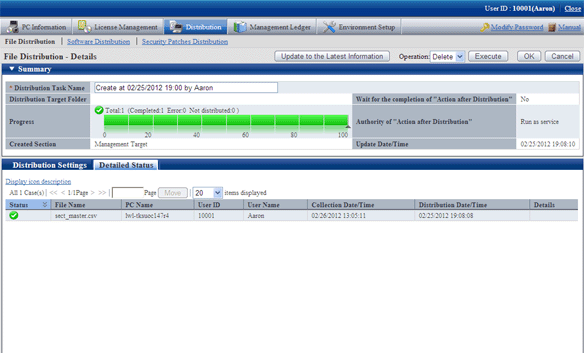
Distribution Task Name | Display the name corresponding to the distribution task. The details of distribution task can be viewed by clicking the distribution task name. |
Progress | Display the progress of distribution task. The color of column chart shows the percentage of progress.
The meaning of icons is described as follows.
: Distributing.
Beside the icon, the total number of "number of files × distribution target PC” will be displayed as "Number of items". The meanings are described as follows.
|
Creation section | Display the section to which the administrator who created the distribution task belongs. When it is created by system administrator, it is displayed as the fixed name of "Management target". |
Screening according to Creation Section | The content in the distribution task list can be narrowed down according to "Creation Section". The content displayed in the distribution task list will be different depending on the authority of user logging in to the Main Menu.
|
Point
Maximum number of managed tasks
Maximum 100 tasks can be managed on the system.
Tasks cannot be deleted automatically, so please delete the tasks that have been completed normally and are not needed in operation.
When the number of tasks on the system reaches 100, new distribution task will not be added even if the "Add Distribution Task" button is clicked.
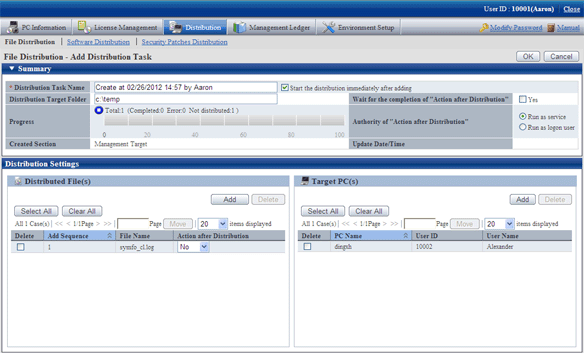
Please click the [Add Distribution Task] button.
→ The window for selecting the file to be distributed and the distribution target PC will be displayed.

The content of setting item is shown as follows.
Item | Description |
|---|---|
Distribution Task Name | Please enter the name of task to be distributed within 30 multi-byte or 60 single-byte characters. It displays "Created on" and "Created User Name" in default.
|
Distribution Target Folder | Please specify the folder name for saving distributed files on CT within 256 characters. When specifying with absolute path, please specify an existing folder on CT. When it is unable to create a folder or a drive that does not exist has been specified, error will occur. When specifying a relative path or the distribution target folder is omitted, files will be saved under “CT installation directory\contents” on CT. In addition, system environment variables and macro can be used in distribution target folder. (User environment variables such as %HOMEDRIVE% .etc cannot be used.)
In addition, if the file to be distributed has already existed under the distribution target folder, it will be overwritten. |
Progress | It is the same as the progress displayed in the initial window. |
Creation Section | Display the section to which the administrator that created the distribution task belongs. |
Wait for the completion of "Action after Distribution" | Set the waiting for completion when executing the file specified in "Action after Distribution. When processing the file specified in "Action after Distribution" after one file processing has completed, please select "Yes". |
Authority of "Action after Distribution" | There are the following two methods to execute the file specified in “Action after Distribution".
|
Update Date/Time | Display the date and times when distribution task is registered and updated. |
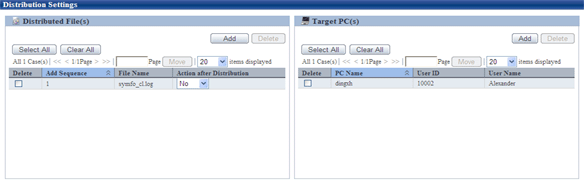
In the [Distribution settings] tab in the bottom left field of the window, click the [Add] button of " Distributed file " and select the file to be distributed.
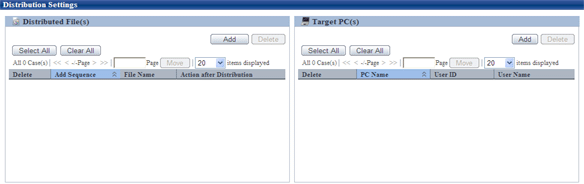
→ After a file is selected, it will be added to the list of files to be distributed.
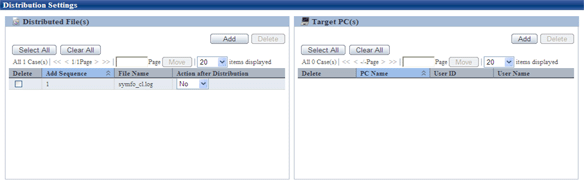
In case of wrong registration, please select the file that should be deleted from the list and click the [Delete] button.
Point
Number of files can be registered in a single task
In a single task, maximum 10 files can be registered.
When there are more than 10 files, please compress it to zip file in advance or register separately.
Note
The file/folder properties of registered file (read-only .etc) cannot be kept after distribution. When it is required to set file/folder properties, please reset the properties after downloading.
When uploading the file that is being used, the file after uploading will be a 0-byte file. No matter if the original file is 0 byte or not, it will be displayed as 0 byte after uploading. Please stop using this file and upload again.
Please do not upload a file that is more than 2GB. Once uploaded, the browser cannot be operated.
Point
About "Action after Distribution"
The content specified in the list of “Action after Distribution will be operated after the distribution of all files registered in the same distribution task has completed.
The operation timing is shown as follows.
When the execution method of “Action after Distribution" is "Execute by Server"
Processing will be performed right after distribution no matter whether the user has logged on to Windows or not.
When the execution method of “Action after Distribution" is "Execute by Login User"
Action after Distribution will be performed after the user has logged on to Windows. If there is no user logged on to Windows, Action after Distribution will not be performed until logon to Windows.
Please open the file displayed on the window according to the "Execute by Login User" method.
When the file displayed on the window is opened according to the "Execute by Server" method, the window of application will not be displayed on the window of logon user, and it will be in stopped status sometimes during the processing.
When the application for which “Waiting for Execution of Action after Distribution" is set to "Waiting for Completion of Execution" is in stopped status all the time and cannot be terminated, "Distribution has ended abnormally" will be displayed in "Progress" after 3 hours.
The Action after Distribution is performed according to the sequence of adding files to distribution task.
The content displayed in the list may vary with file extension.
When the extension is not “zip”
The following can be specified.
No | No processing will be performed after distribution. |
Open | Open the file with related application defined by logon user. |
When the extension is “zip”
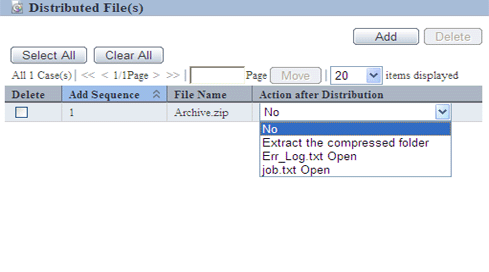
The following can be specified.
No | No processing will be performed after distribution. |
Extract the compressed folder | Extract automatically according to the structure within the compressed folder on PC. The target directory of extraction is "Distribution Target Folder". |
file Open | Open the file with related application defined by logon user. file: All file names up to the second level within the compressed folder |
In addition, after "Action after Distribution" has been specified, control for "Action after Distribution" can be set for each distribution task.
Here, when the check box “Yes” of "Wait for the completion of "Action after Distribution"" item is selected, for the files of which "Open" has been selected, as the result of waiting for completion of execution, the return value of file will be output to detailed information.
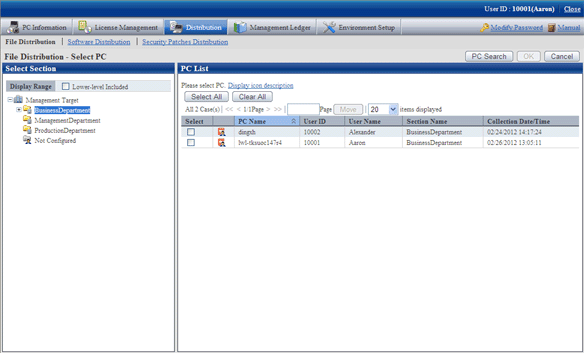
Please click the [Add] button of " Target PC(s) " in the bottom right field of window.
→ The PC selection window will be displayed.
Note
If the PC in which the check box is not displayed is the CT prior to V13.2.0 or the command mode CT. Distribution cannot be performed.
Select the target Target PC(s) from the PC selection window, select the check box and click the [OK] button, the PC will be added to the list of distribution target PC.
Point
Number of PCs can be registered in a single task
In a single task, maximum 2000 PCs can be registered.
When there are more than 2000 PCs, please separate the task and register again.
If there is not problem in the settings, please click the [OK] button.
→ When "Start the distribute immediately after adding" is selected, and the [OK] button is clicked, the following message box will be displayed.
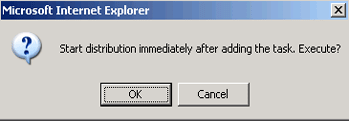
Click the [OK] button in the message box, the distribution task will be added and file distribution will start.
Click the [Cancel] button to return to the window for adding distribution task.