This section describes the preparation items before starting the AC Menu, notes of using, and the startup method.
Preparations
The AC menu uses Microsoft® Excel to display data. Therefore, please perform the following preparations and operations on the PC that uses the AC menu.
When the security level of Microsoft® Excel is set to “High” or “Highest”, the AC Menu cannot be operated.
When Microsoft® Excel 2002 or Microsoft® Office Excel 2003 is used, select [Macro] - [Security] from the [Tool] menu of Microsoft® Excel, and modify the security level to ‘Medium”.
When Microsoft® Office Excel 2007 is used, please modify the settings according to the following procedure.
Click the [Office] button of Microsoft® Excel, and click the [Excel Options] button.
In the [Basic Settings] tab of the option dialog, select the [Display [Development] tab in Ribbon] item and click the [OK] button.
Click the [Development] tab displayed in the ribbon and click [Macro Security].
In the [Macro Settings] window, select [Enable All Macros] and click the [OK] button.
When Microsoft® Office Excel 2010 is used, please modify the settings according to the following procedure.
Click the [File] tab of Microsoft® Excel and click the [Option] button.
Click [Security Center] in the option dialog, and click the [Settings of Security Center] button of the [Microsoft Excel] security center.
Click [Macro Settings] in the security center dialog. Select [Display warning, and disable all macros] in the [Macro Settings] window, and click the [OK] button.
In the ‘Security Warning” window of Microsoft® Excel, when [Disable Macro] is selected, the AC Menu cannot be operated.
When the “Security Warning” window of Microsoft® Excel is displayed, please make sure to select “Enable Macro”.
If the above preparations and operations are not performed, the AC Menu cannot run normally. At this time, please perform the above settings again after logging off the AC Menu, and then start the AC Menu again.
Notes
In the process of starting the AC Menu, if the Excel file is being edited at the same time, please pay attention to the following items.
The AC Menu performed operations such as display data through linking with Microsoft® Excel. Therefore, since the AC Menu is using Microsoft® Excel, please do not open a new Excel file in the display window. If it is needed to open an Excel file using Microsoft® Excel during the operation of the AC Menu, please start and open the file from the Start menu.
When opening a new file from the Microsoft® Excel being used by the AC Menu, the Excel file may not be displayed, or it may take a long time before it can be displayed.
If it is still not displayed after 30 seconds, please log off the AC Menu and start Microsoft® Excel from the Start menu. Then, open the new file from this Microsoft® Excel.
When a new file is opened from the Microsoft® Excel being used by the AC Menu, please pay attention to the following items.
The [×] button at top right of the Microsoft® Excel window should not be clicked. To close the Excel file that is newly opened, please click the [×] button of this Excel file, or select [Close] or [Exit] from the [File] menu.
Please do not copy the sheet or modify the sheet name for the Excel file that is being used by the AC Menu. To execute, please use it after logging off from the AC Menu.
When the AC Menu is being used to display or operate data, if the [F11] key is pressed, graph sheet will be added. At this time, return to the previous window according to the following steps.
Right-click the added graph sheet in the sheet list displayed at the bottom of window.
Select delete in the displayed pop-up menu.
The deletion confirmation message is displayed, click the [OK] button to execute deletion.
Steps
The procedure of starting the AC Menu is as follows.
1. Start the AC Menu.
On the PC installed with “Desktop Patrol AC”, select [Programs] (or [All Programs]) - [Systemwalker Desktop Patrol] - [AC Menu] from the [Start] menu.
→ The following window is displayed.
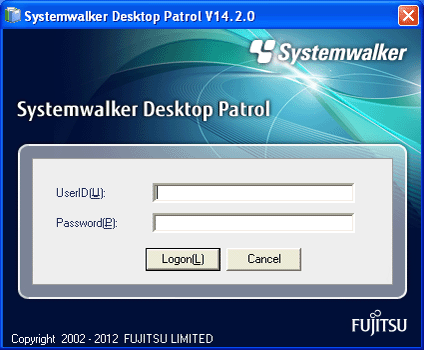
Logon.
Set the following information and click the [Logon] button.
Item | Description |
|---|---|
[User ID] | Set the following information.
|
[Password] | Set the password corresponding to the user ID. |
→ The following window is displayed.
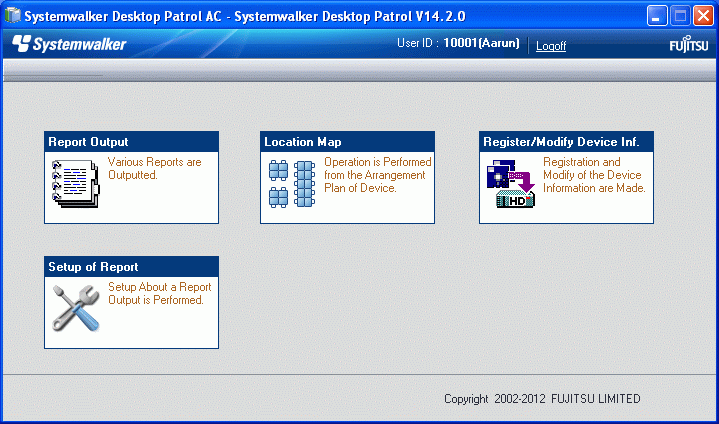
Select menu according to application.