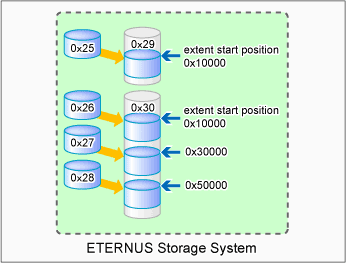
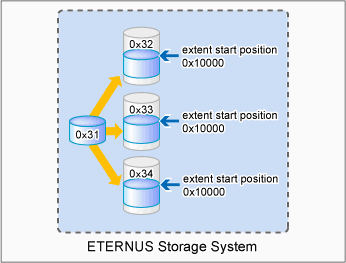
If you want to copy the contents of a disk volume, specify the extent start position in the copy source volume, the extent size, and the extent start position in the copy destination volume. AdvancedCopy Manager CCM can backup the contents of a volume to a partition by using these specifications. Under AdvancedCopy Manager CCM, this is called the LU to Partition function.
Figure 3.5 Copying a volume to a partition

Note
This function is used for saving data to secondary media, such as backing up to tape. Do not use this function for copying from one disk to another disk.
Adding copy pairs
To use the LU to Partition function, specify the extent start position and add a copy pair.
Copy pairs are strings that define the copy source and copy destination logical volumes.
Figure 3.6 Copy pair format

(1) Copy source ETERNUS name
(2) Copy source logical volume number
(3) Extent start position at the copy source volume (block units)
(4) Extent size at the copy source volume (number of blocks)
(5) Copy destination ETERNUS name
(6) Copy destination logical volume number
(7) Extent start position at the copy destination volume (block units)
A character string starting with "0x" expresses a hexadecimal value.
Follow the procedure below to add a copy pair.
Calculating the extent size at the copy source
Calculate the extent size at the copy source that is to be added to the copy pair.
Execute "A.3.1 acinq lv (Logical volume information display command)" on the backup server to check the copy source logical volume number (LV No) and the logical volume size (LV Size).
[Execution example]
> acinq lv -a E4000 LV No LV Name LV Size LV Type RG No Encrypt ------ ------- ------- ------- ----- ------- 0x0000 128M Open 0 - 0x0001 128M Open 0 - 0x0002 128M Open 0 - 0x0003 128M Open 0 - 0x0004 128M Open 0 - 0x0005 128M Open 0 - 0x0006 128M Open 0 - 0x0007 128M Open 0 - 0x0008 1024M Open 0 - 0x0009 1024M Open 0 - 0x000A 1024M Open 0 - 0x000B 1024M Open 0 - 0x000C 1024M Open 0 - 0x000D 1024M Open 0 - 0x000E 1024M Open 0 - 0x000F 1024M Open 0 - |
Calculate the extent size (number of blocks) from the logical volume size in MB.
Use the following formula to calculate the extent size (number of blocks):
extent size (number of blocks) = logical volume size (MB) * 1024 * 1024/512 |
Information
If the copy source logical volume number is not known
[For Solaris, Linux, HP-UX, AIX]
Execute the "A.9.2 acgetvolinfo (Logical volume information display command)" on the transaction server to check the copy source logical volume number (LV No) and the extent size (Size).
[Execution example]
[For Solaris]
# acgetvolinfo /dev/rdsk/c4t0d10s2 BOX-ID,LV No,Address,Size 00E4000M3#####E450S20A####KD4030639004##,0x001,0x0,0x40000 |
[For Linux]
# acgetvolinfo /dev/sdo BOX-ID,LV No,Address,Size 00E4000M3#####E450S20A####KD4030639004##,0x001,0x0,0x40000 |
[For HP-UX]
# acgetvolinfo /dev/rdsk/c1t0d20 BOX-ID,LV No,Address,Size 00E4000M3#####E450S20A####KD4030639004##,0x001,0x0,0x40000 |
[For AIX]
# acgetvolinfo /dev/hdisk10 BOX-ID,LV No,Address,Size 00E4000M3#####E450S20A####KD4030639004##,0x001,0x0,0x40000 |
Calculate the logical volume size (in bytes or MB) from the extent size (number of blocks) of the logical volume size.
Use the following formula to calculate the logical volume size (in bytes or MB):
logical volume size (in bytes) = extent size (in blocks) * 512 logical volume size (in MB) = extent size (in blocks) * 512/(1024 * 1024) |
[For Windows]
Check the copy-source logical volume number (LV No) by executing "A.9.2 acgetvolinfo (Logical volume information display command)" in the transaction server.
[Execution example]
C:\> acgetvolinfo F: BOX-ID,LV No,Address,Size 00E4000M3#####E450S20A####KD4030639004##,0x001,0x80,0x20000 |
Check the logical volume size by executing A.3.1 acinq lv (Logical volume information display command) in the backup server.
Creating partitions
Create partitions at the copy destination volume.
The partition size must be larger than the copy source logical volume size. As a guideline, create a partition with a size that is 128MB larger than the copy source logical volume.
Note
Megabyte unit
In this document, the megabyte unit is defined as being 1024x1024 bytes.
However, when creating partitions, note that Linux calculates the megabyte unit as being 1000x1000 bytes.
Point
Creating partitions
For Windows
Create partitions with a drive letter.
For Solaris
Create partitions without a VTOC label.
Checking the information on the copy destination logical volume
Execute the "A.9.2 acgetvolinfo (Logical volume information display command)" on the backup server to check the copy destination logical volume (LV No), the extent start position (Address), and the extent size (Size) to be added.
Point
Check that the extent size of a partition at the copy destination is larger than the extent size of the copy source volume.
[Execution example]
[For Solaris]
# acgetvolinfo /dev/dsk/c0t0d0s3 BOX-ID,LV No,Address,Size 00E4000M3#####E450S20A####KD4030639004##,0x008,0x0100000,0x140cc3 |
[For Linux]
# acgetvolinfo /dev/sda1 BOX-ID,LV No,Address,Size 00E4000M3#####E450S20A####KD4030639004##,0x008,0x0100000,0x140cc3 |
[For Windows]
C:\> acgetvolinfo X: BOX-ID,LV No,Address,Size 00E4000M3#####E450S20A####KD4030639004##,0x008,0x0100000,0x140cc3 |
Under Windows, execute the disppart command to unmount a partition.
[Execution example]
C:\>mountvol X: /p |
Note
Do not mount the copy destination volume partition during AdvancedCopy Manager CCM operation.
Adding copy pairs
Using "A.6.5 acpair add (Copy pair addition command)" to add a copy pair to a copy group.
Create copy pairs at the copy source volume by specify the following values:
Values specified to the copy source volume
Extent start position: 0x0
Extent size: Logical volume extent size calculated in the step 1
Values specified to the copy destination volume
Extent start position: Copy destination volume extent start position checked in the step 3
The execution example below shows how to add copy groups.
For OPC, QuickOPC, EC, or REC
Figure 3.7 Adding copy pairs (OPC, QuickOPC, EC, or REC)

[Execution example]
> acpair add -g GRP1 -p E4000/0x25[addr=0x0,size=0x5000]:E4000/0x29[addr=0x10000] Successful completion. > acpair add -g GRP1 -p E4000/0x26[addr=0x0,size=0x5000]:E4000/0x30[addr=0x10000] Successful completion. > acpair add -g GRP1 -p E4000/0x27[addr=0x0,size=0x5000]:E4000/0x30[addr=0x30000] Successful completion. > acpair add -g GRP1 -p E4000/0x28[addr=0x0,size=0x5000]:E4000/0x30[addr=0x50000] Successful completion. |
For SnapOPCP [Excluding Linux 5 for Intel Itanium]
Figure 3.8 Adding copy pairs (For SnapOPCP)

[Execution example]
> acpair add -g GRP2 -p E4000/0x31[addr=0x0,size=0x5000]:E4000/0x32[addr=0x10000] Successful completion. > acpair add -g GRP2 -p E4000/0x31[addr=0x0,size=0x5000]:E4000/0x33[addr=0x10000] Successful completion. > acpair add -g GRP2 -p E4000/0x31[addr=0x0,size=0x5000]:E4000/0x34[addr=0x10000] Successful completion. |
Note
Multiple sessions cannot be created for the same volume (SDV) under SnapOPC+.
Register copy pairs by creating one partition for one volume.
Checking added copy pairs
Checking the logical volume number of an added copy pair
Use "A.6.3 acgroup detail (Copy group detail information display command)" to display the ETERNUS disk storage system information, and check that the copy pair was added to the specified logical volume number.
[Execution example]
> acgroup detail -g GRP1 Copy Group Name : GRP1 Copy Group Type : OPC Disk Array Name : E4000 (00E4000M3#####E450S20A####KD4030639004##) Pair --------------------- E4000/0x25[addr=0x0,size=0x5000]:E4000/0x29[addr=0x10000] E4000/0x26[addr=0x0,size=0x5000]:E4000/0x30[addr=0x10000] E4000/0x27[addr=0x0,size=0x5000]:E4000/0x30[addr=0x30000] E4000/0x28[addr=0x0,size=0x5000]:E4000/0x30[addr=0x50000] |