Perform setup on the admin server.
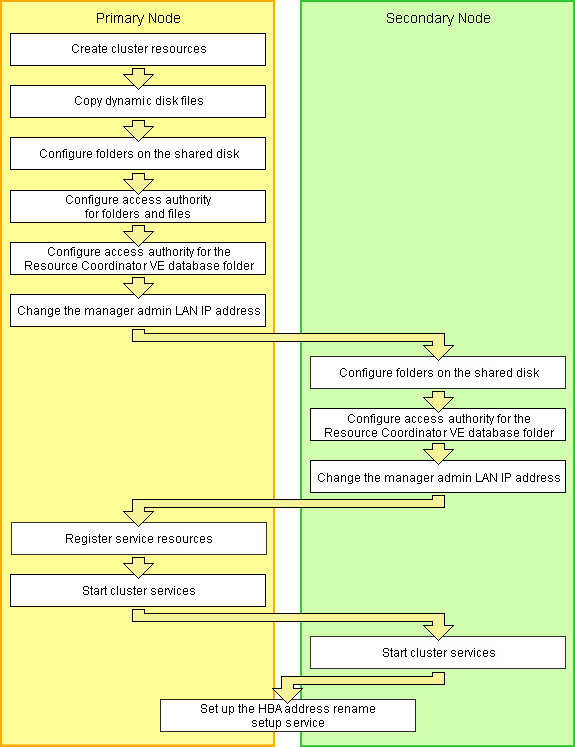
The flow of setup is as shown below.
Figure B.1 Manager Service Setup Flow
Setup of managers as cluster services (cluster applications) is performed using the following procedure.
This explanation assumes that the shared disk for managers has been allocated to the primary node.
Create Cluster Resources
Store the generic scripts.
Store the generic scripts created in "B.2.1 Preparations" in the manager installation folders on the primary node and the second node.
After storing the scripts, set the access rights for the script files.
Use the command prompt to execute the following command on each script file.
>cacls File_name /P "NT AUTHORITY\SYSTEM:F" "BUILTIN\Administrators:F" <RETURN> |
Note
When using the following language versions of Windows, replace the specified local system name (NT AUTHORITY\SYSTEM) and administrator group name (BUILTIN\Administrators) with those in the following list:
Language | Local system name | Administrator group name |
|---|---|---|
German | NT-AUTORITÄT\SYSTEM | VORDEFINIERT\Administratoren |
French | AUTORITE NT\SYSTEM | BUILTIN\Administrateurs |
Spanish | NT AUTHORITY\SYSTEM | BUILTIN\Administradores |
Russian | NT AUTHORITY\SYSTEM | BUILTIN\Администраторы |
Open the [Failover Cluster Management] window and connect to the cluster system.
Configure a manager "service or application".
Right-click [Services and Applications] on the [Failover Cluster Management] tree, and select [More Actions]-[Create Empty Service or Application].
[New Service or Application] will be created under [Services and Applications].
Right-click [New Service or Application], and select [Properties] from the displayed menu.
The [New Service or Application Properties] dialog is displayed.
Change the "Name" on the [General] tab, select the resource name of the primary node from "Preferred owners", and click <Apply>.
When the settings have been applied, click <OK>.
From this point, this explanation assumes that the name of the "service or application" for Resource Coordinator VE has been configured as "RC-manager".
Allocate the shared disk to the manager "service or application".
Right-click [Services and Applications] - [RC-manager], and select [Add Storage] from the displayed menu.
The [Add Storage] window will be displayed.
From the "Available disks:", select the shared disk for managers and click <OK>.
Allocate the client access point to the manager "service or application".
Right-click [Services and Applications] - [RC-manager], select [Add Resource] - [1 - Client Access Point] from the displayed menu.
The [New Resource Wizard] window will be displayed.
Configure the following parameters on the [General] tab and then click <Next>.
Set the network name prepared in "B.2.1 Preparations".
Select the network to use from the pull-down menu.
Set the IP address prepared in "B.2.1 Preparations".
"Confirmation" will be displayed.
Check the information displayed for "Confirmation" and click <Next>>.
If configuration is successful, the "Summary" window will be displayed.
Click <Finish>.
"Name: Network_Name" and "IP Address:IP_Address" will be created in the "Server_name" of the "Summary of RC-manager" displayed in the center of the window.
The specified value in step b. is displayed for "Network_Name" and "IP_Address"
When a network other than the admin LAN has been prepared for RC console access, perform step 6 process.
Allocate the IP address to the manager "service or application".
Right-click [Services and Applications] - [RC-manager], select [Add Resource] - [Other Resources] - [4 - Add IP Address] from the displayed menu.
"IP Address: <not configured>" will be created in the "Other Resources" of the "Summary of RC-manager" displayed in the center of the window.
Right-click "IP Address: <not configured>", and select [Properties] from the displayed menu.
The [IP Address: <not configured> Properties] window is displayed.
Configure the following parameters on the [General] tab and then click <Apply>.
Set the network name prepared in "B.2.1 Preparations".
Select the network to use from the pull-down menu.
Set the IP address prepared in "B.2.1 Preparations".
When the settings have been applied, click <OK>.
Copy Dynamic Disk Files
Copy the files from the dynamic disk of the manager on the primary node to the shared disk for managers.
Use Explorer to create the "Drive_name:\RCoordinator\" folder on the shared disk.
Use Explorer to copy the files and folders from the local disk of the primary node to the folder on the shared disk.
Local disk (Source) | Shared disk (Target) |
|---|---|
Installation_folder\Manager\etc\opt\FJSVssmgr\current\certificate | Drive_name:\RCoordinator\certificate |
Installation_folder\Manager\Rails\config\rcx_secret.key | Drive_name:\RCoordinator\rcx_secret.key |
Installation_folder\Manager\Rails\config\rcx\rcxdb.pwd | Drive_name:\RCoordinator\rcxdb.pwd |
Installation_folder\Manager\Rails\db | Drive_name:\RCoordinator\db |
Installation_folder\Manager\Rails\log | Drive_name:\RCoordinator\log |
Installation_folder\Manager\Rails\tmp | Drive_name:\RCoordinator\tmp |
Installation_folder\Manager\sys\apache\conf | Drive_name:\RCoordinator\conf |
Installation_folder\Manager\sys\apache\logs | Drive_name:\RCoordinator\logs |
Installation_folder\Manager\var | Drive_name:\RCoordinator\var |
Installation_folder\ScwPro\Bin\ipTable.dat (*1) | Drive_name:\RCoordinator\ipTable.dat |
Installation_folder\ScwPro\scwdb (*1) | Drive_name:\RCoordinator\scwdb |
Installation_folder\ScwPro\tftp\rcbootimg (*1) | Drive_name:\RCoordinator\rcbootimg |
User_specified_folder\ScwPro\depot (*1) | Drive_name:\RCoordinator\depot |
*1: Not necessary when ServerView Deployment Manager is used in the same subnet.
Release the sharing settings of the following folder:
Not necessary when ServerView Deployment Manager is used in the same subnet.
Installation_folder\ScwPro\scwdb
Execute the following command using the command prompt:
>net share ScwDB$ /DELETE <RETURN> |
Use Explorer to change the names of the folders below that were copied.
Installation_folder\Manager\etc\opt\FJSVssmgr\current\certificate
Installation_folder\Manager\Rails\config\rcx_secret.key
Installation_folder\Manager\Rails\config\rcx\rcxdb.pwd
Installation_folder\Manager\Rails\db
Installation_folder\Manager\Rails\log
Installation_folder\Manager\Rails\tmp
Installation_folder\Manager\sys\apache\conf
Installation_folder\Manager\sys\apache\logs
Installation_folder\Manager\var
Installation_folder\ScwPro\Bin\ipTable.dat (*1)
Installation_folder\ScwPro\scwdb (*1)
Installation_folder\ScwPro\tftp\rcbootimg (*1)
*1: Not necessary when ServerView Deployment Manager is used in the same subnet.
Note
When folders or files are in use by another program, attempts to change folder names and file names may fail.
If attempts to change names fail, change the names after rebooting the server.
Delete the following file from the shared disk:
Drive_name:\RCoordinator\db\rmc_key
Configure Folders on the Shared Disk (Primary node)
On the primary node, configure symbolic links to the files and folders on the shared disk.
Use the command prompt to configure a symbolic link from the files and folders on the local disk of the primary node to the files and folders on the shared disk.
Execute the following command.
Folder
>mklink /d Link_source Link_target <RETURN> |
File
>mklink Link_source Link_target <RETURN> |
Specify the folders or files copied in "Copy Dynamic Disk Files" for Link_source.
Specify the folders or files copied to the shared disk in "Copy Dynamic Disk Files" for Link_target.
The folders and files to specify are as given below:
Local disk (Link source) | Shared disk (Link target) |
|---|---|
Installation_folder\Manager\etc\opt\FJSVssmgr\current\certificate | Drive_name:\RCoordinator\certificate |
Installation_folder\Manager\Rails\db | Drive_name:\RCoordinator\db |
Installation_folder\Manager\Rails\log | Drive_name:\RCoordinator\log |
Installation_folder\Manager\Rails\tmp | Drive_name:\RCoordinator\tmp |
Installation_folder\Manager\sys\apache\conf | Drive_name:\RCoordinator\conf |
Installation_folder\Manager\sys\apache\logs | Drive_name:\RCoordinator\logs |
Installation_folder\Manager\var | Drive_name:\RCoordinator\var |
Installation_folder\ScwPro\scwdb (*1) | Drive_name:\RCoordinator\scwdb |
Installation_folder\ScwPro\tftp\rcbootimg (*1) | Drive_name:\RCoordinator\rcbootimg |
*1: Not necessary when ServerView Deployment Manager is used in the same subnet.
Local disk (Link source) | Shared disk (Link target) |
|---|---|
Installation_folder\Manager\Rails\config\rcx_secret.key | Drive_name:\RCoordinator\rcx_secret.key |
Installation_folder\Manager\Rails\config\rcx\rcxdb.pwd | Drive_name:\RCoordinator\rcxdb.pwd |
Installation_folder\ScwPro\Bin\ipTable.dat (*1) | Drive_name:\RCoordinator\ipTable.dat |
*1: Not necessary when ServerView Deployment Manager is used in the same subnet.
Note
Before executing the above command, move to a folder one level higher than the link source folder.
Example
When specifying a link from "Installation_folder\Manager\sys\apache\logs" on the local disk to "Drive_name:\RCoordinator\logs" on the shared disk
>cd Installation_folder\Manager\sys\apache <RETURN> |
Change the registry of the primary node.
Not necessary when ServerView Deployment Manager is used in the same subnet.
Backup the registry to be changed.
Execute the following command.
x64
>reg save HKEY_LOCAL_MACHINE\SOFTWARE\Wow6432Node\Fujitsu\SystemcastWizard scw.reg <RETURN> |
x86
>reg save HKEY_LOCAL_MACHINE\SOFTWARE\Fujitsu\SystemcastWizard scw.reg <RETURN> |
Change the registry.
Execute the following command.
x64
>reg add HKEY_LOCAL_MACHINE\SOFTWARE\Wow6432Node\Fujitsu\SystemcastWizard\ResourceDepot /v BasePath /d Drive_name:\RCoordinator\depot\ /f <RETURN> |
x86
>reg add HKEY_LOCAL_MACHINE\SOFTWARE\Fujitsu\SystemcastWizard\ResourceDepot /v BasePath /d Drive_name:\RCoordinator\depot\ /f <RETURN> |
Change Drive_name based on your actual environment.
If changing the registry fails, restore the registry.
Execute the following command.
x64
>reg restore HKEY_LOCAL_MACHINE\SOFTWARE\Wow6432Node\Fujitsu\SystemcastWizard scw.reg <RETURN> |
x86
>reg restore HKEY_LOCAL_MACHINE\SOFTWARE\Fujitsu\SystemcastWizard scw.reg <RETURN> |
Note
Do not use the backup registry file created using this procedure for any other purposes.
Configure Access Authority for Folders and Files
Set the access authority for the folders and files copied to the shared disk.
Use the command prompt to set the access authority for the folders and files on the shared disk.
The folders and files to specify are as given below:
Folder
Drive_name:\RCoordinator\certificate
Drive_name:\RCoordinator\conf\ssl.key
Drive_name:\RCoordinator\var\log
File
Drive_name:\RCoordinator\rcx_secret.key
Execute the following command.
Folder
>cacls Folder_name /T /P "NT AUTHORITY\SYSTEM:F" "BUILTIN\Administrators:F" <RETURN> |
File
>cacls File_name /P "NT AUTHORITY\SYSTEM:F" "BUILTIN\Administrators:F" <RETURN> |
Note
When using the following language versions of Windows, replace the specified local system name (NT AUTHORITY\SYSTEM) and administrator group name (BUILTIN\Administrators) with those in the following list:
Language | Local system name | Administrator group name |
|---|---|---|
German | NT-AUTORITÄT\SYSTEM | VORDEFINIERT\Administratoren |
French | AUTORITE NT\SYSTEM | BUILTIN\Administrateurs |
Spanish | NT AUTHORITY\SYSTEM | BUILTIN\Administradores |
Russian | NT AUTHORITY\SYSTEM | BUILTIN\Администраторы |
Configure Database Folder Access Authority (Primary node)
Set the access authority for the folder for the Resource Coordinator VE database copied to the shared disk.
Execute the following command using the command prompt of the primary node:
>cacls Drive_name:\RCoordinator\db\data /T /P "NT AUTHORITY\SYSTEM:F" "BUILTIN\Administrators:F" "rcxdb:C" <RETURN> |
Change the Manager Admin LAN IP Address (Primary node)
Change the admin LAN IP address of the manager.
Specify the admin LAN IP address set in step 5. of "Create Cluster Resources".
Bring the admin LAN IP address for the manager "service or application" online.
Execute the following command using the command prompt of the primary node:
>Installation_folder\Manager\bin\rcxadm mgrctl modify -ip IP_address <RETURN> |
Allocate the shared disk to the secondary node.
Right-click [Services and Applications]-[RC-manager] on the Failover Cluster Management tree, and select [Move this service or application to another node]-[1- Move to node node_name] from the displayed menu.
The name of the secondary node is displayed for node_name.
Configure Folders on the Shared Disk (Secondary node)
On the secondary node, configure symbolic links to the folders on the shared disk.
Use Explorer to change the names of the folders and files below.
Installation_folder\Manager\etc\opt\FJSVssmgr\current\certificate
Installation_folder\Manager\Rails\config\rcx_secret.key
Installation_folder\Manager\Rails\config\rcx\rcxdb.pwd
Installation_folder\Manager\Rails\db
Installation_folder\Manager\Rails\log
Installation_folder\Manager\Rails\tmp
Installation_folder\Manager\sys\apache\conf
Installation_folder\Manager\sys\apache\logs
Installation_folder\Manager\var
Installation_folder\ScwPro\Bin\ipTable.dat (*1)
Installation_folder\ScwPro\scwdb (*1)
Installation_folder\ScwPro\tftp\rcbootimg (*1)
*1: Not necessary when ServerView Deployment Manager is used in the same subnet.
Note
When folders or files are in use by another program, attempts to change folder names and file names may fail.
If attempts to change names fail, change the names after rebooting the server.
Release the sharing settings of the following folder:
Not necessary when ServerView Deployment Manager is used in the same subnet.
Installation_folder\ScwPro\scwdb
Execute the following command using the command prompt:
>net share ScwDB$ /DELETE <RETURN> |
Use the command prompt to configure a symbolic link from the folder on the local disk of the secondary node to the folder on the shared disk.
Execute the following command.
Folder
>mklink /d Link_source Link_target <RETURN> |
File
>mklink Link_source Link_target <RETURN> |
Specify a file or folder on the local disk of the secondary node for Link_source.
Specify a file or folder on the shared disk of the secondary node for Link_target.
The folders to specify are as given below:
Local disk (Link source) | Shared disk (Link target) |
|---|---|
Installation_folder\Manager\etc\opt\FJSVssmgr\current\certificate | Drive_name:\RCoordinator\certificate |
Installation_folder\Manager\Rails\db | Drive_name:\RCoordinator\db |
Installation_folder\Manager\Rails\log | Drive_name:\RCoordinator\log |
Installation_folder\Manager\Rails\tmp | Drive_name:\RCoordinator\tmp |
Installation_folder\Manager\sys\apache\conf | Drive_name:\RCoordinator\conf |
Installation_folder\Manager\sys\apache\logs | Drive_name:\RCoordinator\logs |
Installation_folder\Manager\var | Drive_name:\RCoordinator\var |
Installation_folder\ScwPro\scwdb (*1) | Drive_name:\RCoordinator\scwdb |
Installation_folder\ScwPro\tftp\rcbootimg (*1) | Drive_name:\RCoordinator\rcbootimg |
*1: Not necessary when ServerView Deployment Manager is used in the same subnet.
Local disk (Link source) | Shared disk (Link target) |
|---|---|
Installation_folder\Manager\Rails\config\rcx_secret.key | Drive_name:\RCoordinator\rcx_secret.key |
Installation_folder\Manager\Rails\config\rcx\rcxdb.pwd | Drive_name:\RCoordinator\rcxdb.pwd |
Installation_folder\ScwPro\Bin\ipTable.dat (*1) | Drive_name:\RCoordinator\ipTable.dat |
*1: Not necessary when ServerView Deployment Manager is used in the same subnet.
Note
Before executing the above command, move to a folder one level higher than the link source folder.
Example
When specifying a link from "Installation_folder\Manager\sys\apache\logs" on the local disk to "Drive_name:\RCoordinator\logs" on the shared disk
>cd Installation_folder\Manager\sys\apache <RETURN> |
Configure Database Folder Access Authority (Secondary node)
Set the access authority for the folder for the Resource Coordinator VE database copied to the shared disk.
Execute the following command using the command prompt of the secondary node:
>cacls Drive_name:\RCoordinator\db\data /T /G "rcxdb:C" /E <RETURN> |
Change the Manager Admin LAN IP Address (Secondary node)
Change the admin LAN IP address of the manager.
Specify the admin LAN IP address set in step 5. of "Create Cluster Resources".
Execute the following command using the command prompt of the secondary node:
>Installation_folder\Manager\bin\rcxadm mgrctl modify -ip IP_address <RETURN> |
Allocate the shared disk to the primary node.
Right-click [Services and Applications]-[RC-manager] on the Failover Cluster Management tree, and select [Move this service or application to another node]-[1- Move to node node_name] from the displayed menu.
The name of the primary node is displayed for node_name.
Register Service Resources
Add the manager service to the manager "service or application".
Add the following six services.
Resource Coordinator Manager
Resource Coordinator Task Manager
Deployment Service (*1)
TFTP Service (*1)
PXE Services (*1)
Resource Coordinator DB Server (PostgreSQL)
*1: Not necessary when ServerView Deployment Manager is used in the same subnet.
Perform the following procedure for each of the above services:
Right-click [Services and Applications]-[RC-manager] on the Failover Cluster Management tree, and select [Add a resource]-[4 - Generic Service] from the displayed menu.
The [New Resource Wizard] window will be displayed.
Select the above services on "Select Service" and click <Next>>.
"Confirmation" will be displayed.
Check the information displayed for "Confirmation" and click <Next>>.
If configuration is successful, the "Summary" window will be displayed.
Click <Finish>.
After completing the configuration of all of the services, check that the added services are displayed in "Other Resources" of the "Summary of RC-manager" displayed in the center of the window.
Configure registry replication as a service in the manager "service or application".
Not necessary when ServerView Deployment Manager is used in the same subnet.
Configure the registry replication of resources based on the following table.
x64
Resource for Configuration | Registry Key |
|---|---|
Deployment Service | [HKEY_LOCAL_MACHINE\]SOFTWARE\Wow6432Node\Fujitsu\SystemcastWizard\ResourceDepot |
[HKEY_LOCAL_MACHINE\]SOFTWARE\Wow6432Node\Fujitsu\SystemcastWizard\DatabaseBroker\Default | |
PXE Services | [HKEY_LOCAL_MACHINE\]SOFTWARE\Wow6432Node\Fujitsu\SystemcastWizard\DHCP |
[HKEY_LOCAL_MACHINE\]SOFTWARE\Wow6432Node\Fujitsu\SystemcastWizard\PXE\ClientBoot\ |
x86
Resource for Configuration | Registry Key |
|---|---|
Deployment Service | [HKEY_LOCAL_MACHINE\]SOFTWARE\Fujitsu\SystemcastWizard\ResourceDepot |
[HKEY_LOCAL_MACHINE\]SOFTWARE\Fujitsu\SystemcastWizard\DatabaseBroker\Default | |
PXE Services | [HKEY_LOCAL_MACHINE\]SOFTWARE\Fujitsu\SystemcastWizard\DHCP |
[HKEY_LOCAL_MACHINE\]SOFTWARE\Fujitsu\SystemcastWizard\PXE\ClientBoot\ |
During configuration, enter the section of the registry keys after the brackets ([ ]).
Perform the following procedure for each of the above resources:
Right-click the target resource on "Other Resources" on the "Summary of RC-manager" displayed in the middle of the [Failover Cluster Manager] window, and select [Properties] from the displayed menu.
The [target_resource Properties] window will be displayed.
Click <Add> on the [Registry Replication] tab.
The [Registry Key] window will be displayed.
Configure the above registry keys on "Root Registry Keys" and click <OK>.
When configuring the second registry key, repeat steps b. and c.
After configuration of the registry keys is complete, click <Apply>.
When the settings have been applied, click <OK> and close the dialog.
Add the generic scripts to the manager "service or application".
Add the three generic scripts from the script files that were created in step 1. of "Create Cluster Resources". Perform the following procedure for each generic script.
Right-click [Services and Applications]-[RC-manager] on the Failover Cluster Management tree, and select [Add a resource]-[3 - Generic Script] from the displayed menu.
The [New Resource Wizard] window will be displayed.
Set the script files created in step 1. of "Create Cluster Resources" in the "Script file path" of the "Generic Script Info", and click <Next>>.
"Confirmation" will be displayed.
Check the information displayed for "Confirmation" and click <Next>>.
If configuration is successful, the "Summary" will be displayed.
Click <Finish>.
After completing the configuration of all of the generic scripts, check that the added generic scripts are displayed in "Other Resources" of the "Summary of RC-manager" displayed in the center of the window.
Configure the dependencies of the resources of the manager "service or application".
Configure the dependencies of resources based on the following table.
Resource for Configuration | Dependent Resource |
|---|---|
Resource Coordinator Manager | Shared Disks |
Resource Coordinator Task Manager | Shared Disks |
Resource Coordinator Sub Web Server (Mongrel) Script | Resource Coordinator Task Manager |
Resource Coordinator Sub Web Server (Mongrel2) Script | Resource Coordinator Task Manager |
Resource Coordinator Web Server (Apache) Script | Shared Disks |
Deployment Service (*1) | PXE Services |
TFTP Service (*1) | Deployment Service |
PXE Services (*1) | Admin LAN IP Address |
Resource Coordinator DB Server (PostgreSQL) | Shared Disks |
*1: Not necessary when ServerView Deployment Manager is used in the same subnet.
Perform the following procedure for each of the above resources:
Right-click the target resource on "Other Resources" on the "Summary of RC-manager" displayed in the middle of the [Failover Cluster Manager] window, and select [Properties] from the displayed menu.
The [target_resource Properties] window will be displayed.
From the "Resource" of the [Dependencies] tab select the name of the "Dependent Resource" from "Table B.6 Configuring Resource Dependencies" and click <Apply>.
When the settings have been applied, click <OK>.
Start Cluster Services
Right-click [Services and Applications]-[RC-manager] on the Failover Cluster Management tree, and select [Bring this service or application online] from the displayed menu.
Confirm that all resources have been brought online.
Switch the manager "service or application" to the secondary node.
Confirm that all resources of the secondary node have been brought online.
Note
When registering the admin LAN subnet, additional settings are required.
For the settings, refer to "Settings for Clustered Manager Configurations" of "6.1.7 Registering Admin LAN Subnets [Windows]" of the "ServerView Resource Coordinator VE Setup Guide".
Set up the HBA address rename Setup Service
When configuring managers and the HBA address rename setup service in cluster systems, perform the following procedure.
Not necessary when ServerView Deployment Manager is used in the same subnet.
Performing the following procedure starts the HBA address rename setup service on the standby node in the cluster.
Switch the manager "service or application" to the primary node.
Right-click [Services and Applications]-[RC-manager] on the Failover Cluster Management tree, and select the primary node using [Move this service or application to another node] from the displayed menu.
Switch the "Current Owner" of the "Summary of RC-manager" displayed in the center of the window to the primary node.
Configure the startup settings of the HBA address rename setup service of the secondary node.
Execute the following command using the command prompt:
>"Installation_folder\WWN Recovery\opt\FJSVrcxrs\bin\rcxhbactl.exe" <RETURN> |
The [HBA address rename setup service] dialog is displayed.
Configure the following parameters in the [HBA address rename setup service] dialog.
Specify the admin LAN IP address set in step 5. of "Create Cluster Resources".
Specify the port number for communication with the manager. The port number during installation is 23461.
When the port number for "rcxweb" on the manager has been changed, specify the new port number.
Click <Run>.
Confirm that the "Status" becomes "Running".
Click <Stop>.
Confirm that the "Status" becomes "Stopping".
Click <Cancel> and close the [HBA address rename setup service] dialog.
Switch the manager "service or application" to the secondary node.
Right-click [Services and Applications]-[RC-manager] on the Failover Cluster Management tree, and select the resource name of the secondary node from the [Move this service or application to another node] from the displayed menu.
The "Current Owner" of the "Summary of RC-manager" switches to the secondary node.
Configure the startup settings of the HBA address rename setup service of the primary node.
The procedure is the same as step 2.
Take the manager "service or application" offline.
Right-click [Services and Applications]-[RC-manager] on the Failover Cluster Management tree, and select [Take this service or application offline] from the displayed menu.
Configure a "service or application" for the HBA address rename service.
Right-click [Services and Applications] on the [Failover Cluster Management] tree, and select [More Actions]-[Create Empty Service or Application].
[New Service or Application] will be created under [Services and Applications].
Right-click [New Service or Application], and select [Properties] from the displayed menu.
The [New Service or Application Properties] dialog is displayed.
Change the "Name" on the [General] tab, select the resource name of the primary node from "Preferred owners", and click <Apply>.
When the settings have been applied, click <OK>.
From this point, this explanation assumes that the name of the "service or application" for the HBA address rename setup service has been configured as "RC-HBAar".
Add the generic scripts to the manager "service or application" for the HBA address rename service.
Right-click [Services and Applications]-[RC-manager] on the Failover Cluster Management tree, and select [Add a resource]-[3 - Generic Script] from the displayed menu.
The [New Resource Wizard] window will be displayed.
Set the script files in the "Script file path" of the "Generic Script Info", and click <Next>>.
"Confirmation" will be displayed.
Script File Path
Installation_folder\Manager\cluster\script\HBAarCls.vbs
Check the information displayed for "Confirmation" and click <Next>>.
The "Summary" will be displayed.
Click <Finish>.
Check that the added "HBAarCls Scripts" are displayed in "Other Resources" of the "Summary of RC-manager" displayed in the center of the window.
Add the generic scripts for the coordinated starting of the "service or application" for the HBA address rename service, to the "service or application" for the manager.
Right-click [Services and Applications]-[RC-manager] on the Failover Cluster Management tree, and select [Add a resource]-[3 - Generic Script] from the displayed menu.
The [New Resource Wizard] window will be displayed.
Set the script files in the "Script file path" of the "Generic Script Info", and click <Next>>.
"Confirmation" will be displayed.
Script File Path
Installation_folder\Manager\cluster\script\HBAarClsCtl.vbs
Check the information displayed for "Confirmation" and click <Next>>.
The "Summary" will be displayed.
Click <Finish>.
Check that the added "HBAarClsCtl Scripts" are displayed in "Other Resources" of the "Summary of RC-manager" displayed in the center of the window.
Configure the dependencies of the resources of the manager "service or application".
Configure the dependencies of resources based on the following table.
Resource for Configuration | Dependent Resource |
|---|---|
PXE Services (*1) | HBAarClsCtl Script |
HBAarClsCtl Script | Admin LAN IP Address |
*1: The PXE Services have been configured in step 4, "Register Service Resources", but change them using the above procedure.
Configure the dependencies of resources based on the following table for each of the above resources:
Refer to step 4, "Register Service Resources" for how to perform the settings of Resource Dependencies.
Configure the property to refer to when executing the "HBAarClsCtl scripts".
Execute the following command using the command prompt of the primary node:
>CLUSTER RES "HBAarClsCtl_Script" /PRIV HBAGroupName="RC-HBAar"<RETURN> |
Note
Specify a name such as the name of the generic scripts created in step 8 for "HBAarClsCtl_scripts", and the name of the
"service or application" for the "HBA address rename service" for "RC-HBAar".
Bring the manager "service or application" online.
Right-click [Services and Applications]-[RC-manager] on the Failover Cluster Management tree, and select [Bring this service or application online] from the displayed menu.
Confirm that all resources of the "RC-manager" have been brought online.
Click [Services and Applications] - [RC-HBAar] on the Failover Cluster Management tree.
Check that the "Status" of the "Summary of RC-HBAar" is online, and the "Current Owner" is the primary node.
Configure the startup settings of the HBA address rename setup service of the primary node.
Execute the following command using the command prompt:
>"Installation_folder\WWN Recovery\opt\FJSVrcxrs\bin\rcxhbactl.exe" <RETURN> |
The [HBA address rename setup service] dialog is displayed.
Check that the "Status" of the [HBA address rename setup service] dialog is "Running ".
Click <Cancel> and close the [HBA address rename setup service] dialog.
Switch the manager "service or application" to the primary node.
Right-click [Services and Applications]-[RC-manager] on the Failover Cluster Management tree, and select the primary node using [Move this service or application to another node] from the displayed menu.
The "Current Owner" of the "Summary of RC-manager" switches to the primary node.
Click [Services and Applications] - [RC-HBAar] on the Failover Cluster Management tree.
Check that the "Status" of the "Summary of RC-HBAar" is online, and the "Current Owner" is the secondary node.
Confirm the status of the HBA address rename setup service of the secondary node.
The procedure is the same as step 12.
Note
Set the logging level of Failover Cluster to 3 (the default) or higher.
It is possible to confirm and change the logging level by executing the following command using the command prompt:
Logging level confirmation
>CLUSTER /PROP:ClusterLogLevel <RETURN> |
Changing the logging level (Specifying level 3)
>CLUSTER LOG /LEVEL:3 <RETURN> |
The "service or application" configured in "Set up the HBA address rename Setup Service" for the "HBA address rename service", is controlled so that it is online on the other node, and online processing is performed in coordination with the manager "service or application".
For "service or application" for the "HBA address rename service", do not move the node using operations from the [Failover Cluster Management] window.