Replication Groups can be created for ease of replication management with one or more source/destination device pairs belonging to any single group.
It is also possible to create Volume Pairs that do not belong to a Replication Group.
Replication Groups are created by using the following steps:
Right-click anywhere in the Site view to invoke the context menu.
Select the [New] > [Replication Group] option to invoke the [New Replication Group] wizard dialog box.
Enter settings in accordance with the displayed contents.
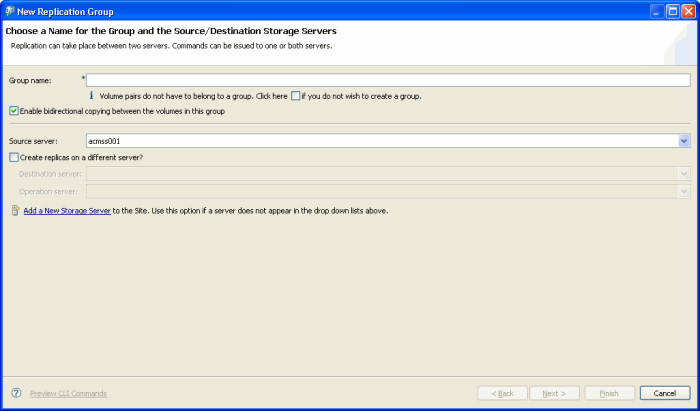
Label | Description |
|---|---|
Group name: | Mandatory field for the group name only if it is other than a Volume Pair. |
Click here if you do not wish to create a group. | Enable this checkbox if you do not wish to create a group. Volume Pairs do not have to belong to a Replication group. |
Enable bidirectional copying between the volumes in this group | Enable bidirectional copying between the devices in this group |
Source server: | Can be any server in the site |
Create replicas on a different server? | Enable this field only if the destination is on a different server. If the site has only one server, then this field is disabled. |
Destination server: | Shows all servers at the site except the current source server. If the source is changed, this list will be updated. This field is only enabled if the [Create replicas on a different server?] checkbox is enabled. |
Operation server: | The argument values are as follows: "Source", "Destination", "Both". "Both" is the default value. Only enabled when the source and destination servers are different and the [Create replicas on a different server?] checkbox is enabled. |
Add a New Storage Server to the Site. Use this option if a server does not appear in the drop down lists above. | This link opens the [New Storage Server] dialog box to add more servers to the site if necessary. If a server is added, the combo box values are automatically updated. |
Select a source server from the Source server combo box.
If the replica is hosted on a different Storage Server, enable the checkbox [Create replica on a different server?]. Specify the destination server and operation server accordingly.
Click [Next] to display the New Replication Group dialog box. Create a Volume Pair by specifying the source and destination servers.
Note
When creating a new Replication Group, do not select a device already registered as a backup volume.
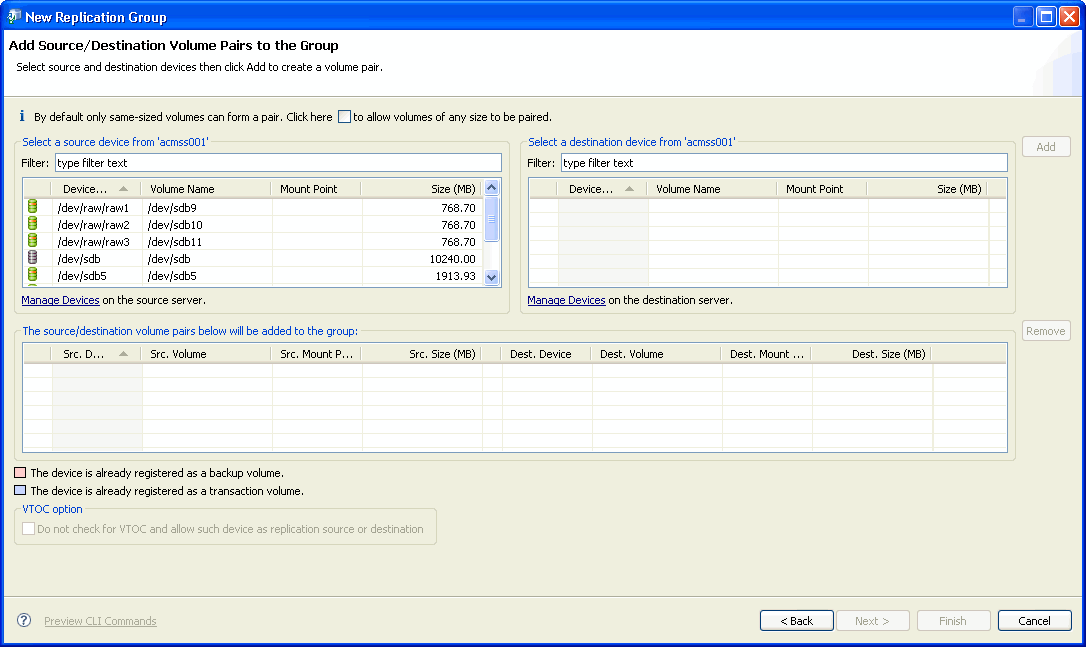
Label | Description |
|---|---|
By default only same-sized devices can form a pair. Click here to allow volumes of any size to be paired. | Enable the checkbox only to allow devices of any size to be paired. When unchecked, the destination server devices table displays only compatible devices. When checked, any size devices can be paired |
Select a source device from 'server_name1': | Lists all devices on the source server that have not yet been assigned as the source device of a pair in this group only. |
Select a destination device from 'server_name2': | Lists all devices on the destination server that have not been assigned yet as the destination device of a pair in this group only. |
Manage Devices on the source server. Manage Devices on the destination server. | Click one of these links to open the [Manage Devices] wizard for the server. If any devices are added, the source list is automatically updated. |
Allow volume with VTOC as replication source or destination | This option is only enabled when one of the devices is a slice in a Solaris operating platform and allows the volume with VTOC to be the replication source or destination. |
Specify a filter string to limit the range of devices available for selection.
Similarly, a list of available destination server devices with compatible attributes is displayed to the right of the source list.
Select a destination volume and click [Add] to add the Paired Volume to the group.
If more than one Volume Pair is to be added to the group, repeat the previous two steps as required. Click [Finish] to complete the creation of the Replication Group.
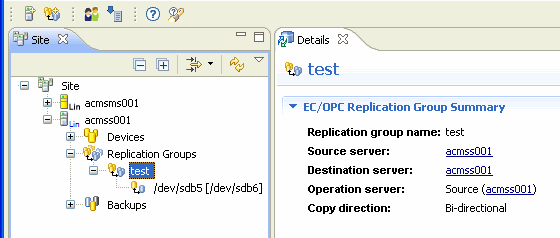
Check the details of the new Replication Group or Volume Pair by selecting it from the Site view to refresh the Details view with summary information.