Web USPから取得したコンテンツに対し、コンテンツ切り出しツールで定義したカスタマイズを実施し、ブリックコンテンツに表示するシナリオの記述例を以下に示します。
パッケージの置き場所
[Portalworksインストールフォルダ]\samples\sampleGoURL.jar
シナリオ実行概要
以下の例は、カスタマイズしたXHTML文書を取得し、表示するシナリオの作成例です。処理の流れは、以下のとおりです。
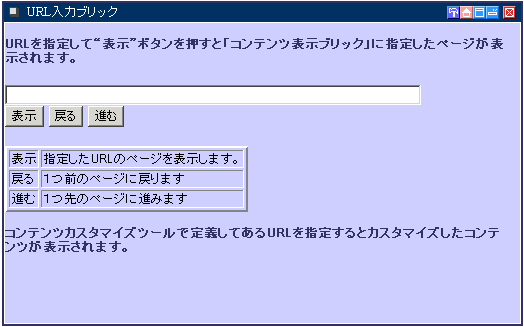
URLを入力するフォーム画面(URL入力ブリック)を表示する。
そのフォームにURLを入力し、[表示]ボタンを押して送信処理を行う。
Web USPを介してXHTMLコンテンツを取得し、コンテンツ切り出しツールの定義に従って、部分的に切り取られたコンテンツを取得します。
取得したコンテンツをブラウザに送信します。
以下の手順で操作します。
特定のURLに対しコンテンツのカスタマイズを定義します。
“Portalworks管理者ガイド”の“12.2 コンテンツ切り出しツール”に従って、コンテンツを部分的に切り出す定義を行います。
“Portalworks管理者ガイド”の“12.3 カスタマイズ対象の設定“に従って、切り出しツール設定した定義を運用状態にします。
Portalworksにログオンし、本シナリオを使ったサービスを表示します。
ここで示した画面が、“URL入力ブリック”に表示されます。
“URL入力ブリック”のテキストフィールドにコンテンツのカスタマイズ対象としたURLを指定して“表示”ボタンをクリックします。
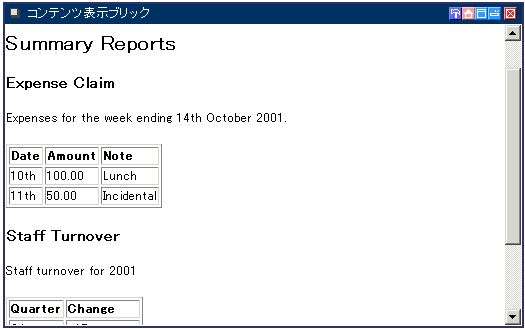
Web USPを介してURLで指定されたコンテンツを取得し、コンテンツ切り出しツールでの定義に従ってカスタマイズした内容を“コンテンツ表示ブリック“に表示します。
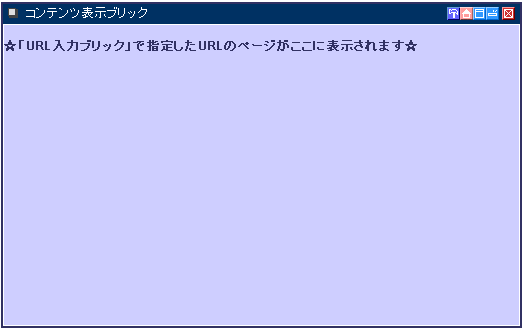
コンテンツ表示ブリック”の初期画面は以下のようになります。
“URL入力ブリック”で指定したコンテンツが以下のように“コンテンツ表示ブリック”内に表示されます。
アクティブシナリオJSP(goURLScenario.jsp)
<%@ page contentType="text/html; charset=Shift_JIS" %>
<%@ include file="/scenario/scenarioInit.jsp" %>

<pwst:prologueScenario result="ps" debugFile="scenarioDebug.txt"/>
<%
String url = scenarioRequest.getParamValue("url");
String go = scenarioRequest.getParamValue("go");
String back = scenarioRequest.getParamValue("back");
String forward = scenarioRequest.getParamValue("forward");

//現在位置の変数
int pos;
String s_pos = (String)scenarioContext.getAttribute("position");

//履歴のvector
Vector history = (Vector)scenarioContext.getAttribute("history");

//URL指定がない状態で「表示」ボタンを押した時
if( back==null && forward==null ) {
  scenarioContext.setAttribute("button", "go");
  //初期画面
  if( url==null || url.length()==0) {
    scenarioContext.setAttribute("url", null);
%>
    <!-- アクティブドックにフォワードする -->
    <pwst:epilogueScenario/>
    <jsp:forward page="goURLDoc.jsp"/>

<%
  //「表示」ボタンか「Enter」キーを押した時
  } else {
    //現在位置を属性に設定する
    if(s_pos==null)
      pos = 1;
    else
      pos = Integer.parseInt(s_pos) + 1;

    s_pos = Integer.toString(pos);
    scenarioContext.setAttribute("position", s_pos);

    //URLを履歴に追加する
    if(history==null){
      history = new Vector();
      history.add(0, url);
    }
    history.add(pos, url);
    scenarioContext.setAttribute("history", history);
  }

  //コールに必要なオブジェクトの作成
  String method=scenarioRequest.getParamValue("method");
  Hashtable uspParam = new Hashtable();
  uspParam.put("sponsorAction", "request");
  uspParam.put("targetURL", url);
  uspParam.put("httpMethod", "GET");
%>

  <pwst:call service="WebUSP" type="XHTML" paramObject="<%= uspParam %>" result="callResult"/>

<%
  //コール先が取得できなかった時
  if(callResult.getReturnCode()!=0) {
%>
    <br>**callResult.getReturnCode=<%= callResult.getReturnCode()%>
    <br>**callResult.getDetailCode=<%= callResult.getDetailCode()%>
    <br>
<%
  //コール先を取得できた時
  } else {
    scenarioContext.setAttribute("url", url);
%>
    <pwst:epilogueScenario/>
    <jsp:forward page="goURLDoc.jsp"/>
<%
  }
}else
//「戻る」ボタンを押した時
if(back!=null) {
  scenarioContext.setAttribute("button", "back");
  //移動先の位置を設定
  pos=0;
  if( s_pos!=null && Integer.parseInt(s_pos) > 0)
    pos = Integer.parseInt(s_pos) - 1;
  else { //初期画面で「戻る」ボタンを押した時
     scenarioContext.setAttribute("url", null);
%>
    <pwst:epilogueScenario/>
    <jsp:forward page="goURLDoc.jsp"/>
<%
  }

  s_pos = Integer.toString(pos);
  scenarioContext.setAttribute("position", s_pos);

  //移動先のURLを取得
  if( pos>0 && pos<history.size() )
    url = (String)history.elementAt(pos);
  else
  //最初の画面に戻る
  if( pos==0 ) {
    scenarioContext.setAttribute("url", null);
%>
    <pwst:epilogueScenario/>
    <jsp:forward page="goURLDoc.jsp"/>
<%
  } else
    System.err.println("URL移動でエラーとなりました。(ベクターにない要素番号のため)");

  //コールに必要なオブジェクトの作成
  String method=scenarioRequest.getParamValue("method");
  Hashtable uspParam = new Hashtable();
  uspParam.put("sponsorAction", "request");
  uspParam.put("targetURL", url);
  uspParam.put("httpMethod", "GET");
%>

  <pwst:call service="WebUSP" type="XHTML" paramObject="<%= uspParam %>" result="callResult"/>

<%
  //コール先が取得できなかった時
  if(callResult.getReturnCode()!=0) {
%>
    <br>**callResult.getReturnCode=<%= callResult.getReturnCode()%>
    <br>**callResult.getDetailCode=<%= callResult.getDetailCode()%>
    <br>
<%
  //コール先を取得できた時
  } else {
    scenarioContext.setAttribute("url", url);
%>
    <pwst:epilogueScenario/>
    <jsp:forward page="goURLDoc.jsp"/>
<%
  }
} else
//「進む」ボタンを押した時
if(forward!=null) {
  scenarioContext.setAttribute("button", "forward");
  //移動先の位置を設定
  pos=0;
  if(s_pos!=null && Integer.parseInt(s_pos)>=0)
    pos = Integer.parseInt(s_pos) + 1;
  else{
    scenarioContext.setAttribute("url", null);
%>
    <pwst:epilogueScenario/>
    <jsp:forward page="goURLDoc.jsp"/>
<%
  }

  //移動先のURLを取得
  if(pos<history.size()) {
    s_pos = Integer.toString(pos);
    scenarioContext.setAttribute("position", s_pos);
    url = (String)history.elementAt(pos);
  } else {
    pos--;
    s_pos = Integer.toString(pos);
    scenarioContext.setAttribute("position", s_pos);
    if( history==null ) {
      scenarioContext.setAttribute("url", null);
%>
      <pwst:epilogueScenario/>
      <jsp:forward page="goURLDoc.jsp"/>
<%
    } else
      url = (String)history.lastElement();
  }

  //コールに必要なオブジェクトの作成
  String method=scenarioRequest.getParamValue("method");
  Hashtable uspParam = new Hashtable();
  uspParam.put("sponsorAction", "request");
  uspParam.put("targetURL", url);
  uspParam.put("httpMethod", "GET");
%>

  <pwst:call service="WebUSP" type="XHTML" paramObject="<%= uspParam %>" result="callResult"/>

<%
  //コール先が取得できなかった時
  if(callResult.getReturnCode()!=PWScenarioTagResult.ERROR_OK) {
%>
    <h3>callタグの復帰値</h3>
    <br>**callResult.getReturnCode=<%= callResult.getReturnCode()%>
    <br>**callResult.getDetailCode=<%= callResult.getDetailCode()%>
    <br>
<%
  //コール先を取得できた時
  } else {
    scenarioContext.setAttribute("url", url);
%>
    <pwst:epilogueScenario/>
    <jsp:forward page="goURLDoc.jsp"/>

<%
  }
}else{

  scenarioContext.setAttribute("button", "no");
  scenarioContext.setAttribute("position", "0");
  scenarioContext.setAttribute("url", null);
%>
  <pwst:epilogueScenario/>
  <jsp:forward page="goURLDoc.jsp"/>
<%
}
%>アクティブドックJSP(goURLDoc.jsp)
<%@ page contentType="text/html; charset=Shift_JIS" %>
<%@ include file="/scenario/docInit.jsp" %>
<pwst:prologueDoc result="ps" debugFile="scenarioDebug2.txt"/>

<!-- URLを指定するブリックの表示設定 -->
<pwst:content type="HTML" contentId="goURL1"/>
<html>
<head>
<meta http-equiv="Content-Language" content="ja">
<meta http-equiv="Content-Type" content="text/html; charset=shift_jis">
<title>URL入力</title>
</head>
<body bgcolor=ccccff>

<br>
<font color=333366><b>URLを指定して“表示”ボタンを押すと
「コンテンツ表示ブリック」に指定したページが表示されます。<b></font>

<form action= "<%= scenarioContext.makeLink()%>">
<input type=text name=url size=80><br>
<input type=submit name=go value="表示">
<input type=submit name=back value="戻る" >
<input type=submit name=forward value="進む">
</form>

<table border=2>
<tr>
<td>表示</td><td>指定したURLのページを表示します。</td>
</tr><tr>
<td>戻る</td><td>1つ前のページに戻ります</td>
</tr><tr>
<td>進む</td><td>1つ先のページに進みます</td>
</tr></table>
<br>
<font color=333366>コンテンツカスタマイズツールで定義してあるURLを指定すると
カスタマイズしたコンテンツが表示されます。</font>

</body>
</html>


<!-- 指定したURLを表示するブリックの表示設定 -->
<pwst:content type="HTML" contentId="goURL2" />
<!-- 指定したURLを表示するブリックの表示設定 -->

<%
String url = (String)scenarioContext.getAttribute("url");
String back = scenarioRequest.getParamValue("back");
String forward = scenarioRequest.getParamValue("forward");
String s_pos = (String)scenarioContext.getAttribute("position");
int pos;
if( s_pos!=null )
  pos = Integer.parseInt(s_pos);
else
  pos = -1; //初期状態でボタンを押した時

  if( url==null || url.length()==0 ){
%>

<!-- URLがNULLの時 -->
<html>
<head>
<meta http-equiv="Content-Language" content="ja">
<meta http-equiv="Content-Type" content="text/html; charset=shift_jis">
<meta name="GENERATOR" content="Microsoft FrontPage 4.0">
<meta name="ProgId" content="FrontPage.Editor.Document">
<title>コンテンツ表示</title>
</head>
<body bgcolor=ccccff>

<br>
<font color=333366><b>☆「URL入力ブリック」で指定したURLのページがここに表示されます☆</b></font>

</body>
</html>


<%
} else {
%>

<!-- URLが指定された時 -->
  <pwst:receive service="WebUSP" type=”XHTML” timeout="60" result="receiveResult"/>

<%
  if(receiveResult.getReturnCode()!=PWScenarioTagResult.ERROR_OK){
%>
    <h3>receiveの復帰値</h3>
    <br>
    receiveResult.getReturnCode=<%=receiveResult.getReturnCode()%>
    <br>
    receiveResult.getDetailCode=<%=receiveResult.getDetailCode()%>
    <br>
<%
  }else{
    Object receiveObject;
    receiveObject=receiveResult.getXhtmlContent();

    try{
      scenarioContext.contentToResponse(receiveObject);
    }catch(java.io.IOException ie){
    }
%>

<%
  }
}
%>

<pwst:epilogueDoc/>
留意事項
“URL入力ブリック”で指定するURLが https である場合、“Portalworks管理者ガイド”の“11.1.4 HTTPSの設定”に従って、事前にCA証明書を登録しておく必要があります。