This section explains how to add a disk to the device unit and how to delete a disk from the device unit.
If the automatic configuration function is used to automatically configure a RAIDGroup and LogicalVolumes for the device unit that has been newly created, disks must be added in advance by this procedure according to the configuration of the real device.
This is because the automatic configuration function makes a configuration within the range of the disks already mounted. Disks must also be added in advance by this procedure even in cases where a RAIDGroup is to be configured manually.
A disk can also be added to, or deleted from, the real device unit displayed with the device load operation.
When a volume shortage occurs during operation, for instance, a RAIDGroup and LogicalVolumes need to be created. If free disks are required to create them do not exist, the required disks must be added to the real device. To be prepared for this type of situation, the user can use the procedure explained here to add disks to the disk mount positions and then execute the automatic configuration function or configure a RAIDGroup and LogicalVolumes manually. Doing so enables the user to create in advance the device configuration after disk addition without actually adding disks to the real device.
Mount a disk according to the following procedure:
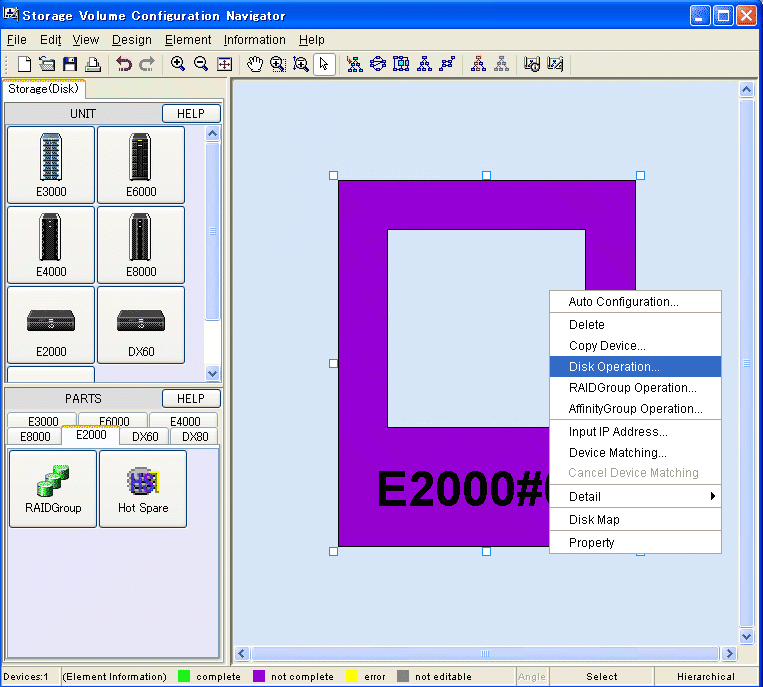
While selecting a device unit, select [Design] - [Disk Operation] from the menu bar or select [Disk Operation] from the pop-up menu to open the disk operation window. The figure below shows how the disk operation window is opened.
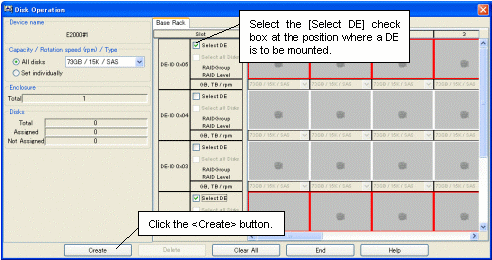
Check whether a DE is already mounted at the position where a disk is to be mounted. If not, mount a DE by following the procedure below. If a DE is already mounted, this operation is not required.
To delete an existing DE, select the [Select DE] check box, and click the <Delete> button.
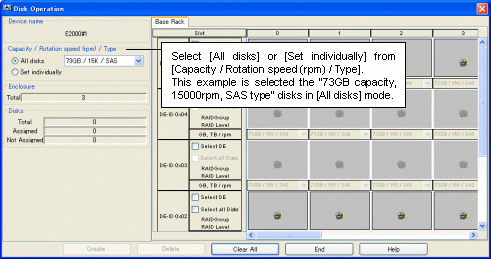
Specify the type of the disk to be mounted. The disk type can be specified either for all disks (All disks) or for individual slots (Set individually).Select either [All disks] or [Set individually] from [Capacity / Rotation speed (rpm) / Type]. When [All disks] is selected, click the down arrow and select the type of the disks to be added. When [Set individually] is selected, select the type of the disk to be added to each disk slot. Disk types are displayed as follows:
Description on the screen | Disk type name |
|---|---|
FC | Fibre Channel Disk |
FC(N) | Nearline FC Disk |
SAS | SAS Disk |
SAS(N) | Nearline SAS Disk |
SATA(N) | Nearline SATA Disk |
SSD | SSD |
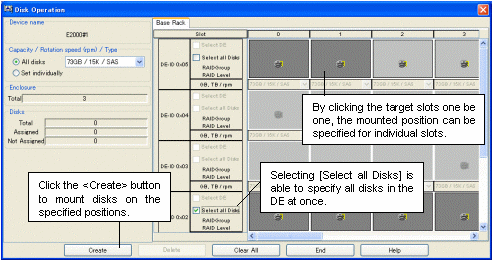
After specifying the disk type, specify the position where the disks are to be mounted. The disk mount position can be specified either for all disk mount positions in a DE or for individual slots. After specifying the disk mount positions, click the <Create> button. The figure below shows how disks are mounted.
To delete a disk, select the disk and click the <Delete> button.