

| ETERNUS SF AdvancedCopy Manager User's Guide 13.0 -Microsoft(R) Windows(R) 2000/Microsoft(R) Windows Sever(TM) 2003-, -Solaris-, -HP-UX-, -Linux-, -AIX- |
|
Contents
Index
|
This chapter explains the window structure of the AdvancedCopy Manager Web client and details how to operate the initial window.
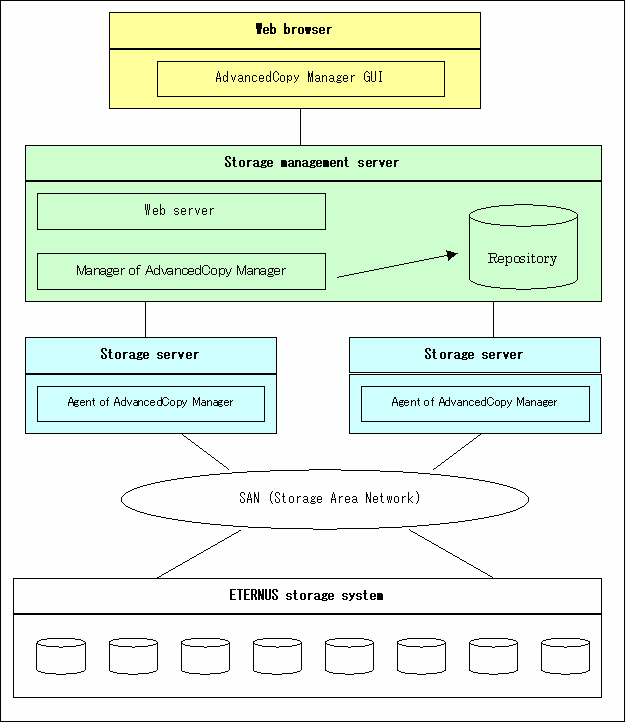
AdvancedCopy Manager provides efficient use of distributed storage, and uses a Web browser for centralized management of storage. The Web client of this product also offers the following management functions:
Security management
Backup management
Replication management
Each management window is activated from the AdvancedCopy Manager initial window. On the initial window the user can define a storage management server, storage server for storage management, and device information.
Figure 1.1 shows the AdvancedCopy Manager window structure.
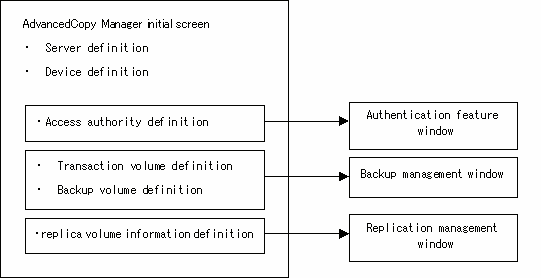
Figure 1.2 shows an example system environment configuration.
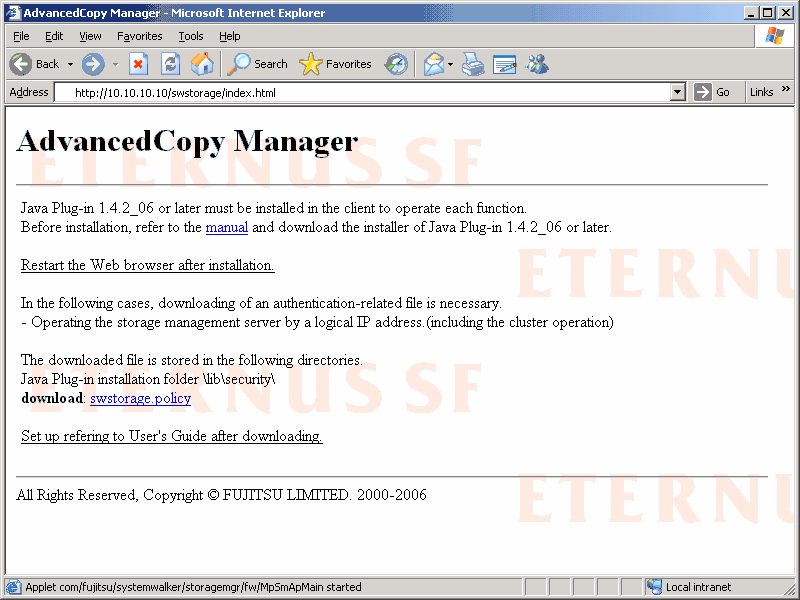
The initial window and management windows of AdvancedCopy Manager are executed via the Web browser. Therefore, Java Plug-in 1.4.2_06 or later must be installed in the client. For installation details, refer to "Setting up a client" .
Activate the initial window by entering the AdvancedCopy Manager URL in the Web browser.
To access the Storage management server by its physical IP address, enter:
http://storage-management-server-physical-IP-address (:port-number)/swstorage/index.html
To access the Storage management server by its logical IP address (ex. in cluster operation), enter:
http://storage-management-server-logical-IP-address (:port-number)/swstorage/index.html
When the default (80) is set as a service target port number in the Web server setup, no port number need be specified. When a value other than the default is set, specify a port number.

Storage management server access through a proxy is not supported.
For details, see "Browser and Java Plug-in settings."

Usually the physical IP address of the Storage management server (mentioned above) and a logical IP address are entered when the AdvancedCopy Manager cluster is set up, or when the database is created during AdvancedCopy Manager installation. When distinguishing and employing the IP address for the Storage management server machine being equipped with two or more network cards, and using an above-mentioned IP address and an above-mentioned Web screen Please input the IP address set up by "GUI connection information setting command (stgguiipset)" in "ETERNUS SF AdvancedCopy Manager Operator's Guide".

If the storage management server uses a logical IP address (such as for cluster operation), then appropriate settings in authentication-related files are required. For more information, see "Settings of authentication-related files."
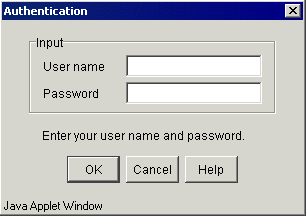
When [AdvancedCopy Manager URL] is selected on the Web browser, the authentication dialog box is displayed. Enter the name and password of a user or privileged user registered with the AdvancedCopy Manager authentication feature (i.e.root user), and click [OK].
See "Authentication Feature Window Operation" for details on how to register users and access permissions.
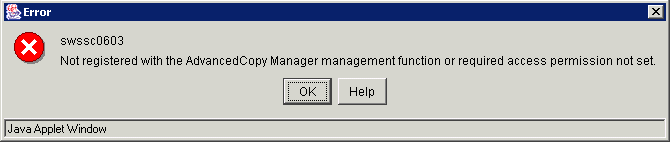
If user authentication fails, an error dialog is displayed as shown below. Enter the correct user name and password.
If an unregistered user name or an incorrect password is entered, the following error message is displayed:
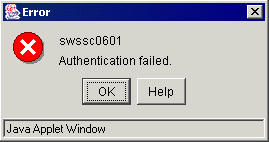
A user name registered in the system was entered, but this user name is either not recorded in the AdvancedCopy Manager authentication system or does not have the required write, execute, or read permission.

The display item type, item sequence, and item display width set by a user on the initial window are retained for the user and are valid on the window when it is reactivated by the user. This configuration is valid each time the same user name is used.
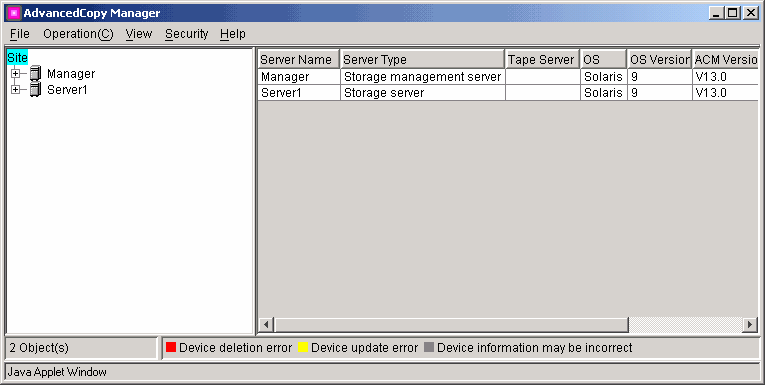
This is the first view displayed after user authentication.
This view displays server information, and
is displayed when [Site] is double-clicked on the Tree window.

The display item of this screen can also be displayed using the "stgxfwcmdispsrv" command of AdvancedCopy Manager.
Refer to "Configuration management command" in the "ETERNUS SF AdvancedCopy Manager Operator's Guide" for details on commands.
Table 1.1 lists items displayed on the server list view.
|
No. |
Item name |
Explanation |
Display selection |
Default |
|---|---|---|---|---|
|
1 |
Server Name |
Managing server name |
Yes |
|
|
2 |
Server Type |
Server type (Storage management server or Storage server) |
Yes |
Yes |
|
3 |
Tape Server |
"Y"for Tape Server operation |
Yes |
Yes |
|
4 |
OS |
Type of installed OS |
Yes |
Yes |
|
5 |
OS Version |
Version of installed OS |
Yes |
Yes |
|
6 |
ACM Version |
Installed version of this product |
Yes |
Yes |
|
7 |
IP Address |
IP address of managing server |
Yes |
Yes |
|
8 |
Port Number |
Port number for communication with managing server |
Yes |
Yes |
"Yes" in the display selection column indicates that the item is to be displayed and can be selected (see "Changing display items."
"Yes" in the default column indicates that the item is displayed when the screen is initialized.
Table 1.2 lists the supported operations.
|
Operation |
Explanation |
Operation method |
|---|---|---|
|
Add Server |
Adds server. |
|
|
Update Server |
Changes server information. |
See "Server modification method." |
|
Delete Server |
Deletes sever. |
|
|
Refresh Server |
Acquires and reflects information about all server-managed devices |
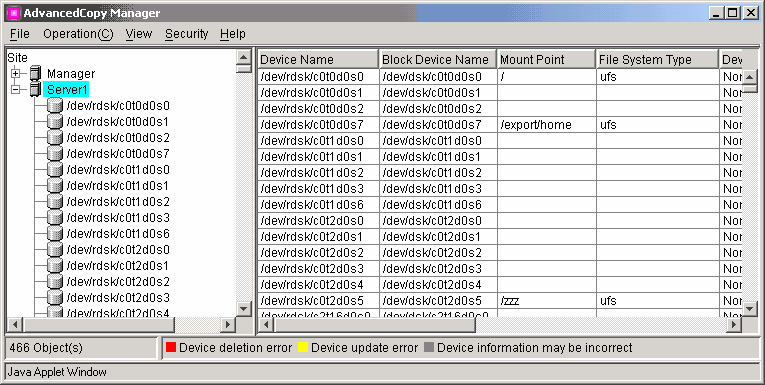
This view displays information about devices managed with a specified server.
This view is displayed when a server name is double-clicked on the Tree window.


The display item of this screen can also be displayed using the "stgxfwcmdispdev" command of AdvancedCopy Manager.
Refer to "Configuration management command" in the "ETERNUS SF AdvancedCopy Manager Operator's Guide" for details on commands.

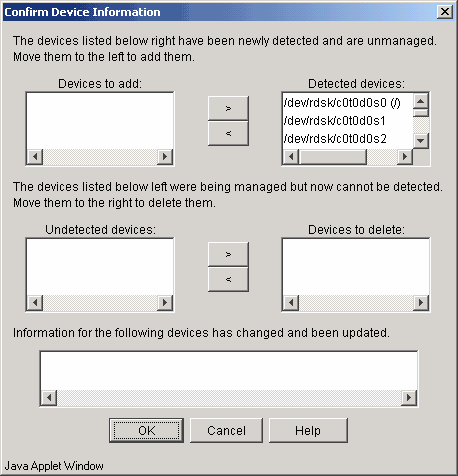
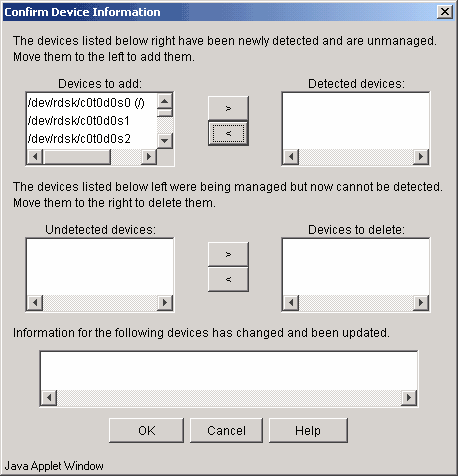
During acquisition/reflection of information on all devices, if the device has invalid settings and its information is reflected to the repository, then the name of the device in the Device List view becomes highlighted in gray. The following are examples of such cases:
Though the settings are invalid, the user mistakenly continued processing by clicking in the "Confirmation of device information" dialog box.
AdvancedCopy is supported, but the information to be handled is the device information in a cabinet where settings are not defined (including cases in which AdvancedCopy is not used in one cabinet for mirroring volumes between cabinets).
Table 1.3a, 1.3b, 1.3c, 1.3d and 1.3e list displayed items. The table entries "SDX" and "SDX object" are SynfinityDISK and PRIMCLUSTER Global Disk Services (The following, GDS) terms. For details, please refer to the manual of the relevant product.
|
No. |
Item name |
Explanation |
Display selection |
Default |
|---|---|---|---|---|
|
1 |
Device Name |
Name of device which AdvancedCopy Manager manages internally Displayed in the g?d?p? format g?: Disk array number(If there is no device mounted on the ETERNUS storage system, this value is 0.) d?: Disk number(*1) p?: Logical disk number(*2) For SDX object, format"disk class name/mirror volume name:g?d?p?"is used Disk class name: SDX object disk class name Mirror volume name: SDX object mirror volume name |
Yes |
|
|
2 |
Block Device Name |
Block device name Displayed in the disk?p? format disk?: Disk number displayed with disk administrator p?: Logical disk number(*2) |
Yes |
Yes |
|
3 |
Mount Point |
Drive letter |
Yes |
Yes |
|
4 |
File System Type |
File system type |
Yes |
Yes |
|
5 |
Device Type |
Device type |
Yes |
Yes |
|
6 |
Size (MB) |
Size assigned to device (MB) |
Yes |
Yes |
(*1) Number assigned uniquely in disk array device and different from disk number in disk administrator
(*2) Logical disk sequence number in disk. The logical disk is defined in the disk administrator as explained below. The numbers are assigned sequentially from left to right in the disk administrator.
For a basic partition, the logical disk consists of the entire partition
For an extended partition, the logical disk consists of a logical drive in the partition
|
No. |
Item name |
Explanation |
Display selection |
Default |
|---|---|---|---|---|
|
1 |
Device Name |
RAW device name |
Yes |
|
|
2 |
Block Device Name |
Block device name |
Yes |
Yes |
|
3 |
Mount Point |
Mount point name |
Yes |
Yes |
|
4 |
File System Type |
File system type |
Yes |
Yes |
|
5 |
Device Type |
Device type |
Yes |
Yes |
|
6 |
Size (MB) |
Size assigned to device (MB) |
Yes |
Yes |
|
No. |
Item name |
Explanation |
Display selection |
Default |
|---|---|---|---|---|
|
1 |
Device Name |
RAW device name or LVM subordinate's volume group name |
Yes |
|
|
2 |
Block Device Name |
Block device name or LVM subordinate's volume group name |
Yes |
Yes |
|
3 |
Mount Point |
Mount point name |
Yes |
Yes |
|
4 |
File System Type |
File system type |
Yes |
Yes |
|
5 |
Device Type |
Device type |
Yes |
Yes |
|
6 |
Size (MB) |
Size assigned to device (MB) |
Yes |
Yes |
|
No. |
Item name |
Explanation |
Display selection |
Default |
|---|---|---|---|---|
|
1 |
Device Name |
Use a RAW device name if it has already been created; otherwise, use a block device name. |
Yes |
|
|
2 |
Block Device Name |
Block device name |
Yes |
Yes |
|
3 |
Mount Point |
Mount point name |
Yes |
Yes |
|
4 |
File System Type |
File system type |
Yes |
Yes |
|
5 |
Device Type |
Device type |
Yes |
Yes |
|
6 |
Size (MB) |
Size assigned to device (MB) |
Yes |
Yes |
|
No. |
Item name |
Explanation |
Display selection |
Default |
|---|---|---|---|---|
|
1 |
Device Name |
RAW device name or LVM subordinate's volume group name |
Yes |
|
|
2 |
Block Device Name |
Block device name or LVM subordinate's volume group name |
Yes |
Yes |
|
3 |
Mount Point |
Mount point name |
Yes |
Yes |
|
4 |
File System Type |
File system type |
Yes |
Yes |
|
5 |
Device Type |
Device type |
Yes |
Yes |
|
6 |
Size (MB) |
Size assigned to device (MB) |
Yes |
Yes |
"Yes" in the display selection column indicates that the item is to be displayed and can be selected (see "Changing display items."
"Yes" in the default column indicates that the item is displayed when the screen is initialized.
Table 1.4 lists supported operations on the device view list.
|
Operation |
Explanation |
Operation method |
|---|---|---|
|
Refresh Device |
Acquires and reflects information about the specific device |
See "Acquisition/reflection of information on specific device." |
|
Delete Device |
Deletes device information. |
|
|
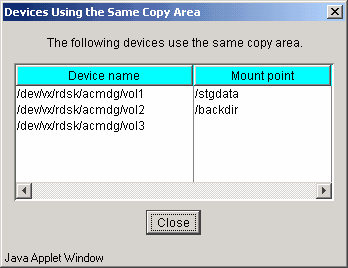
List Devices Using the Same Copy Area |
The devices using the same copy area as the specified device can be displayed. |
|
|
List Devices in the Same Logical Group |
The devices in the same logical group as the specified device can be displayed. |
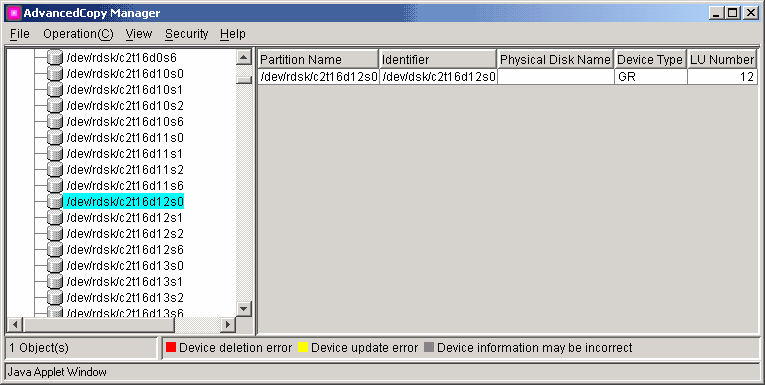
This view displays information about the partitions comprising the specified device.
This view is displayed when a device name is double-clicked in the Tree window.

The display item of this screen can also be displayed using the "stgxfwcmdisppat" command of AdvancedCopy Manager.
Refer to "Configuration management command" in the "ETERNUS SF AdvancedCopy Manager Operator's Guide" for details on commands.
Tables 1.5a, 1.5b, 1.5c, 1.5d and 1.5e list displayed items on the partition list views of different types of servers.
|
No. |
Item name |
Explanation |
Display selection |
Default |
|---|---|---|---|---|
|
1 |
Partition Name |
Partition name If present on the ETERNUS storage system, the display format is the same as that in item No. 1 of Table 1.3a. In cases other than the above, the S?p? format is used S?: Signature (8-digit hexadecimal notation) p?: Logical disk number (*1) |
Yes |
|
|
2 |
Identifier |
Device name managed internally by AdvancedCopy Manager The display format is the same as that in item No. 1 of Table 1.3a. |
Yes |
Yes |
|
3 |
Physical Disk Name |
Physical disk name The display format is the same as that in item No. 2 of Table 1.3a. |
Yes |
Yes |
|
4 |
Device Type |
If present on the ETERNUS storage system, "GR". |
Yes |
Yes |
|
5 |
LU Number |
If present on the ETERNUS storage system, LU number. |
Yes |
Yes |
(*1) Logical disk sequence number of disk. The logical disk is defined by the disk administrator as explained below. The numbers are assigned sequentially from the top left to the right by the disk administrator.
For a basic partition, the logical disk consists of the entire partition.
For an extended partition, the logical disk consists of a logical drive in the partition.
|
No |
Item name |
Explanation |
Display selection |
Default |
|---|---|---|---|---|
|
1 |
Partition Name |
RAW device name For SDX(slice) object, format "RAW device name:c?t?d?" is used. |
Yes |
|
|
2 |
Identifier |
Block device name For SDX(slice) object, format "block device name:c?t?d?" is used. |
Yes |
Yes |
|
3 |
Physical Disk Name |
This item is left blank. |
Yes |
Yes |
|
4 |
Device Type |
If present on the ETERNUS storage system, "GR". |
Yes |
Yes |
|
5 |
LU Number |
If present on the ETERNUS storage system, LU number. |
Yes |
Yes |
|
No. |
Item name |
Explanation |
Display selection |
Default |
|---|---|---|---|---|
|
1 |
Partition Name |
RAW device name or LVM subordinate's volume group name |
Yes |
|
|
2 |
Identifier |
Block device name or LVM subordinate's volume group name |
Yes |
Yes |
|
3 |
Physical Disk Name |
This item is left blank. |
Yes |
Yes |
|
4 |
Device Type |
If present on the ETERNUS storage system, "GR". |
Yes |
Yes |
|
5 |
LU Number |
If present on the ETERNUS storage system, LU number. |
Yes |
Yes |
|
No. |
Item name |
Explanation |
Display selection |
Default |
|---|---|---|---|---|
|
1 |
Partition Name |
When the RAW device name is being created, it is a RAW device name:otherwise, it is a block device name. For the slice unit of SDX object, format "RAW device name:sd?" is used. |
Yes |
|
|
2 |
Identifier |
Block device name For the slice unit of SDX object, format "block device name:sd?" is used. |
Yes |
Yes |
|
3 |
Physical Disk Name |
This item is left blank. |
Yes |
Yes |
|
4 |
Device Type |
If present on the ETERNUS storage system, "GR". |
Yes |
Yes |
|
5 |
LU Number |
If present on the ETERNUS storage system, LU number. |
Yes |
Yes |
|
No. |
Item name |
Explanation |
Display selection |
Default |
|---|---|---|---|---|
|
1 |
Partition Name |
RAW device name or LVM subordinate's volume group name |
Yes |
|
|
2 |
Identifier |
Block device name or LVM subordinate's volume group name |
Yes |
Yes |
|
3 |
Physical Disk Name |
This item is left blank. |
Yes |
Yes |
|
4 |
Device Type |
If present on the ETERNUS storage system, "GR". |
Yes |
Yes |
|
5 |
LU Number |
If present on the ETERNUS storage system, LU number. |
Yes |
Yes |
"Yes" in the display selection column indicates that the item is to be displayed and can be selected (see "Changing display items."
"Yes" in the default column indicates that the item is displayed when the screen is initialized.
No operations are supported by partition list view.
The screen shown below is displayed when [Basic tree directory] is selected on the server list view and [Add Server...] is selected on the [Operation] menu.
The same screen is also displayed when [Basic tree directory] is right-clicked on the server list view and [Add Server...] is selected from the popup menu.
To add a new server, enter the necessary information in the following dialog and click [OK].

Table 1.6 lists the input items.
|
No. |
Item name |
Selection |
Value |
Explanation |
|---|---|---|---|---|
|
1 |
Server name |
User defined |
Maximum of 255 bytes |
Specifies the name of the storage server to be added. The name must be less than 255 bytes(*2) and a unique server name for AdvancedCopy Manager in order for it to manage the server.
|
|
Use hostname |
- |
|||
|
2 |
IP address |
- |
Value conforming to IPv4 rule |
Specify a physical IP address if the server is managed as a physical server. Specify a logical IP address if the IP address is made redundant and managed (as a logical server), as in a cluster environment. |
|
3 |
Port number |
- |
1024 to 65535 |
Port number assigned to service name stgxfws if the server is managed as a physical server. Port number specified during cluster setup, as in a cluster environment. |
(*1) The following characters can be used: single-byte alphanumeric characters, minus sign (-), underscore (_), hash (#), and period (.). The first character must be a single-byte alphanumeric character. (A double-byte character causes an error.)

This operation can also be carried out using the "stgxfwcmaddsrv" command of AdvancedCopy Manager.
Refer to "Configuration management command" in the "ETERNUS SF AdvancedCopy Manager Operator's Guide" for details on commands.
This chapter explains how to change server information.
The Web screen can be used to change the following server information:
Storage server IP address
Storage server port number
Storage management server name
Storage server name
This is also used when the Tape Server management function is installed on the target server later.

This operation can also be carried out using the "stgxfwcmmodsrv" command of ETERNUS SF AdvancedCopy Manager.
Refer to "Configuration management command" in the "ETERNUS SF AdvancedCopy Manager Operator's Guide" for details on commands.

The following server information is performed using a management server information change command. Please refer to " Changing the Operating Environment" in the "ETERNUS SF AdvancedCopy Manager Operator's Guide" for details on changing:
Storage management server IP address
Storage management server port number
When you define by the Storage server used as the candidate for change as a replication source or replication destination volume using a replication management function, please delete a setup of an original / replica volume with reference to "Deleting an original volume or replica volume" in the ETERNUS SF AdvancedCopy Manager Operator's Guide.
Stop the AdvancedCopy Manager service in the target storage server. For details on how to stop the service, refer to the ETERNUS SF AdvancedCopy Manager Operator's Guide.
Change the system IP address in the storage server.
If the Storage Server transaction is running as a cluster operation, change the logical IP address for the Storage Server transaction.
Activate the AdvancedCopy Manager service in the storage server. For details on how to activate the service, refer to the ETERNUS SF AdvancedCopy Manager Operator's Guide.
Select the server whose information is to be changed from the server list view, and select [Update Server...] on the [Operation] menu. Alternatively, right-click the server selected in the server list view and select [Update Server...] from the popup menu. The following dialog is displayed:

Change the information as required and click [OK].
When you want to change the Storage Server that is being used as a replication source or destination volume for a replication management function, delete the original / replica volume. For details, refer to "Deleting an original volume or replica volume" in the ETERNUS SF AdvancedCopy Manager Operator's Guide.
Stop the AdvancedCopy Manager service in the target storage server. For details on how to stop the service, refer to the ETERNUS SF AdvancedCopy Manager Operator's Guide.
In the storage server, change the port number for the AdvancedCopy Manager communication service (stgxfws).
When the Storage server is a Solaris OE server, HP-UX, or Linux server, change the communication service (stgxfws) port number written in the /etc/services.
When the Storage server is a Windows server, change the communication service (stgxfws) port number written in the Windows installation directory \system32\drivers\etc\services.
If the Storage Server transaction is running as a cluster operation, change the port number of the Communications Service (stgxfws_logical node name) for the Storage Server transaction.
Activate the AdvancedCopy Manager service in the storage server. For details on how to activate the service, refer to the ETERNUS SF AdvancedCopy Manager Operator's Guide.
Select the server whose information is to be changed form the server list view, and select [Update Server...] on the [Operation] menu. Alternatively, right-click the server selected in the server list view and select [Update Server...] form the popup menu. The following dialog is displayed:
Change the information as required and click [OK].
Determine whether the target storage management server to be changed is also used as a storage server. If it is, refer to the chapter entitled, "How to change the storage server name." Then, perform Procedure 4.
Select the server whose information is to be changed from the server list view, and select [Update Server...] on the [Operation] menu. Alternatively, right-click the server in the server list view and select [Update Server...] from the popup menu. Then, the following dialog is displayed.
Change the information as required and click [OK].
Execute the Management server information change command (stgcmmodnode) in each storage server managed by this storage management server. For details on changing server information, refer to the ETERNUS SF AdvancedCopy Manager Operator's Guide.
In the Storage server to be changed, when the definition is given as an original or replica volume using a replication management function, please delete the original/ replica volume. For details, refer to Chapter 8.6.2 "Deleting an original volume or replica volume" in the ETERNUS SF AdvancedCopy Manager Operator's Guide.
Select the server whose information is to be changed from the server list view, and select [Update server...] on the [Operation] menu. Alternatively, on the server list view, right-click the server and select [Update server...] from the popup menu. The following dialog is displayed:
Change the information as required and click [OK].
Select the target server on the server list view, and select [Delete Server...] on the [Operation] menu to display the dialog shown below.
Alternatively, select the target server on the server list view, right click, and select [Delete Server...] on the popup menu. The dialog shown below is displayed.
Click [Yes] to delete the server.
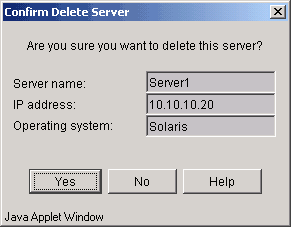

A storage management server cannot be deleted.

This operation can also be carried out using the "stgxfwcmdelsrv" command of AdvancedCopy Manager.
Refer to "Configuration management command" in the "ETERNUS SF AdvancedCopy Manager Operator's Guide" for details on commands.
The following two methods can be used to register device information:
Acquisition/reflection of information on all devices
Acquisition/reflection of information on specific device

Use this method not only when starting operation but also when changing the device configuration because registration, deletion, and update are implemented by comparing the present device control information with the detected device information.

Device information on the following cannot be registered with AdvancedCopy Manager because of management off the subject.
GPT disk (for a Windows or HP-UX server)

This operation can also be carried out using the "stgxfwcmsetdev" command of AdvancedCopy Manager.
For details on commands, see the AdvancedCopy Manager Operator's Guide - Configuration Management Commands edition corresponding to the operating system used.
Acquire and reflect all server-managed devices.
Use this method for the initial registration of device information
Select a target server on the server list view,and select [Refresh Server...] on the [Operation] menu to display the dialog shown below.
Alternatively, on the server list view, right-click the server and select [Refresh Server...] on the popup menu. T he dialog shown below is displayed:


The time needed for this operation depends on the total number of devices defined in the selected storage server. If many devices are defined, perform this operation when there is low CPU I/O load.
The standard time necessary for one device (partition) is about 0.5 seconds nder a no-load condition.
Select [Yes] to acquire information about all devices defined with the selected server.
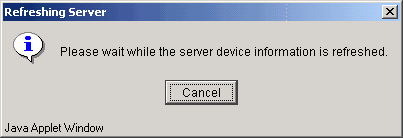
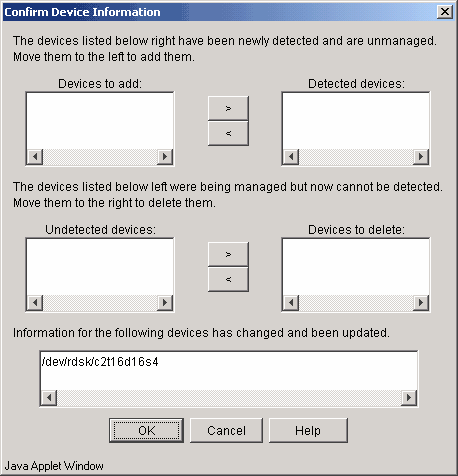
If the currently managed device information is acquired, the following dialog is displayed.

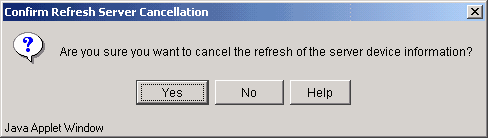
To stop the device information acquisition, click [Cancel].
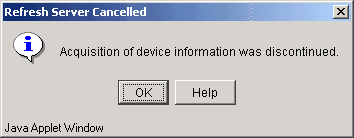
When the acquisition is stopped normally, the following dialog is displayed.
If you click [OK], the dialog shown below may display.
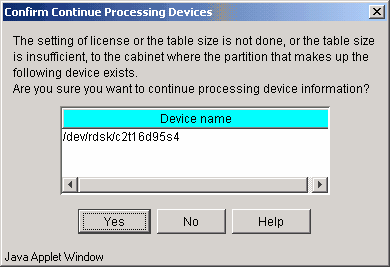
The ETERNUS/GR cabinet containing the partitions of the displayed device may have invalid settings. In this case, click [Yes] after verifying that it is okay to continue processing. For example, if AdvancedCopy is supported but you want to manage the device information in a cabinet where settings are not defined (including cases in which AdvancedCopy is not used in one cabinet for mirroring volumes between cabinets.)
If you click [No], operation returns to step 4.

Ensure that the AdvancedCopy license setting is correct and cache table size is correctly set. Also, make sure that the cache table is large enough.
If the LUN slice of the ETERNUS/GR cabinet containing the partitions of the displayed device is shared with another device, click [Yes](for example, when the backup server is in operation.)
If you click [No], operation returns to step 4.

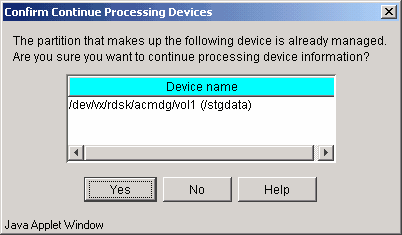
When managing logical servers operating on a single physical server, ensure that each device is only registered once.
If the dialog explained in step 5 or step 6 is not displayed, or if [Yes] is selected in the dialog of step 6, the settings for the specified device are reflected on the system. If the device information has been changed, the information of the detected device is updated.

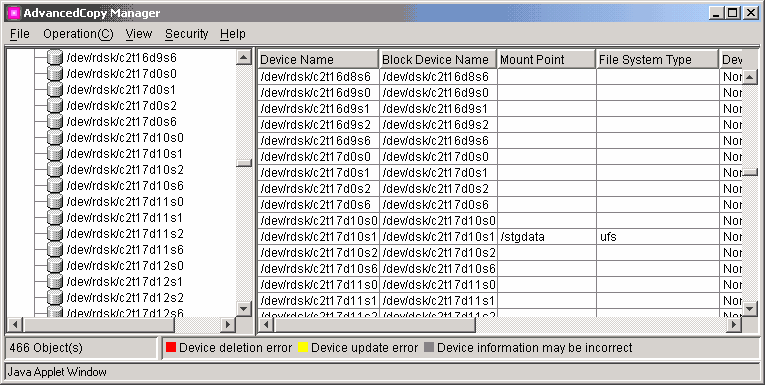
In step 5, the device subject to processing may have invalid settings when [Yes] in the dialog box is clicked. In this case, the name of the device in the Device List view becomes highlighted in gray.

If an error occurs when the device information is changed, the color of the corresponding device name changes to red or yellow. The colors have the following meanings:
Red
Information of this device is under management but undetected. An error occurs when deleting it.
Yellow
Information different from the currently managed information is acquired. An error occurs when updating the current information.
Execute the action described in the error message displayed in the error dialog and then re-execute the device information acquisition.
Acquire and reflect specific device information.
Use this method to update registered device information.
Select the target device on the device list view and select [Refresh Device...] on the [Operation] menu to display the dialog shown below.
Alternatively, from the device list view, right-click the selected server and select [Refresh Device...] on the popup menu.
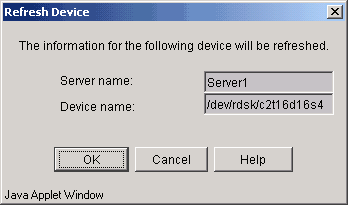
Select [OK] to display the dialog shown below and acquire information on a specific device.
If the currently managed device information is acquired, the following dialog is displayed.
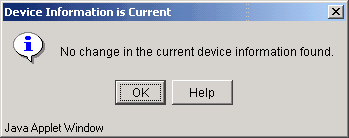
Click [OK] to reflect the acquired device information.
Acquiring and/or reflecting device information causes the system to compare processing with the device information on the current managing device. However, this method deletes device information regardless of whether the information can be detected on the current managing device.
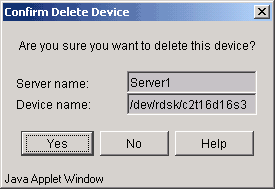
Select the target server from the device list view and select [Delete Device...] on the [Operation] menu to display the dialog shown below.
Alternatively, from the device list view, right-click the selected device and select [Delete Device...] from the popup menu.
Click [Yes] to delete the device.

This operation can also be carried out using the "stgxfwcmdeldev" command of AdvancedCopy Manager.
Refer to "Configuration management command" in the "ETERNUS SF AdvancedCopy Manager Operator's Guide" for details of commands.
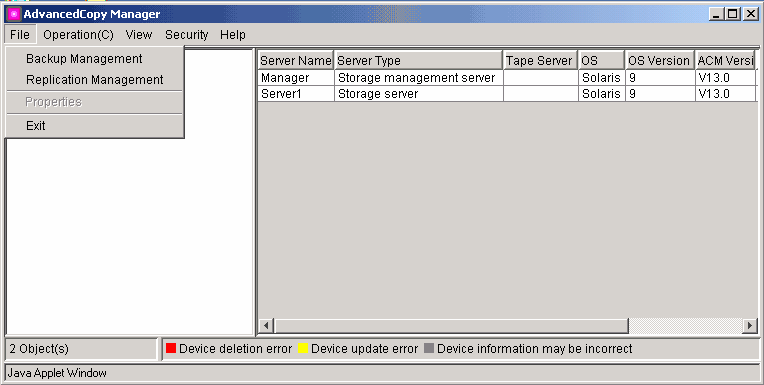
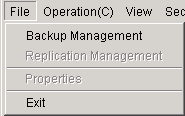
Select the management window to be activated from the [File] menu. The selected management window is displayed.
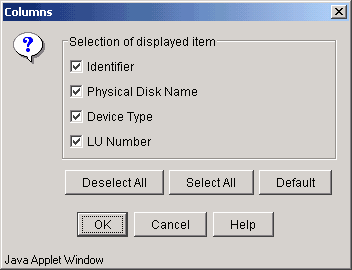
It is possible to configure which items are listed in the list window currently displayed.
Select "Columns" from the "View" menu to display the configuration window.
Select the items to be displayed and click the "'OK" button to change the display items.
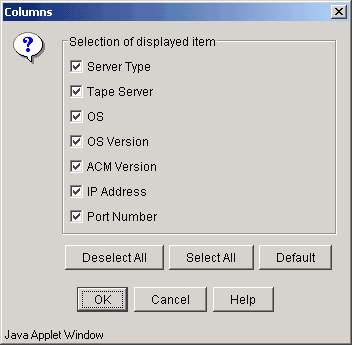
If "Deselect All" is selected, all display items will be deselected.
If "Select All" is selected, all display items will be selected.
If "Default" is selected, those items marked "Yes" in the "Default" column of Table 1.1 will be selected. Use this option to restore the initial settings.

Only the items marked "Yes" in the "Display selection" column of Table 1.1 can be set.
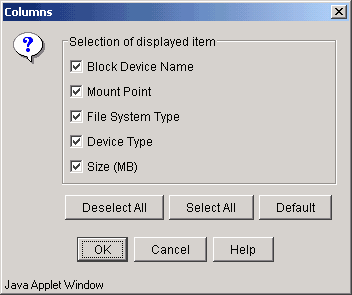
When you click [Deselect All], none of the selection target items are displayed on the device list view.
When you click [Select All], all of the selection target items are displayed.
When you click [Default], items with"Yes" in the default columns of Table 1.3a, Table 1.3b, Table 1.3c, Table 1.3d or Table 1.3e are displayed. Click [Default] to initialize the setting.

Items with "Yes" in the display selection columns in Table 1.3a, Table 1.3b, Table 1.3c, Table 1.3d or Table 1.3e can be the target of this selection.
If "Deselect All" is selected, all display items will be deselected.
If "Select All" is selected, all display items will be selected.
If "Default" is selected, those items marked "Yes" in the "Default" column of Table 1.5a, Table 1.5b, Table 1.5c, Table 1.5d and Table 1.5e will be selected. Use this option to restore the initial settings.

Only the items marked "Yes" in the "Display selection" column of Table 1.5a, Table 1.5b, Table 1.5c, Table 1.5d and Table 1.5e can be set.
The devices using the same copy area as the specified device can be displayed.
No device can be selected in the following cases:
Device not in the ETERNUS storage system with the AdvancedCopy function mounted
SDX object in units of logical volumes
VxVM volume not supported
Device not set up (For the cabinet containing this device, the AdvancedCopy license setting may be undefined, the cache table size may be unspecified, or the cache table may be too small.)
In the Device List view, select the device to check, and select [List Devices Using the Same Copy Area] from the [Operations] menu. The window shown below is displayed.
Alternatively, in the Device List view, right-click the device, and select [List Devices Using the Same Copy Area] from the popup menu. The window shownbelow is displayed.
The devices in the same logical group as the specified device can be displayed.
No device can be selected in the following cases:
No device related to LVM or VxVM
In the Device List view, select the device to check, and select [List Devices in the Same Logical Group] from the [Operations] menu. The window shown below is displayed.
Alternatively, in the Device List view, right-click the device, and select [List Devices in the Same Logical Group] from the popup menu. The window shown below is displayed.
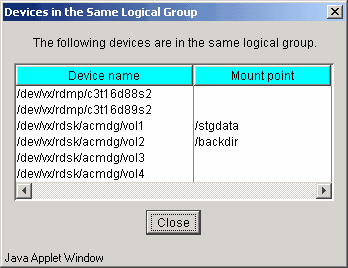

The details displayed are based on information registered in AdvancedCopy Manager. Therefore, when the configuration has been changed there is a device not registered in a logical group, and after it registers, correct information is not displayed. For this case, please execute acquisition of device information on the registration of the device not registered and the device which does the "Acquisition/reflection of information on all devices" processing again.
This section describes software settings required for the initial window and each management window.
Java Plug-in 1.4.2_06 or later must be installed in the client to use the initial window and each management window. Download the installer for JRE(including the Java Plug-in) from the Sun Microsystems,Inc. Java2 Runtime Environment download web site.
The URL as of May, 2006 is:
http://java.sun.com/j2se/1.4.2/download.html
(The URL may be changed without prior notice.)

If a version earlier than Java Plug-in 1.4.2_06 is installed in the client, remove it before installing Java Plug-in 1.4.2_06 or later.

Be sure to restart the Web browser.
The settings of authentication-related files must be defined when:
The storage management server uses a logical IP address (such as for cluster operation), and
If multiple network cards are mounted in the Storage management server.
If swstorage.policy, which is linked to the screen displayed by the web browser, is selected after pointing the browser to the AdvancedCopy Manager URL, a download dialog box is displayed. If [Save to file] or [Save this file to disk] is selected, the following dialog box is displayed.
Save the file to the directory containing the Java Plug-ins installation folder \lib\security.
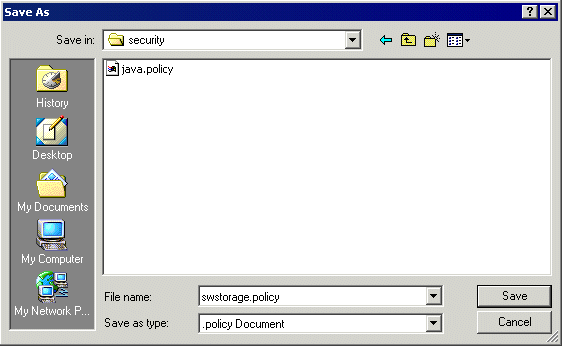
After saving the file, change the IP address on the first line in the saved file to the IP address to be entered as the URL. Edit it as follows:
The storage management server uses a logical IP address that is "50.50.50.50":
"10.10.10.10" -> "50.50.50.50"
"60.60.60.60" is the IP address specified for the URL, and the address is different from the IP address set on the storage management server:
"10.10.10.10" -> "60.60.60.60"
For details on how to display the IP address for a GUI connection as specified on the Storage management server, see "GUI connection information setting command (stgguiipset)" in the ETERNUS SF AdvancedCopy Manager Operator's Guide corresponding to the operating system used.
In the above cases, if the port number used to provide service is not the default value (80) in a Web server setting, then use an editor to add ":port-number" as a suffix to the IP address.
Example: Port number "8080" is used in a Web server setting to provide service
"10.10.10.10" -> "50.50.50.50:8080"
grant codeBase "http://50.50.50.50:8080/swstorage-j/archive/-" {
permission java.net.SocketPermission "20.20.20.20:1024-","accept,connect,listen,resolve";
};
Replace "20.20.20.20" on the second line of the stored file with the target physical address. If there is more than one target physical address, then copy and paste the second line as many times as the number of target physical IP addresses before the last line, and describe each address on one line.
If the storage management server uses a logical IP address, describe all physical IP addresses.
Describe all physical addresses of the active machine and every standby machine, particularly for cluster operation.
All the valid IP addresses, including the IP address to be specified as the URL, on the Storage management server, if multiple network cards are mounted in the Storage management server
Example: Physical IP address "70.70.70.70" and "80.80.80.80"
grant codeBase "http://50.50.50.50:8080/swstorage-j/archive/-" {
  permission java.net.SocketPermission "70.70.70.70:1024-","accept,connect,listen,resolve";
  permission java.net.SocketPermission "80.80.80.80:1024-","accept,connect,listen,resolve";
}; |
Add the final following line in the description to the Java Plug-in installation folder \lib\security\java.security file, which is the authentication setup file.
# The default is to have a single system-wide policy file,
# and a policy file in the user's home directory.
policy.url.1=file:${java.home}/lib/security/java.policy
policy.url.2=file:${user.home}/.java.policy
policy.url.3=file:${java.home}/lib/security/swstorage.policy |

Depending on the version of the Web browser that is used, the authentication-related files may be saved with incorrect file names. For example, "swstorage.policy" may be changed to "swstorage.policy.policy." If the file name is incorrect, the Web client cannot be used normally. Therefore, after saving the file, check whether its name is correct. If the file name is incorrect, change it to "swstorage.policy."

After modifying the data in the authentication setting file, be sure to restart the Web browser.
To use any management window in an environment where Windows XP Service Pack 2 or Windows Server 2003 Service Pack 1 has been applied, configure the settings of the Windows firewall function by performing the following steps:
Open the [Windows Firewall] window from [Control Panel].
Check the registered programs and services on the [Exceptions] tab.
Take action as follows according to the registration status of the Web browser used:
Click the [Add Program] button, and the [Add Program] dialog box is displayed.
Select the Web browser from the list.
Click the [Change Scope] button, and the [Change Scope] dialog box is displayed.
Specify the IP address of the storage management server in [Custom List], and click the [OK] button.
If the storage management server operates with a logical IP address, all physical IP addresses must be entered.
In cluster operation particularly, all physical IP addresses of the operating machine and standby machines must be entered.
If the IP address specified for the storage management server is not the IP address specified for the URL, all valid IP addresses for the storage management server, including the IP address specified for the URL, must be entered.
Click the [OK] button in the [Add Program] dialog box.
Click the [OK] button, and the [Windows Firewall] window closes.
Select the Web browser from the list of programs and services on the [Exceptions] tab.
Click the [Edit] button, and the [Edit] dialog box is displayed.
Click the [Change Scope] button, and the [Change Scope] dialog box is displayed.
If [Custom List] has been selected, add the IP address of the storage management server, and click the [OK] button.
If [My Network (subnet) only] has been selected and the user's network has the storage management server, click the [OK] button without making a change.
If the storage management server operates with a logical IP address, all physical IP addresses must be entered.
In cluster operation particularly, all physical IP addresses of the operating machine and standby machines must be entered.
If the IP address specified for the storage management server is not the IP address specified for the URL, all valid IP addresses for the storage management server, including the IP address specified for the URL, must be entered.
Click the [OK] button in the [Edit] dialog box.
Click the [OK] button, and the [Windows Firewall] window closes.
This section describes browser and Java Plug-in settings.
When a Java Plug-in is installed, open the [Java Plug-in Properties] window as follows:
Select [Settings] - [Control Panel] - [Java Plug-in].
Table 1.7 outlines the relationship between the settings in the [Java Plug-in Properties] window and Web browser window operations. Note that the Web browser window may not operate normally unless the proper settings are made in the properties window. The default values at the time of Java Plug-in installation are used for operation. No particular changes are necessary.
|
Tag |
Set value |
Setting |
Default value |
Remarks |
|---|---|---|---|---|
|
Basic |
Java Console |
Optional |
Do not start console |
This is an optional setting, but if "Display the console" is specified, the operating status of the Web browser window is displayed on the Java console, and it can be used as data for troubleshooting if an error occurs in the window. |
|
Advanced |
Java Runtime Environment |
Use Java Plug-in default |
Use Java Plug-in default |
Set the Runtime level for Web browser window operations. Do not specify any other level. If this is not checked, a problem may occur. |
|
Java Runtime parameters |
None |
None |
The settings are irrelevant. |
|
|
Proxies |
Use browser settings |
Always check this check box. |
Checked |
If this is not checked, a problem may occur. |
|
Cache |
Enable Caching |
Checking this check box is recommended. |
Checked |
If this is checked, any management window that has been opened once takes less time to open when called from the initial window. |
To use the Web browser, specify either the IP address or the server name of the Storage management server in the Web browser. Also, disable the proxy of the Web browser for the IP address or the server name specified.
For Netscape Navigator 4.7 or later
Select [Preferences] from the [Edit] menu to open the [Preferences] dialog box. From the displayed categories (tree), select [Advanced] - [Proxies], click "Manual proxy configuration," and click the [View] button. The [Manual Proxy Configuration] dialog box then opens. Enter the IP address of the Storage management server into the "Do not use proxy servers for domains beginning with:" list box in Exceptions.
For Internet Explorer 6.0 or later
Select [Internet Options] from the [Tools] menu to open the [Internet Options] dialog box. In the dialog box, select the Connections tab, and click the [LAN Settings] button. When the [Local Area Network (LAN) Settings] dialog box opens, click the [Advanced] button to display [Proxy settings] dialog box. Enter the IP address of the Storage management server into the "Do not use proxy server for addresses beginning with:" box.
Set the character encoding of the Web browser to Japanese.
For example, to use Netscape Navigator 4.7 or later, select [Character encoding] from the View menu, and check "Japanese (Auto-detect)." Select again [Character encoding] from the View menu, and check "Set this as default."
Access permissions required on the initial window are listed in Table 1.7. The access permissions for the initial window are determined by the logical sum of the access permissions for the backup management function and the replication management function.
For details regarding access permissions, see "Authentication Feature Window Operation".
|
Operation |
Write permission |
Execute permission |
Read permission |
|---|---|---|---|
|
Server information display |
Yes |
Yes |
Yes |
|
Device information display |
Yes |
Yes |
Yes |
|
Partition information display |
Yes |
Yes |
Yes |
|
Columns |
Yes |
Yes |
Yes |
|
Refresh |
Yes |
Yes |
Yes |
|
List Devices Using the Same Copy Area |
Yes |
Yes |
Yes |
|
List Devices in the Same Logical Group |
Yes |
Yes |
Yes |
|
Add Server |
Yes |
No |
No |
|
Update Server |
Yes |
No |
No |
|
Delete Server |
Yes |
No |
No |
|
Refresh Server |
Yes |
No |
No |
|
Refresh Device |
Yes |
No |
No |
|
Delete Device |
Yes |
No |
No |
Yes: Operation possible No: Operation impossible
The [File] menu in the initial window shows the management functions under the AdvancedCopy Manager. This display differs depending on which management functions the user has access permission for. Only those management functions that the user has access permissions for can be selected. Management functions for which the user does not have access permissions are grayed out and cannot be selected.
Figure 1.3 shows an example where the user has Read permission for backup management but does not have any permission for replication management.
|
Contents
Index
|