

| PRIMECLUSTER Global Link Services Configuration and Administration Guide: Redundant Line Control Function 4.2 (for Linux) |
|
Contents
Index
|
| Appendix B Examples of configuring system environments | > B.4 Example of configuring NIC switching mode (IPv4) |
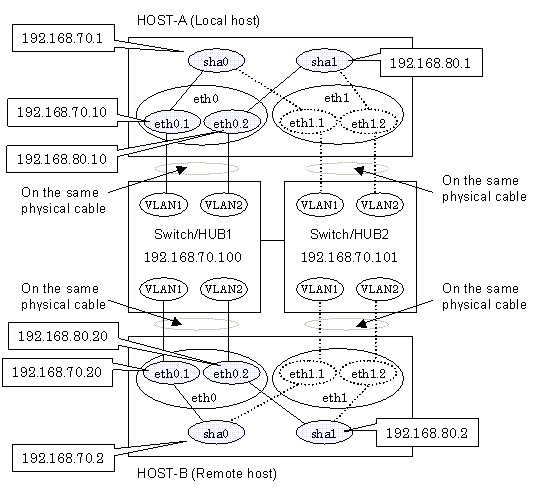
This section describes an example configuration procedure of the network shown in the diagram below.
1-1) Define IP addresses and hostnames in /etc/hosts file.
192.168.70.1 hosta # HOST-A Virtual IP 192.168.70.10 host71 # HOST-A Physical IP (Tagged VLAN interface) 192.168.80.1 hostb # HOST-A Virtual IP 192.168.80.10 host81 # HOST-A Physical IP (Tagged VLAN interface) 192.168.70.2 hostc # HOST-B Virtual IP 192.168.70.20 host72 # HOST-B Physical IP (Tagged VLAN interface) 192.168.80.2 hostd # HOST-B Virtual IP 192.168.80.20 host82 # HOST-B Physical IP (Tagged VLAN interface) 192.168.70.100 swhub1 # Primary Switch/HUB IP 192.168.70.101 swhub2 # Secondary Switch/HUB IP |
1-2) Configure /etc/sysconfig/network-scripts/ifcfg-ethX (X is 0,1) file as follows.

In example (/etc/sysconfig/network-scripts/ifcfg-ethX) of setting the following, operating system is an example of RHEL4. Please refer to "3.2.2 Network configuration" for the setting examples other than RHEL4.
- Contents of /etc/sysconfig/network-scripts/ifcfg-eth0
|
DEVICE=eth0 |
- Contents of /etc/sysconfig/network-scripts/ifcfg-eth1
|
DEVICE=eth1 |
1-3) Configure /etc/sysconfig/network-scripts/ifcfg-ethX.Y (X is 0,1. Y is 1,2) file as follows.
- Contents of /etc/sysconfig/network-scripts/ifcfg-eth0.1
|
DEVICE=eth0.1 |
- Contents of /etc/sysconfig/network-scripts/ifcfg-eth0.2
|
DEVICE=eth0.2 |
- Contents of /etc/sysconfig/network-scripts/ifcfg-eth1.1
|
DEVICE=eth1.1 |
- Contents of /etc/sysconfig/network-scripts/ifcfg-eth1.2
|
DEVICE=eth1.2 |
1-4) When the system is RHEL, on the /etc/sysconfig/network file, define a statement which enables the network configuration.
|
NETWORKING=yes |
Run the following command and reboot the system. After rebooting the system, verify eth0.1 and eth0.2 is enabled using ifconfig command.
/sbin/shutdown -r now
/opt/FJSVhanet/usr/sbin/hanetmask create -i 192.168.70.0 -m 255.255.255.0
/opt/FJSVhanet/usr/sbin/hanetmask create -i 192.168.80.0 -m 255.255.255.0
/opt/FJSVhanet/usr/sbin/hanetconfig create -n sha0 -m d -i 192.168.70.1 -e 192.168.70.10 -t eth0.1,eth1.1
/opt/FJSVhanet/usr/sbin/hanetconfig create -n sha1 -m d -i 192.168.80.1 -e 192.168.80.10 -t eth0.2,eth1.2
Ensure that the physical IP address specified using option '-e' is the same IP address configured in /etc/sysconfig/network-scripts/ifcfg-ethX.Y.
/opt/FJSVhanet/usr/sbin/hanetpoll create -n sha0 -p 192.168.70.100,192.168.70.101 -b off
/opt/FJSVhanet/usr/sbin/hanetpoll copy -n sha0,sha1
Please define only one Standby patrol monitoring function.
/opt/FJSVhanet/usr/sbin/hanetconfig create -n sha2 -m p -t sha0
Run the following command and reboot the system.
/sbin/shutdown -r now
1-1) Define IP addresses and hostnames in /etc/hosts file. Defined information is the same as for HOST-A.
1-2) Configure /etc/sysconfig/network-scripts/ifcfg-ethX (X is 0,1) file as follows.
In example (/etc/sysconfig/network-scripts/ifcfg-ethX) of setting the following, operating system is an example of RHEL4. Please refer to "3.2.2 Network configuration" for the setting examples other than RHEL4.
- Contents of /etc/sysconfig/network-scripts/ifcfg-eth0
|
DEVICE=eth0 |
- Contents of /etc/sysconfig/network-scripts/ifcfg-eth1
|
DEVICE=eth1 |
1-3) Configure /etc/sysconfig/network-scripts/ifcfg-ethX.Y (X is 0,1. Y is 1,2) file as follows.
- Contents of /etc/sysconfig/network-scripts/ifcfg-eth0.1
|
DEVICE=eth0.1 |
- Contents of /etc/sysconfig/network-scripts/ifcfg-eth0.2
|
DEVICE=eth0.2 |
- Contents of /etc/sysconfig/network-scripts/ifcfg-eth1.1
|
DEVICE=eth1.1 |
- Contents of /etc/sysconfig/network-scripts/ifcfg-eth1.2
|
DEVICE=eth1.2 |
1-4) When the system is RHEL, on the /etc/sysconfig/network file, define a statement which enables the network configuration.
|
NETWORKING=yes |
Run the following command and reboot the system. After rebooting the system, verify eth0.1 and eth0.2 is enabled using ifconfig command.
/sbin/shutdown -r now
/opt/FJSVhanet/usr/sbin/hanetmask create -i 192.168.70.0 -m 255.255.255.0
/opt/FJSVhanet/usr/sbin/hanetmask create -i 192.168.80.0 -m 255.255.255.0
/opt/FJSVhanet/usr/sbin/hanetconfig create -n sha0 -m d -i 192.168.70.2 -e 192.168.70.20 -t eth0.1,eth1.1
/opt/FJSVhanet/usr/sbin/hanetconfig create -n sha1 -m d -i 192.168.80.2 -e 192.168.80.20 -t eth0.2,eth1.2
Ensure that the physical IP address specified using option '-e' is the same IP address configured in /etc/sysconfig/network-scripts/ifcfg-ethX.Y.
/opt/FJSVhanet/usr/sbin/hanetpoll create -n sha0 -p 192.168.70.100,192.168.70.101 -b off
/opt/FJSVhanet/usr/sbin/hanetpoll copy -n sha0,sha1
Please define only one Standby patrol monitoring function.
/opt/FJSVhanet/usr/sbin/hanetconfig create -n sha2 -m p -t sha0
Run the following command and reboot the system.
/sbin/shutdown -r now
|
Contents
Index
|