| PRIMECLUSTER Installation and Administration Guide 4.2 (Linux) |
|
Contents
Index
|
| Part 2 Installation | > Chapter 5 Building a Cluster | > 5.1 Initial Cluster Setup |
The procedure for setting up the shutdown facility is given below:

For details on the shutdown facility, see the following manuals:
"3.3.1.8 PRIMECLUSTER SF" in the "PRIMECLUSTER Concept Guide"
"8. Shutdown Facility" in the "PRIMECLUSTER Cluster Foundation (CF) Configuration and Administration Guide"

Survival priority
Even if a cluster partitionoccurs due to a failure in the cluster interconnect, all the nodes will still be able to access the user resources. For details on the cluster partition, see "2.2.2.1 Protecting data integrity" in the "PRIMECLUSTER Concept Guide."
To guarantee the consistency of the data constituting user resources, you have to determine the node groups to survive and those that are to be forcibly stopped.
The weight assigned to each node group is referred to as a "Survival priority" under PRIMECLUSTER.
The greater the weight of the node, the higher the survival priority. Conversely, the less the weight of the node, the lower the survival priority. If multiple node groups have the same survival priority, the node group that includes a node with the name that is first in alphabetical order will survive.
Survival priority can be found in the following calculation:Survival priority = SF node weight + ShutdownPriority of userApplication
- SF node weight (Weight):
- Weight of node. Default value = 1. Set this value while configuring the shutdown facility.
- userApplication ShutdownPriority:
- Set this attribute when userApplication is created. For details on how to change the settings, see "Changing the Operation Attributes of a userApplication."
For details on the ShutdownPriority attribute of userApplication, see "13.1 Attributes available to the user" in the "PRIMECLUSTER Reliant Monitor Service (RMS) with Wizard Tools Configuration and Administration Guide."
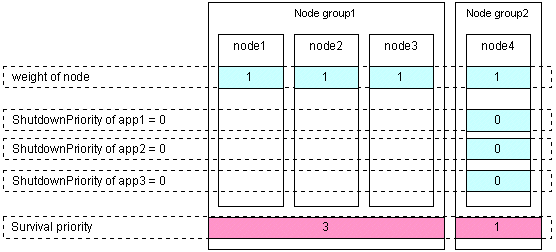
The typical scenarios that are implemented are shown below:[Largest node group survival]
Set the weight of all nodes to 1 (default).
Set the attribute of ShutdownPriority of all user applications to 0 (default).
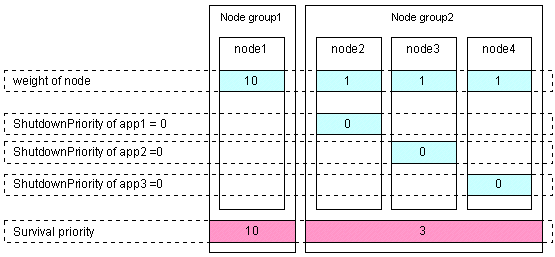
[Specific node survival]
Set the "weight" of the node to survive to a value more than double the total weight of the other nodes.
Set the ShutdownPriority attribute of all user applications to 0 (default).
In the following example, node1 is to survive:
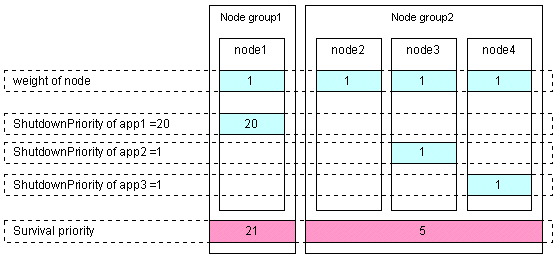
[Specific application survival]
Set the "weight" of all nodes to 1 (default).
Set the ShutdownPriority attribute of the user application whose operation is to continue to a value more than double the total of the ShutdownPriority attributes of the other user applications and the weights of all nodes.
In the following example, the node for which app1 is operating is to survive:
 Setting up the shutdown facility
 Setting up the shutdown daemon
Create /etc/opt/SMAW/SMAWsf/rcsd.cfg on all nodes as shown below:
|
CFNameX,weight=weight,admIP=myadmIP: agent=SA_xxx,timeout=20 |
  CFNameX        : CF node name of the cluster host.
  weight         : Weight of the SF node.
  myadmIP        : IP address of the public LAN on the local node.
  agent=SA_xxx   : Specify the name of the Shutdown Agent.
                       For the RSB Shutdown Agent, specify SA_rsb.
                       For the IPMI Shutdown Agent, specify SA_ipmi.
                       For the BLADE Shutdown Agent, specify SA_blade.
Example) RSB Shutdown Agent
|
node1,weight=1,admIP=10.20.30.100: agent=SA_rsb,timeout=20 |
Example) IPMI Shutdown Agent
|
node1, weight=1, admIP=10.20.30.100: agent=SA_ipmi, timeout=25 |
Example) BLADE Shutdown Agent
|
node1,weight=1,admIP=10.20.30.100: agent=SA_blade,timeout=20 |

For IPMI shutdown agent, set timeout to 25.

When the "/etc/opt/SMAW/SMAWsf/rcsd.cfg" file is to be created, the "/etc/opt/SMAW/SMAWsf/rcsd.cfg.template" file can be used as a prototype.
Setting up the RSB shutdown agentFor the server with the Remote Services Board installed, configure the RSB shutdown agent. You must configure the RSB shutdown agent before you configure the Netdump shutdown agent or the Diskdump shutdown agent.
Create /etc/opt/SMAW/SMAWsf/SA_rsb.cfg on all nodes as shown below:
|
CFName1 ip-address:[port]:[user]:[passwd] [cycle | leave-off] |
  CFNameX     : CF node name of the cluster host.
  ip-address  : IP address of the remote service board.
  port        : Unused.
  user        : User name defined when remote service board is set up.
  passwd      : Password defined when remote service board is set up.
  cycle       : Reboot the node after forcibly stopping the node.
  leave-off   : Power-off the node after forcibly stopping the node.
Example)
|
node1 10.20.30.50::root:rsbpwd cycle |
When the "/etc/opt/SMAW/SMAWsf/SA_rsb.cfg" file is to be created, the "/etc/opt/SMAW/SMAWsf/SA_rsb.cfg.template" file can be used as a prototype.
Change the permission of /etc/opt/SMAW/SMAWsf/SA_rsb.cfg file to 600 by executing the following command.# chmod 600 /etc/opt/SMAW/SMAWsf/SA_rsb.cfg
You need to set the node behavior after collecting the crash dump in the failed node to [reboot | power-off] according to the [cycle | leave-off] settings in the above file. The behavior is defined by modifying the DUMP_ACTION variables in /etc/sysconfig/dump.
Setting up the IPMI shutdown agentFor the server with the IPMI (BMC: Baseboard Management Controller) installed, configure the IPMI shutdown agent. You must configure the IPMI shutdown agent before you configure the Netdump shutdown agent or the Diskdump shutdown agent.
Create /etc/opt/SMAW/SMAWsf/SA_ipmi.cfg on all nodes as shown below:
|
CFName1 ip-address:[user]:[passwd] [cycle | leave-off] |
  CFNameX       : CF node name of the cluster host.
  ip-address    : Ip address for IPMI (BMC).
  user          : User name defined when IPMI (BMC) was setup.
  passwd        : Password defined when IPMI (BMC) was setup.
  cycle         : Reboot the node after forcibly stopping the node.
  leave-off     : Power-off the node after forcibly stopping the node.
Example)
|
node1 10.20.30.50:root:bmcpwd cycle |
When the "/etc/opt/SMAW/SMAWsf/SA_ipmi.cfg" file is to be created, the "/etc/opt/SMAW/SMAWsf/SA_ipmi.cfg.template" file can be used as a prototype.
Change the permission of /etc/ opt/SMAW/SMAWsf/SA_ipmi.cfg file to 600 by executing the following command.# chmod 600 /etc/opt/SMAW/SMAWsf/SA_ipmi.cfg
Setting up the BLADE shutdown agentFor the Blade server, configure the BLADE shutdown agent. You must configure the BLADE shutdown agent before you configure the Netdump shutdown agent or Diskdump shutdown agent .
Create /etc/opt/SMAW/SMAWsf/SA_blade.cfg on all nodes as shown below:
(1) Cluster configuration within a single chassis
|
management-blade-ip IPaddress |
(2) Cluster configuration across multiple chassis
|
community-string SNMPcommunity |
  IPaddress       : IP address of the management blade.
  SNMPcommunity   : SNMP community.
  CFNameX         : CF node name of the cluster host.
  slot-no         : Slot No. of the server blade.
  cycle           : Reboot the node after forcibly stopping the node.
  leave-off       : Power-off the node after forcibly stopping the node.
Example 1)
|
management-blade-ip 10.20.30.50 |
Example 2)
|
community-string public |
When the "/etc/opt/SMAW/SMAWsf/SA_blade.cfg" file is to be created, the "/etc/opt/SMAW/SMAWsf/SA_blade.cfg.template" file can be used as a prototype.
Change the permission of /etc/opt/SMAW/SMAWsf/SA_blade.cfg file to 600 by executing the following command.# chmod 600 /etc/opt/SMAW/SMAWsf/SA_blade.cfg
The rcsd.cfg, SA_rsb.cfg, SA_ipmi.cfg and SA_blade.cfg files must be the same on all nodes. If not, operation errors might occur.
Setting up the Netdump shutdown agentIf the operating system of cluster node is Red Hat Enterprise Linux AS v.3 or Red Hat Enterprise Linux ES v.3,configure the Netdump shutdown agent.
Initialize the Netdump definition file
Execute the following command on any one of the nodes of the cluster system.
# /etc/opt/FJSVcllkcd/bin/panicinfo_setup
To use this command, CF and CF services (CFSH and CFCP) must be running. For details on the setting, see the notes in "Setting Up CF and CIP."
Set up crash dump collection
The procedures for setting up may differ depending on the hardware used for the node.
PRIMERGY TX600 or PRIMERGY RX800
Change RSB_PANIC of /etc/opt/FJSVcllkcd/etc/SA_lkcd.tout as follows on all the nodes.
Before changeRSB_PANIC 0
After change
RSB_PANIC 1
PRIMERGY TX200 S2, RX300 S2, or RX600 S2
Change RSB_PANIC of /etc/opt/FJSVcllkcd/etc/SA_lkcd.tout as follows on all the nodes.
Before change
RSB_PANIC 0
After change
RSB_PANIC 3
Change PANICINFO_TIMEOUT of /etc/opt/FJSVcllkcd/etc/SA_lkcd.tout as follows on all the nodes.
Before change
PANICINFO_TIMEOUT 5
After change
PANICINFO_TIMEOUT 10
BLADE servers (PRIMERGY BX600, BX660, or BX620 S2)
Change RSB_PANIC of /etc/opt/FJSVcllkcd/etc/SA_lkcd.tout as follows on all the nodes.
Before change
RSB_PANIC 0
After change
RSB_PANIC 2
PRIMERGY RX300
You must configure the crush dump settings for PRIMERGY RX300 after "Initialize the Netdump definition file".
Add ":agent=SA_user,timeout=20" after each "CFNameX,weight=weight,admIP=myadmIP" in /etc/opt/SMAW/SMAWsf/rcsd.cfg on all the nodes.
Example)
|
node1,weight=1,admIP=10.20.30.100:agent=SA_user,timeout=20:agent=SA_lkcd,timeout=20:agent=SA_rsb,timeout=20 |
SA_lkcd is set up when panicinfo_setup is executed.
Setting up the Diskdump shutdown agentIf the basic software (*1) is operated on cluster nodes, and PRIMERGY (*2) supports the fast switching function with Diskdump, the Diskdump shutdown agent can be configured.
*1:
Red Hat Enterprise Linux AS v.3 batch correction U05011 or later
Red Hat Enterprise Linux ES v.3 batch correction U05011 or later
Red Hat Enterprise Linux AS v.4 batch correction U05011 or later
*2: PRIMERGY TX600, RX800, TX200 S2, RX300 S2, RX600 S2, BX660, BX620 S2
Initializing the configuration file for the Diskdump
Execute the following command on any one of the cluster nodes.
# /etc/opt/FJSVcllkcd/bin/panicinfo_setup
To execute the command, CF and CF services (CFSH and CFCP) must be activated. For details, see "Setting Up CF and CIP."
Also you must configure the RSB shutdown agent, the IPMI shutdown agent, and the BLADE shutdown agent.
Setting crash dump collection
The procedures for setting up may differ depending on the hardware used for the node.
PRIMERGY TX600
Change RSB_PANIC of /etc/opt/FJSVcllkcd/etc/SA_lkcd.tout as follows on all the nodes.
Before change
RSB_PANIC 0
After change
RSB_PANIC 1
PRIMERGY TX200 S2, RX300 S2, or RX600 S2
Change RSB_PANIC of /etc/opt/FJSVcllkcd/etc/SA_lkcd.tout as follows on all the nodes.
Before change
RSB_PANIC 0
After change
RSB_PANIC 3
Change PANICINFO_TIMEOUT of /etc/opt/FJSVcllkcd/etc/SA_lkcd.tout as follows on all the nodes.
Before change
PANICINFO_TIMEOUT 5
After change
PANICINFO_TIMEOUT 10
Change timeout value of SA_lkcd in the /etc/opt/SMAW/SMAWsf/rcsd.cfg file as follows on all the nodes.
Before change
agent=SA_lkcd,timeout=20
After change
agent=SA_lkcd,timeout=25
BLADE servers (PRIMERGY BX660 or BX620 S2)
Change RSB_PANIC of /etc/opt/FJSVcllkcd/etc/SA_lkcd.tout as follows on all the nodes.
Before change
RSB_PANIC 0
After change
RSB_PANIC 2
PRIMERGY RX300
You must configure the crush dump settings for PRIMERGY RX300 after "Initializing the configuration file for the Diskdump".
Add ":agent=SA_user,timeout=20" after each "CFNameX,weight=weight,admIP=myadmIP" in /etc/opt/SMAW/SMAWsf/rcsd.cfg on all the nodes.
Example)
|
node1,weight=1,admIP=10.20.30.100:agent=SA_user,timeout=20:agent=SA_lkcd,timeout=20:agent=SA_rsb,timeout=20 |
SA_lkcd is set up when panicinfo_setup is executed.
Starting up the shutdown daemonStart or restart the shutdown daemon (rcsd) on all the nodes.
If rcsd has not yet been started, execute sdtool -b. If rcsd is active, stop rcsd by using sdtool -e and then execute sdtool -b. Use sdtool -s to confirm whether rcsd is activated.
# sdtool -b
or,
# sdtool -e
# sdtool -b
|
Contents
Index
|