

| PRIMECLUSTER Global File Services Configuration and Administration Guide 4.2 (Solaris(TM) Operating Environment) |
Contents
Index
 
|
| Part 3 Global File Services Shared File System | > Chapter 21 File System Operations (GUI) | > 21.2 Creation |
The following describes the procedure for creating a file system.
(1) Setting a shared disk device
The partition in which a GFS Shared file system is created and operated must be on a shared disk recognized by PRIMECLUSTER
 . To specify a GDS logical volume as the target device, it must be active.

When registering a GDS logical volume with a class, set the disk type as shared and the scope to include all the nodes that share the GFS Shared File System.

For GDS logical volume operations, see the applicable items under "Operation using Global Disk Services Management View" in the "PRIMECLUSTER Global Disk Services Configuration and Administration Guide."
For the logical volume operations of GDS, see the applicable items under "Operation using Global Disk Services Management View" in the "PRIMECLUSTER Global Disk Services Configuration and Administration Guide."
(2) Setting share information
Click [Create] on the [Operation] menu and the Create File System Wizard screen appears. It is shown in the following Figure Create File System (1).
In the Create File System Wizard screen, set the node information and enter the mount point.
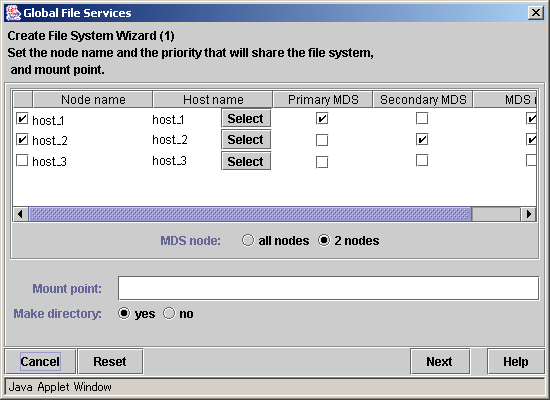

For an explanation of each parameter, see the explanation of sfcnewfs(1M) in Appendix F.2.14, "sfcnewfs(1M)."
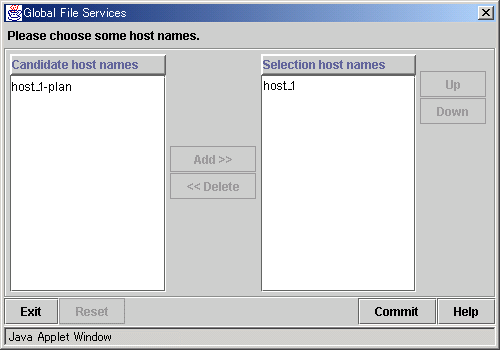
Please choose the host name of LAN to be used from the left-hand side candidate host name list and click <add> to add it to the right-hand side selected host name list. Also, set the priority of the host names by using <up> and <down>. The order of preference is from top down.
 .
.
Owner: root
Group: sys
Access right: 775
After setting the area information items, click the <Next> button to proceed to the next screen which is shown in the following Figure Create File System Wizard (2).
To restore the settings to their default values, click the <Reset> button.
To cancel the file system creates operation, click the <Cancel> button.
(3) Selecting a partition
After completing the MDS configuration, the register partition screen will be displayed. It is shown in the following Figure Create File System Wizard (2).
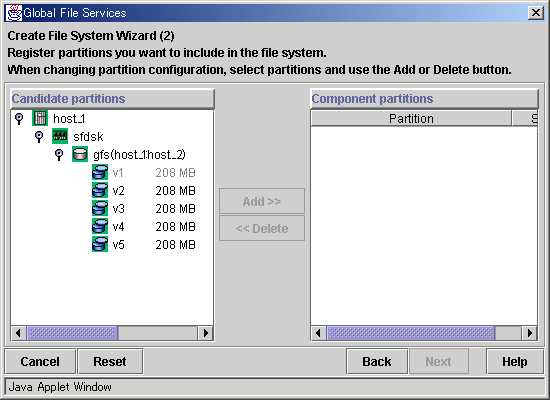
Select the partition from [Candidate partitions] field, and click the <Add> button. More than one partition can be selected at a time. However, a partition or a management partition selected cannot already be part of an existing file system.
After selecting a partition, click the <Next> button to continue. The next screen is shown in Figure Create File System Wizard (3).
To return to the Create File System Wizard (1) screen, click the <Back> button.
To cancel the file system creates operation, click the <Cancel> button.

A GDS logical volume must be active to be registered as a partition.
(4) Setting partition information
In the Create File System Wizard (3) screen, select the area (META/LOG/DATA) to be assigned to each partition selected in the Create File System Wizard (2).
The partition to which META is assigned becomes a representative partition .
.

For an explanation of the combinations of areas (META/LOG/DATA) assigned to partitions, see Section 13.1.6, "Partition configuration."

After setting the area information items, click the <Next> button to proceed to the next screen which is shown in the following Figure Create File System Wizard (4).
To restore the settings to their default values, click the <Reset> button.
To return to the Create File System Wizard (2) screen, click the <Back> button.
To cancel the file system creation operation, click the <Cancel> button.
If you do not need to change extended information, detailed information and mount information, click the <Create> button to create the file system.
(5) Setting extended information
In the Create File System Wizard (4) screen, the extended information values should be set such that they allow for future expansion of the file system and configuration changes.
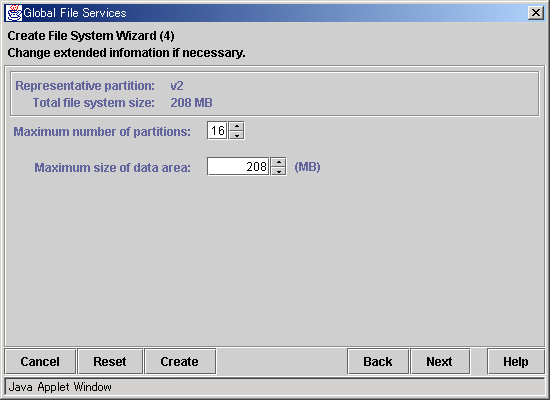

Set the maximum number of partitions and maximum data area size after adequately considering future data area expansion for the file system to be created. For details, see Section 15.2.7, "For future expansion."

For an explanation of each parameter, see the explanation of sfcnewfs(1M) in Appendix F.2.14, "sfcnewfs(1M)."
When the extended information items are correct, click the <Next> button to proceed. The next screen is shown in the following Figure Create File System Wizard (5).
To restore the settings to their default values, click the <Reset> button.
To return to the Create File System Wizard (3) screen, click the <Back> button.
To cancel the file system creation operation, click the <Cancel> button.
If you do not need to change the detailed information and mount information, click the <Create> button to create the file system.
(6) Setting detailed information
In the Create File System Wizard (5), set the detailed information.
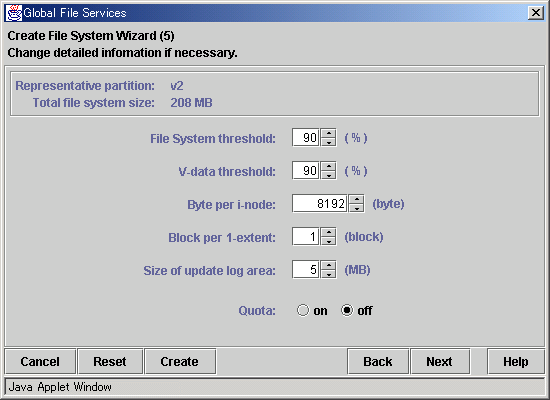

For an explanation of each parameter, see the explanation of sfcnewfs(1M) in Appendix F.2.14, "sfcnewfs(1M)," and Section 23.4, "quota function."

The file system usage limit is the value obtained by subtracting from 100 the minimum percentage of free area in the file system specified by the -f option of sfcnewfs(1M).
The V-data area usage limit is the value obtained by subtracting from 100 the percentage of minimum free area of the V-data area specified by the -m option of sfcnewfs(1M).
When validating quota function, a metadata area is needs to be initialization. Therefore, please specifies -c option of sfcnewfs(1M) when create a file system.
When the detailed information items are correct, click the <Next> button to continue. The next screen is shown in the following Figure Create File System Wizard (6).
To restore the settings to their default values, click the <Reset> button.
To return to the Create File System Wizard (4) screen, click the <Back> button.
To cancel the file system creation operation, click the <Cancel> button.
If you do not need to change the mount information, click the <Create> button to create the file system.
(7) Setting mount information
In the Create File System Wizard (6) screen, set the mount information.
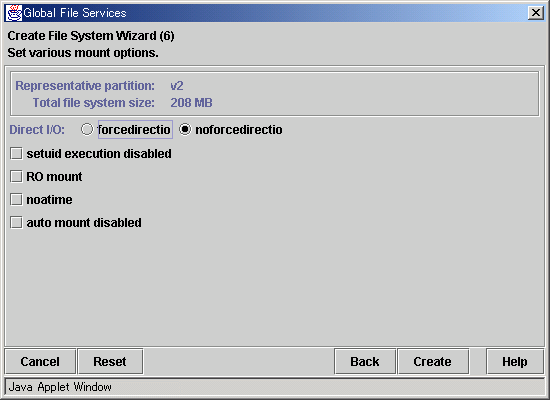
After setting the mount information, click the <Create> button to create the file system.
To restore the settings to their default values, click the <Reset> button.
To return to the Create File System Wizard (5) screen, click the <Back> button.
To cancel the file system creation operation, click the <Cancel> button.
Contents
Index
 
|