
| Machine Administration Guide 2.6 |
Contents
Index
 
|
| Chapter 3 Model Family-Specific Information | > 3.4 PRIMEPOWER800/1000/2000, GP7000F model1000/2000 | > 3.4.1 Starting and Exiting Machine Administration Menu |

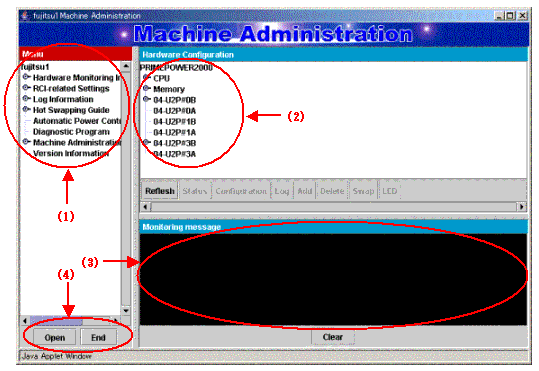
The GUI menu is shown below.
In the GUI menu, the main menu consists of the following three areas:

<Explanation of the display>
(1): Menus are displayed in tree format.By default, only the top-level of menus are displayed.Clickingdisplays subsequent levels of the menu.
Selecting a menu displays the appropriate menu window in another window.
(2): Hardware configuration is always displayed.It displays the name of each hardware component (such as CPU, memory, and battery), and the symbols representing hardware component in detail.
(3): If the status of the hardware component to be monitored changes, a message appears in this area.
(4): The each buttons have the following functions:
[Open] button:
Selecting this button enables you to display the new-lower level of the menu for the selected menu item. Selecting the lowest level of the menu displays the appropriate window as a new window.
[End] button:
Selecting this button ends Machine Administration.
[Clear] button:
Selecting this button clears the message displayed in the Monitoring message area.
[Refresh] button:
Selecting this button updates the information displayed in the Hardware Configuration area.
[Status] button:
Selecting this button displays the status and detailed node information for the node selected in the Hardware Configuration area.
[Configuration] button:
Selecting this button opens the notification settings window for the node selected in the Hardware Configuration area. This button is active only when a battery, UPS unit, fan, power supply unit, disk, memory, CPU or tape unit is selected.
[Log] button:
Selecting this button opens the log information window for the node selected in the Hardware Configuration area. This button is active only when a disk, memory, fan, or power supply unit is selected.
[Add] button:
Selecting this button opens the addition window for the node selected in the Hardware Configuration area. This button is active only when a battery is selected.
[Delete] button:
Selecting this button opens the deletion window for the node selected in the Hardware Configuration area. This button is active only when a battery is selected.
[Swap] button:
Selecting this button opens the Hot Swapping Guide window for the node selected in the Hardware Configuration area. This button is active only when a hot swappable disk, power supply unit, or fan is selected.
[LED] button:
Selecting this button opens the Confirming the RCI-connected Units window for the node selected in the Hardware Configuration area. This button is active only when an RCI node is selected.
Contents
Index
 
|