

| PRIMECLUSTER Global File Services Configuration and Administration Guide 4.1 (Linux) |
Contents
Index
 
|
| Chapter 8 File System Operations (GUI) | > 8.2 Creation |
The following describes the procedure for creating a file system.
(1) Setting a shared disk device
The partition in which a GFS Shared file system is created and operated must be on a shared diskrecognized by PRIMECLUSTER. To make a logical volume of GDS a target device, it must be operating.

Check that the sharing disk is set for simultaneous access.
If a partition is set as a shared disk by automatic detection of shared disks before starting operation, it is already set as a shared disk for simultaneous access. Therefore, there is no need to set it again.
The partition used for creating a GFS shared file system must be on a shared disk recognized by PRIMECLUSTER. In addition, the GDS logical volume must be operating.

For operations of the disk class to which the logical volume of GDS belongs, see the applicable items under "Operation using Global Disk Services Management View" in the "PRIMECLUSTER Global Disk Services Configuration and Administration Guide."
For the logical volume operations of GDS, see the applicable items under "Operation using Global Disk Services Management View" in the "PRIMECLUSTER Global Disk Services Configuration and Administration Guide."
(2) Setting share information
Click [Create] on the [Operation] menu, and the Create File System Wizard (1) appears.
In the Create File System Wizard (1), set sharing nodeinformation, the mount information.
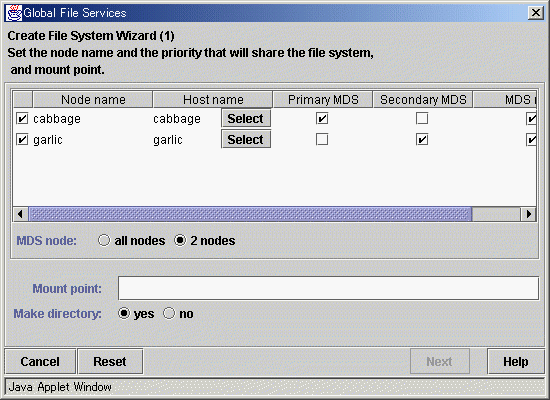

For an explanation of each parameter, see sfcmkfs(8).in this manual.
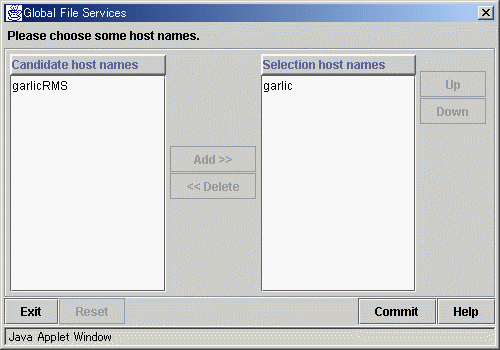
Please choose the host name of LAN used from a left-hand side candidate host name, and add to a right-hand side selection host name. When there are two or more selection host names, please decide the priority of the host name chosen down to <up> <down>. The host name arranged upwards is used preferentially.
 .
.
Owner: root
Group: sys
Access right: 775
(3) Selecting a partition
In the Create File System Wizard (2), register the partitionused for the file system.
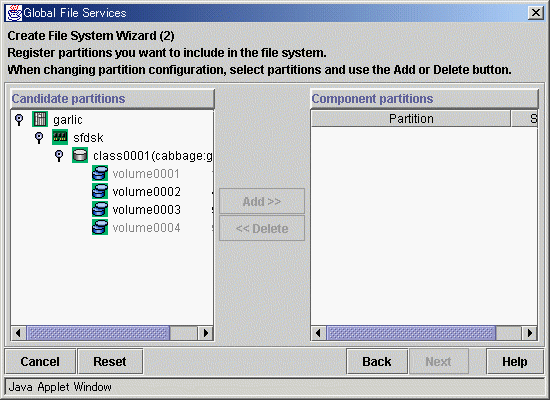
Select the partition from [Candidate partitions] list, and press <Add> button. Only one partition can be selected at a time. A partition in use as a file system or a management partition cannot be chosen.
After selecting a partition, press <Next> button to go to the Create File System Wizard (3).
To return to the Create File System Wizard (1), press <Back> button.
To cancel the file system creates operation, press <Cancel> button.

When the state of the logic volume of GDS is not operating, it cannot choose as a composition partition. When you choose as a composition partition, while operating, please carry out the state of logic volume.
(4) Setting partition information
In the Create File System Wizard (3), select the area (META/LOG/DATA) to be assigned to each partition selected in the Create File System Wizard (2).
The partition to which META is assigned becomes a representative partition .
.
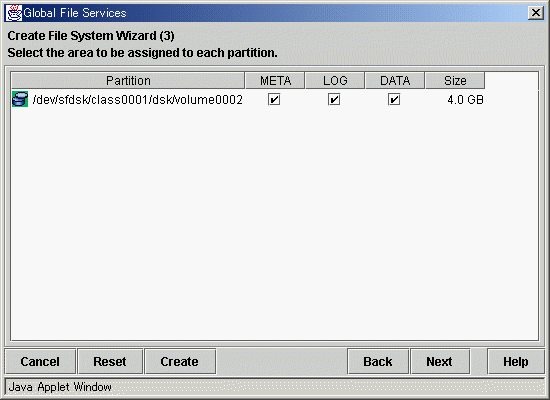
After setting the information items, press <Next> button to go to the Create File System Wizard (4).
To restore a setting to its default, press <Reset> button.
To return to the Create File System Wizard (2), press <Back> button.
To cancel the file system creates operation, press <Cancel> button.
If you don't need change extended information, detailed information and mount information, press <Create> button to create the file system.
(5) Setting detailed information
In the Create File System Wizard (5), set detailed information.
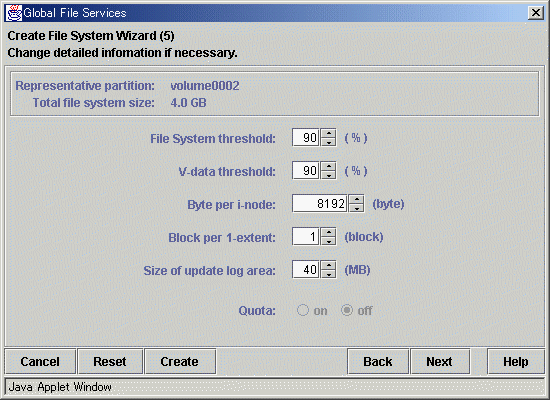

For an explanation of each parameter, see sfcmkfs(8) in this manual.

The file system application limit is the value obtained by subtracting, from 100, the minimum percentage of free space in the file system specified by the -o free option of sfcmkfs(8).
The V data area application limit is the value obtained by subtracting, from 100, the minimum percentage of free space of the V data area specified by the -o mfree option of sfcmkfs(8).
After setting the information items, press <Next> button to go to the Create File System Wizard (6).
To restore a setting to its default, press <Reset> button.
To return to the Create File System Wizard (4), press <Back> button.
To cancel the file system creates operation, press <Cancel> button.
If you don't need change mount information, press <Create> button to create the file system.
(6) Setting mount information
In the Create File System Wizard (6), set mount information.
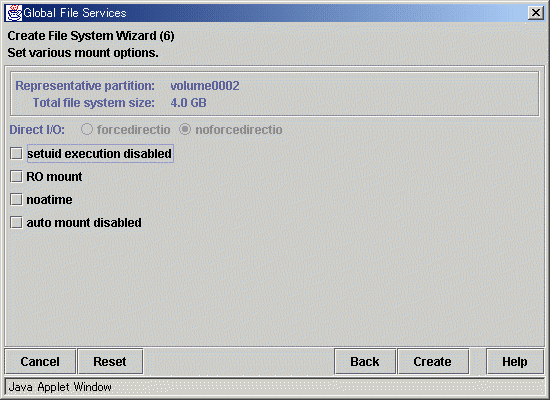
After setting the information items, press <Create> button to create the file system.
To restore a setting to its default, press <Reset> button.
To return to the Create File System Wizard (5), press <Back> button.
To cancel the file system creates operation, press <Cancel> button.
Contents
Index
 
|